This page is a local copy of the eSims for Gaza FAQ + Guide created by @gothhabiba, who is updating this Google doc daily.
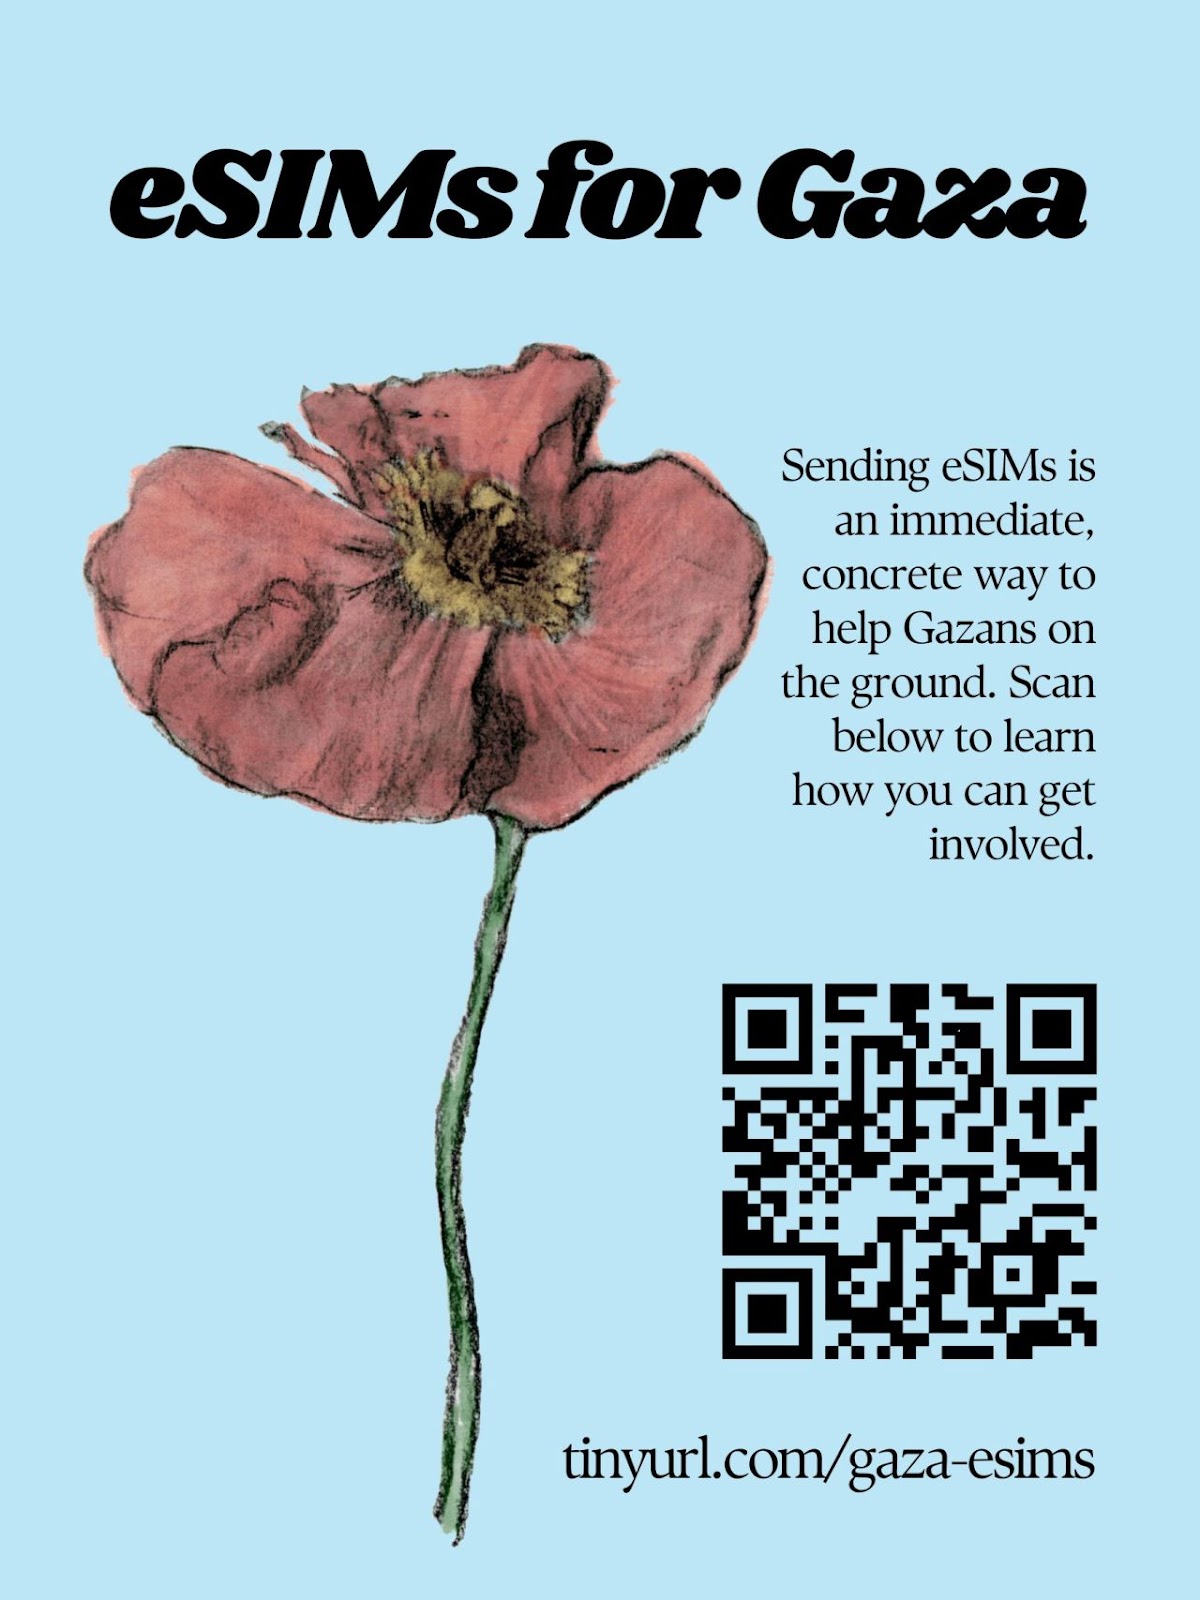
eSims for Gaza is an immediate, concrete way to help Palestinians on the ground. Keep reading to learn how you can get involved.
🍉 FAQ 🍉 #
- What does this initiative do? Is there proof it works?
- Which eSims are needed right now?
- How do I buy an eSim?
- Which app should I use?
- How much data should I buy?
- Is there anything else I need to do?
- Should I top up activated eSims?
- How can I tell if my plan has been activated and see data usage? How do I top up a plan?
- What if my eSim has not been activated?
- Why are different plans called for at different times?
- Is there anything else I can do to help?
What does this initiative do? Is there proof it works? #
Israel is imposing near-constant complete communications blackouts on Gaza; WiFi and SMS messages are highly unreliable. Connecting Humanity (@ConnectingHumanity_ on Instagram) is distributing eSims to people in Gaza (as well as refugees in Egypt) to help break this forced isolation. eSims provide people with data, which is more reliable than WiFi in the current situation. Most of the news that you see coming out of Gaza is from people who are connected via eSim. At the beginning of the initiative, only journalists and relief and medical personnel were supplied with eSims; now, Connecting Humanity is able to help ordinary citizens get connected as well.
Organizer Mirna El Helbawi’s twitter (@Mirna_elhelbawi) posts testimonials from people in Gaza, including journalists, who have been connected to the internet through this initiative. The eSims that Connecting Humanity distributes connect people to news. People are able to video call with their family for the first time in weeks or months, to learn that their family members are still alive, to see their newborn children for the first time, and more, thanks to eSims.
Some of this sharing of news saves lives, as people have been able to flee or avoid areas under bombardment, learn that they are on evacuation lists, and contact embassies.eSims also allow people to continue working and studying online.
Connecting Humanity does not accept cash donations, and the QR codes they receive have no monetary value. Many of the eSims I have sent have been activated and used, as you can see in the screenshots below.
If you or anyone you know is currently in Gaza (or is a refugee in Egypt) and wants an eSim, send an email to gazaesims@gmail.com; the Connecting Humanity team will get you / them connected.
Which eSims are needed right now? #
‼️ NOTE: For the most up to date information and promo codes, check
- Mirna El Helbawi / Connecting Humanity’s socials: Instagram | Twitter
- @gothhabiba’s original document (screen-reader friendly)
- Holafly (“Israel” and “Egypt” plans): code HOLACNG
- Nomad (“regional Middle East” plan): code NOMADCNG (can now be used multiple times from the same email)
- Airalo (“Middle East and North Africa” plan)
- Sparks (“Israel” plan)
- Numero (“Egypt” plan)
Connecting Humanity is calling for:
- Nomad (“regional Middle East” plan): code NOMADCNG (can now be used multiple times from the same email)
- Holafly (“Israel” and “Egypt” plans): code HOLACNG—be sure to include which plan it is in the subject line
- Simly (“Palestine” and “Middle East” plans)
- Airalo (“Discover” plans)
For Connecting Humanity: if you sent an eSim more than two weeks ago and it is still valid and not yet activated, reply to the email in which you originally sent the eSim. To determine whether the eSim is still valid, scan the QR code with an iPhone; tap the yellow button that reads “Cellular plan”; when a screen comes up reading “Activate eSIM,” click the button that says “Continue.” If a message comes up reading “eSIM Cannot Be Added: This code is no longer valid. Contact your carrier for more information,” the eSim is activated, expired, or had an error in installation, and should not be sent. It is very important not to re-send invalid eSims, since people may walk several kilometers to access wifi to connect their eSims only to find out that they cannot be activated.
If a screen appears reading “Activate eSIM: An eSIM is ready to be activated” with a button asking you to “Continue,” do not click “Continue” to activate the eSim on your phone; exit out of the screen and reply to the email containing that QR code.
If you don’t have access to an iPhone, see below under “Guide to topping up eSims” on “how to tell if your eSim is active.”
This will be updated every day. Any new instructions about replying to emails for specific types of unactivated plans will also appear here.
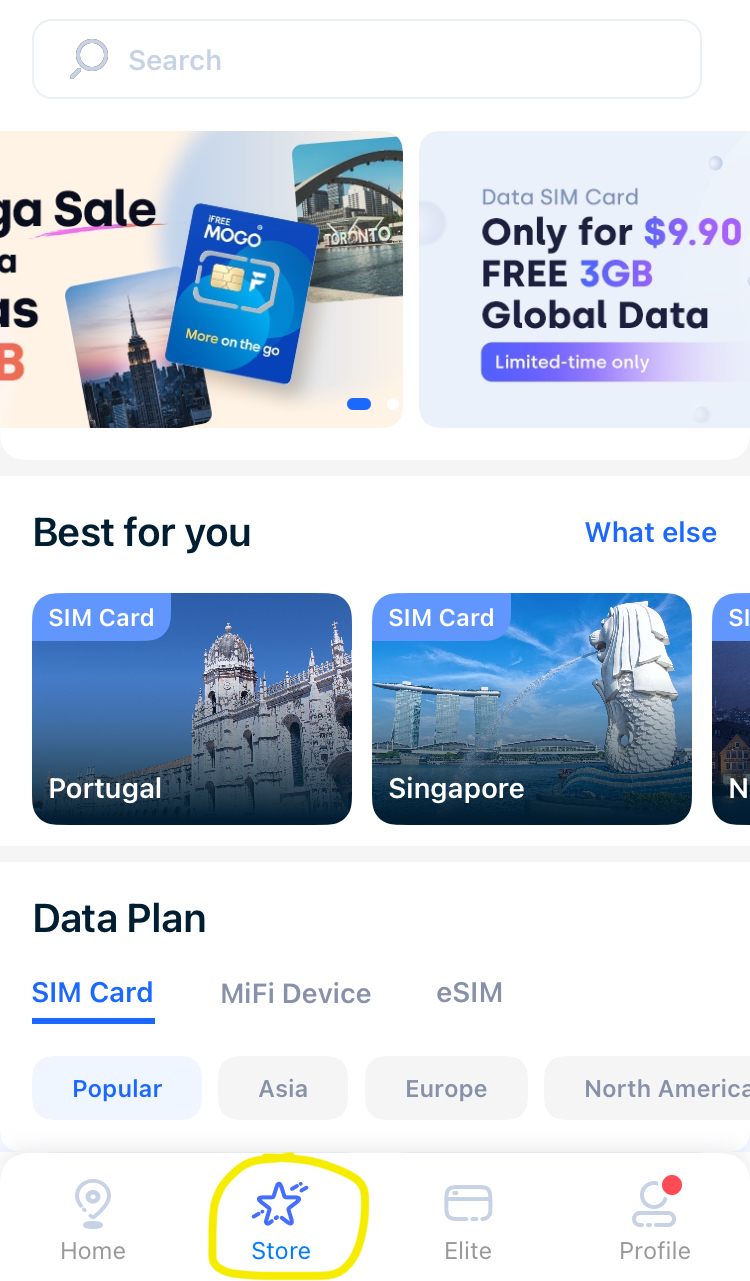
How do I buy an eSim? #
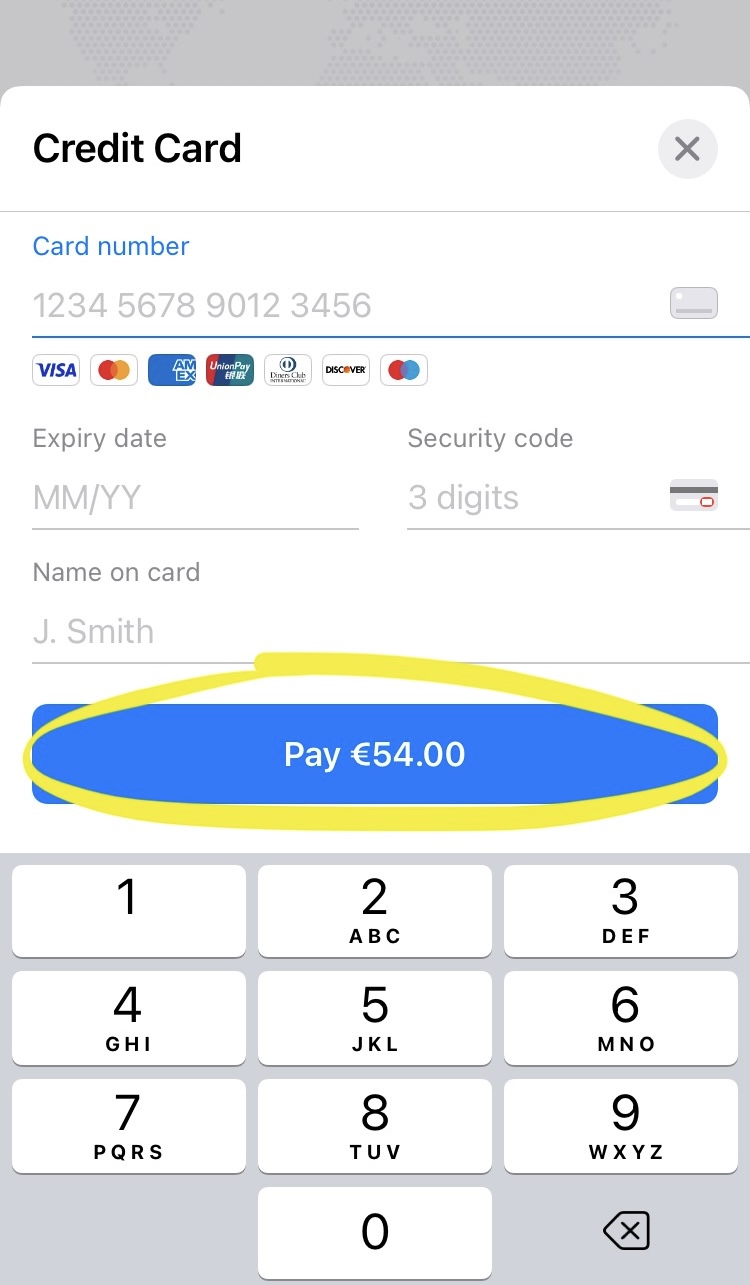
If you cannot download an app or manage an eSim yourself, send funds to Crips for eSims for Gaza(Visa; Mastercard; Paypal; AmEx; Canadian e-transfer), or to Gaza Online, who are buying eSims in bulk.
You can purchase an eSim yourself using a mobile phone app, or on a desktop computer (with the exception of Simly, which does not have a desktop site). See below for a screenreader-accessible “Guide to purchasing eSims” through each of the five services that the Connecting Humanity team is calling for (Nomad, Simly, Holafly, Airalo, and Mogo), as well as the five services that the Gaza Online team is calling for (Nomad, Simly, Holafly, Sparks, and Numero).
Send a screenshot of the plan’s QR code to gazaesims@gmail.com. Be sure to include the app used, the word “eSim,” the type of plan (when an app has more than one, aka “regional Middle East” versus “Palestine”), and the amount of data or time on the plan, in the subject line of your email.
If you’re going to be purchasing many eSims at once, see this list of tips.
You can also purchase and send eSims to Gaza Online’s team here (they also call for Nomad, Airalo, and Holafly eSims; again, see the purchase guide below for instructions on how to purchase from each of these providers on mobile and desktop).
Which app should I use? #
It is best to buy an eSim from one of the apps that the team is currently calling for (see above).
If the team is calling for multiple apps:
-
Nomadis good in terms of data price and ability to top up when eSims are near expiry; but eSims must be stayed on top of, as you cannot top them up once the data has completely run out. Go into the app settings and make sure your “data usage” notifications are turned on.
-
Nomad eSims cannot be purchased on a mobile phone that is not eSim-compatible. Try purchasing on desktop, or use another app.
-
Simly Middle East plans cannot be topped up; Simly Palestine ones can. Simly Palestine plans are the cheapest available on any of these apps. Unlike with Nomad, data can be topped up once it has completely run out.
-
Simly is in support of the eSims for Gaza initiative; they are giving free eSims and donating the profits from Palestine eSims to the Tarahum campaign.
-
Airalo Discover plans (Menalink plans no longer seem to work) can get expensive, but they can be topped up.
-
Holafly sells plans for unlimited data that are valid for a certain number of days. Data usage is not shown, and top-ups don’t seem to work.
-
Mogo has the worst user interface in my opinion. They advertise that top-ups are possible, but I have not been able to test this yet.
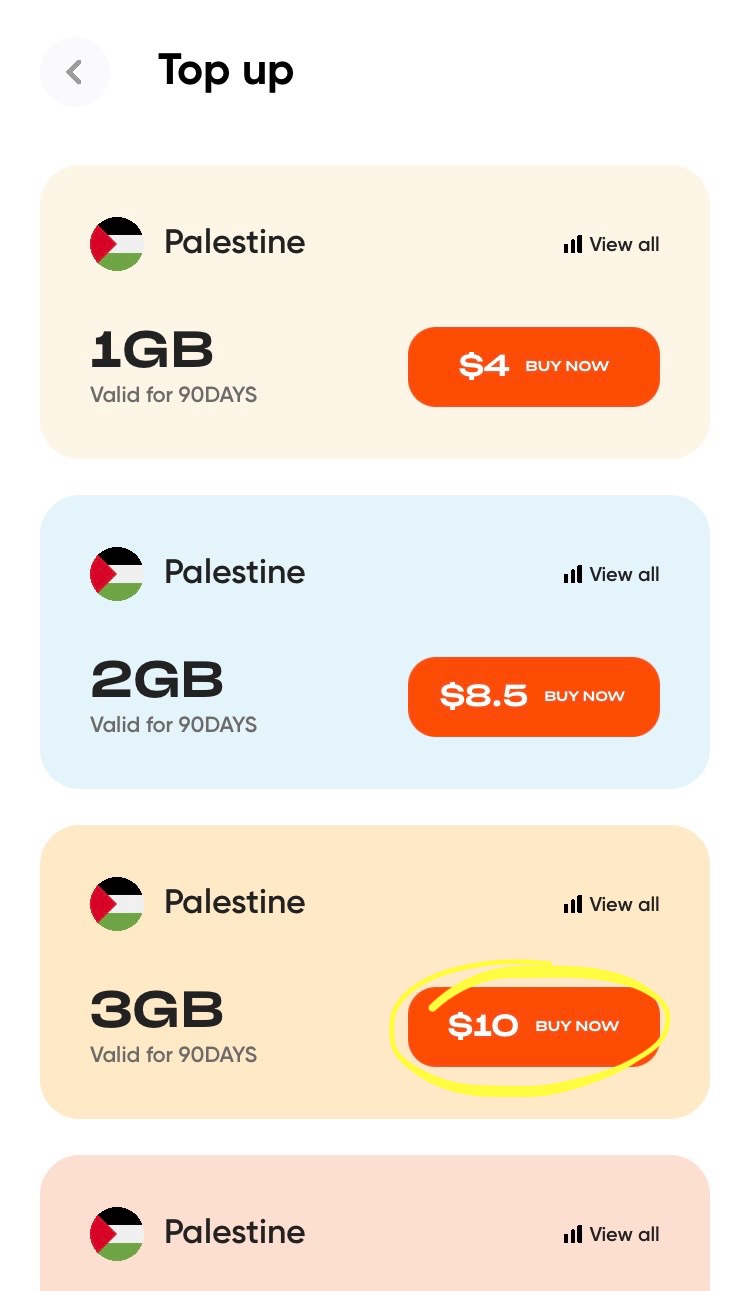
How much data should I buy? #
Mirna el-Helbawi has been told that large families sometimes all rely on the same plan for data (by setting up a hotspot). Some recipients of eSim plans may also be using them to upload video.
For those reasons I would recommend getting the largest plan you can afford for plans which cannot be topped up: namely, Simly “Middle East” plans, and Holafly plans (they say you can top them up, but neither I nor anyone else I know of has gotten it to work yet).
For all other plans, get a small amount of data (1-3 GB, or a 3-day plan), and top up the plan once it has been activated and some data has been used. This will minimize risk in case the eSim cannot be activated. Go into the app’s settings and make sure low-data notifications are on, because a 1GB eSim can run out of data very quickly.
Is there anything else I need to do? #
Check back regularly to see if the plan has been activated (see below under “Guide to topping up eSims” on “How to tell if your eSim is active” for each provider). Once the plan is active, check once a day to see if data is still being used, and how close the eSim is to running out of data or to expiring; make sure your notifications are on. When the data is running low, or the time is almost out, top up the eSim (see below).
Should I top up activated eSims? #
The Connecting Humanity team recommends keeping your eSims topped up once they have been activated.
Keep topping up the eSim for as long as the data usage keeps ticking up. This keeps a person or family connected for longer, without the Connecting Humanity team having to go through another process of installing a new eSim; it also minimizes risk, as people often have to walk for several miles and move to higher ground in order to access WiFi to connect a new eSim, which increases their visibility to the Israeli military.
If the data usage hasn’t changed in a week or so, allow the plan to expire and purchase another one.
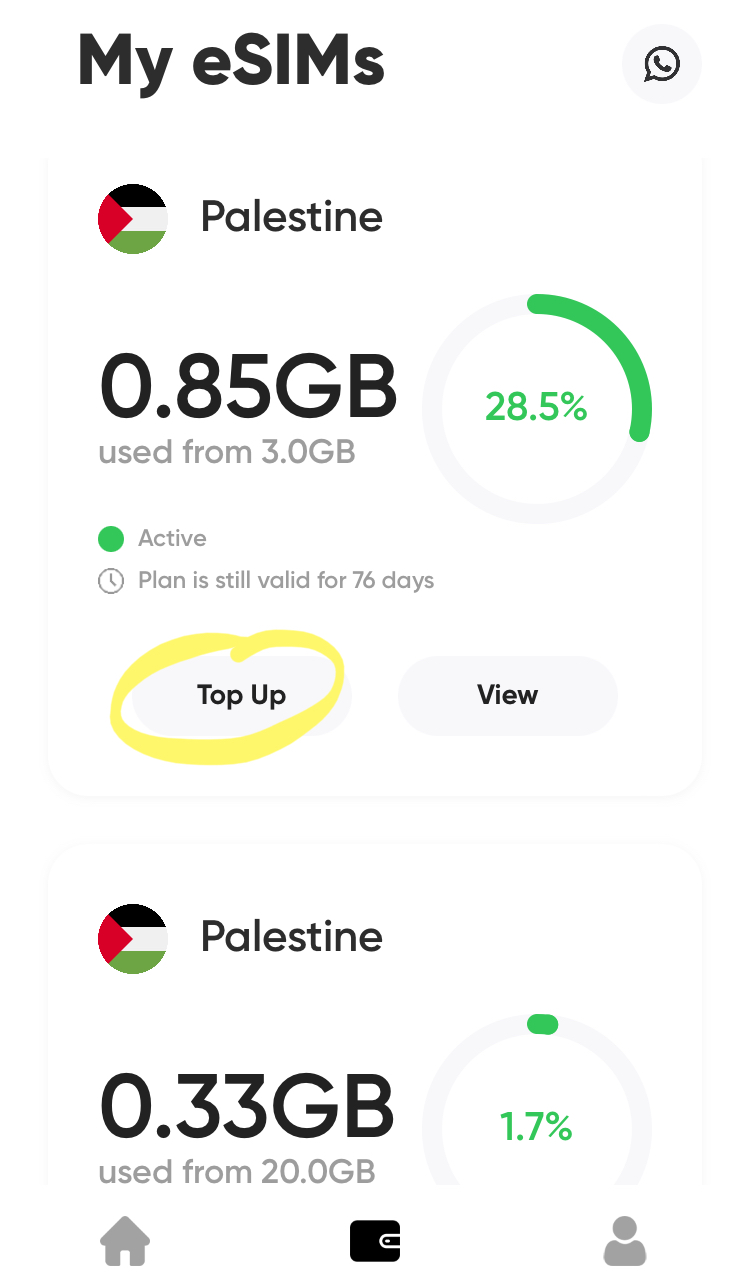
How can I tell if my plan has been activated and see data usage? How do I top up a plan? #
See the “Guide to topping up eSims” at the end of this document on how to tell if your plan has been activated, how to see data usage, how to top up plans, and (for Nomad and Mogo) how to tell when the auto-expiry will start.
What if my eSim has not been activated? #
eSims will usually take about two weeks to be activated. To ensure that your eSim can be used, make sure that the QR code you send is a clear screenshot, and not a photo of a screen; and that you don’t install the eSim on your own phone by scanning the QR code or clicking “install automatically.”
If the eSim hasn’t been activated after two weeks, reply to the original email that you sent to Gaza eSims containing the QR code for that plan. Do not reply to the email before two weeks have passed.
If you purchased the eSim through an app that has a policy of starting the countdown to auto-expiry a certain amount of time after the purchase of the eSim, rather than only upon activation (Nomad and Mogo do this), then also reply to your original email once you’re within a few days of this date. If an inactive Nomad eSim is within 12 hours of that date, contact customer service and ask for a credit (not a refund) and use it to purchase and send another eSim. See the “Guide to topping up eSims” to learn where to find the expiration date.
The Connecting Humanity team sends every eSim they receive. Possible reasons for an eSim not having been activated include: it was given to a journalist as a back-upin case the plan they had activated expired or ran out of data; there was an error during installation or activation and the eSim could no longer be used; the eSim was installed, but not activated, and then Israeli bombings destroyed the phone, or forced someone to leave it behind.
An eSim that was sent but couldn’t be used is still part of an important effort and learning curve. Errors in installation, for example, are happening less often than they were in the beginning of the project.
Why are different plans called for at different times? #
Different eSims work in different areas of the Gaza Strip (and Egypt, where many refugees currently are). The team tries to keep some of each type of eSim on hand.
Is there anything else I can do to help? #
Tell people about this effort, fundraise in your personal networks, and link this guide on social media. Inform people about this effort by posting posters, handing out flyers, asking local businesses to display flyers or booklets, and holding signs directing people to @ConnectingHumanity_ at protests. Here is a poster that is available for download:
Download color poster (18 x 24") #
Download color flyer (8.5 x 11") #
Download black and white poster #
(For a black and white flyer on A4 / 8.5 x 11" printer paper, just print out the black and white poster: the extra white margin space won’t matter.)
Or make your own poster, pamphlet, or protest sign with the url tinyurl.com/gaza-esims, this QR code, to direct people to this FAQ and Guide:

The Connecting Humanity team is very busy connecting people to eSims and don’t often have time to answer questions. Check a few of Mirna El Helbawi’s most recent tweets (@Mirna_elhelbawi) and see if anyone has commented with any questions that you can answer with the information in this document.
🍉 Guide to buying eSims #
For all services:
- Do not activate the eSim you’ve purchased, or it cannot be used.
- Be sure to send a clear screenshot of the eSim’s QR code. Photos taken of physical screens cannot be used.
- Insert screenshots in the body of the email by clicking “insert photo.”
- Include the app used, the word “eSim,” the type of plan (when an app has more than one, aka “regional Middle East” versus “Palestine”), and the amount of data or time on the plan, in the subject line of your email.
- If you plan on sending multiple eSims in any one app, putting the activation code (or order number, confirmation code, ICCID, or other disambiguating information) in the body of the email will be useful for your own reference (see “Guide to topping up eSims” at the bottom of this document).
- App screenshots and exact instructions are for iOS apps.
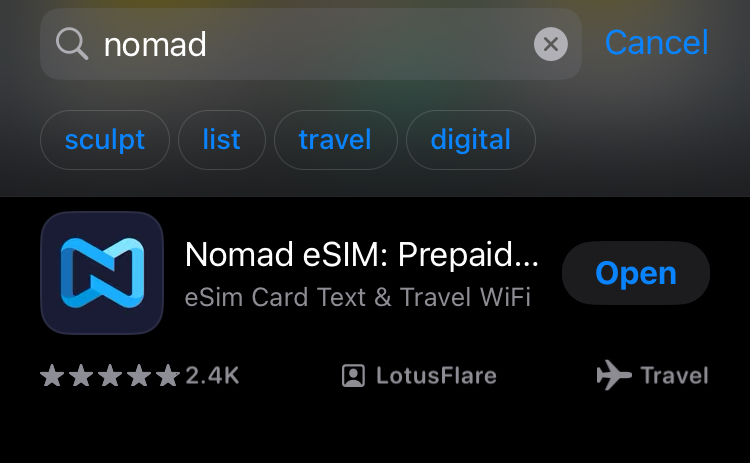
🔵 Nomad #
📱 App #
- Download “Nomad eSIM: Prepaid Data Plan” from the App Store.
-
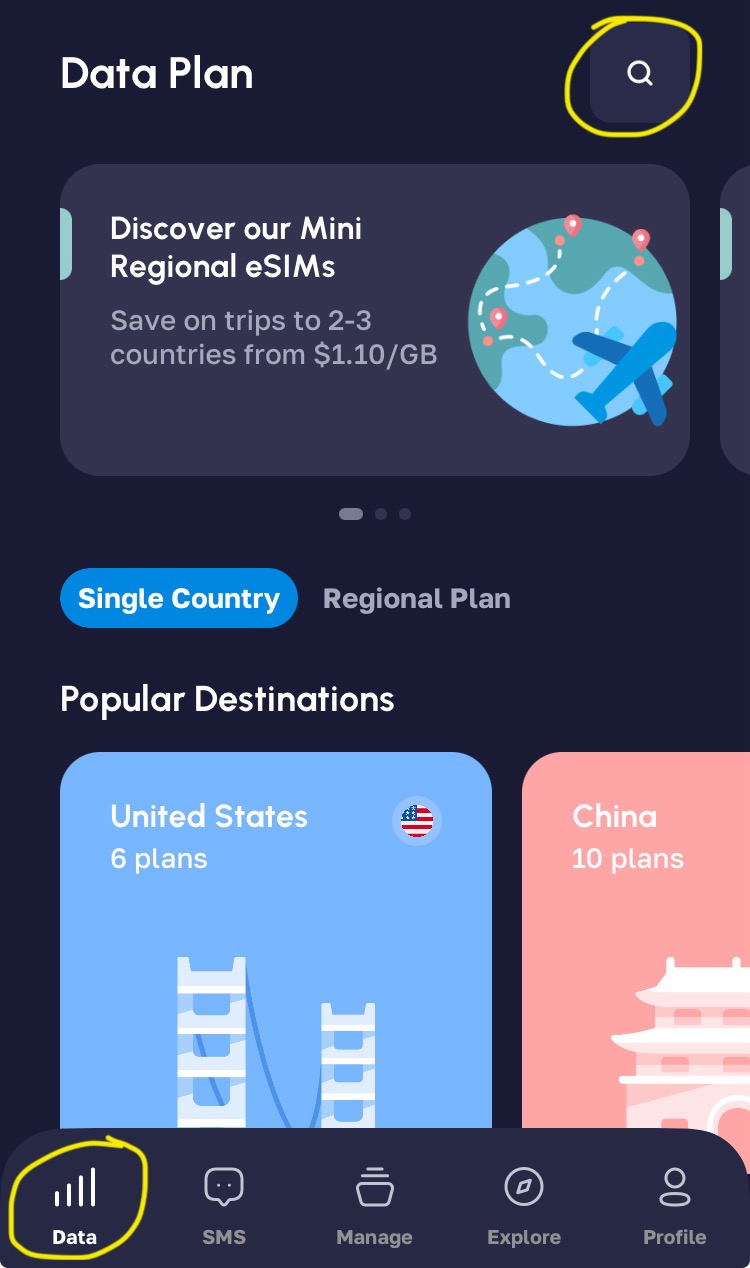
Click “Data” in the ribbon menu at the bottom left of the screen. Click the magnifying glass icon at the top right of the screen to search for a data plan.
-
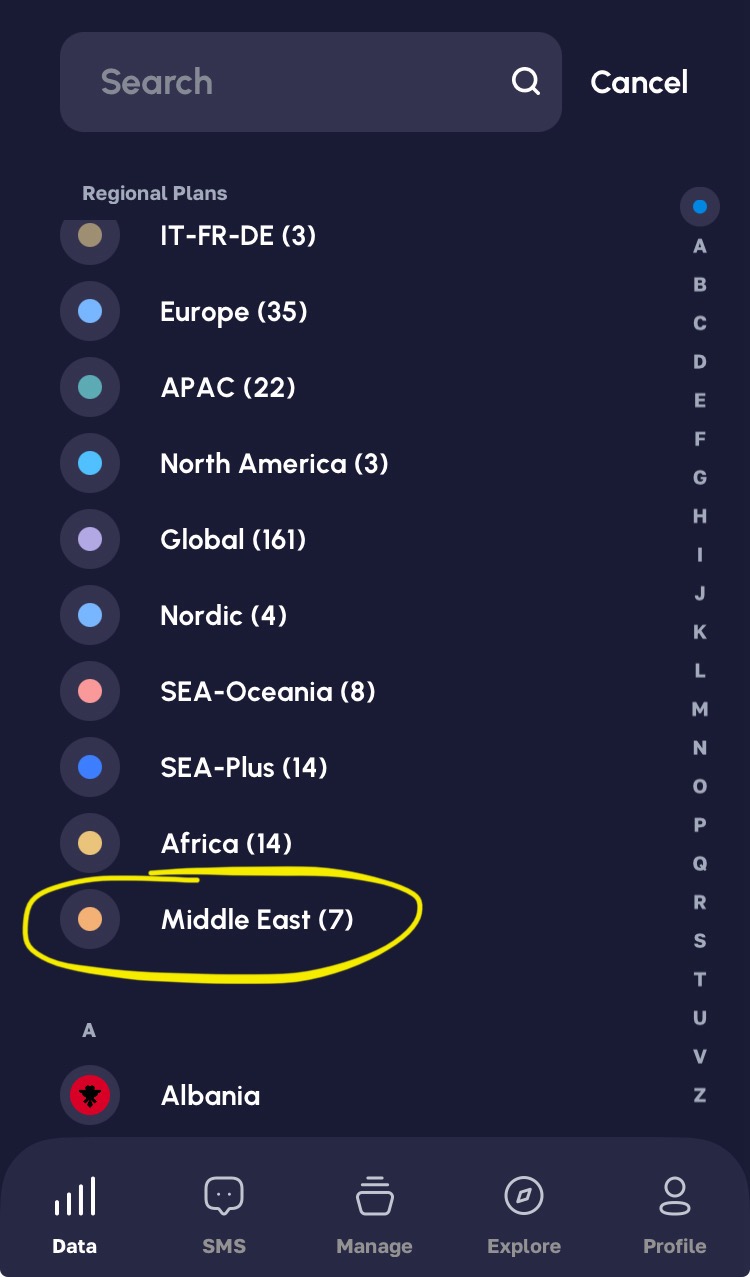
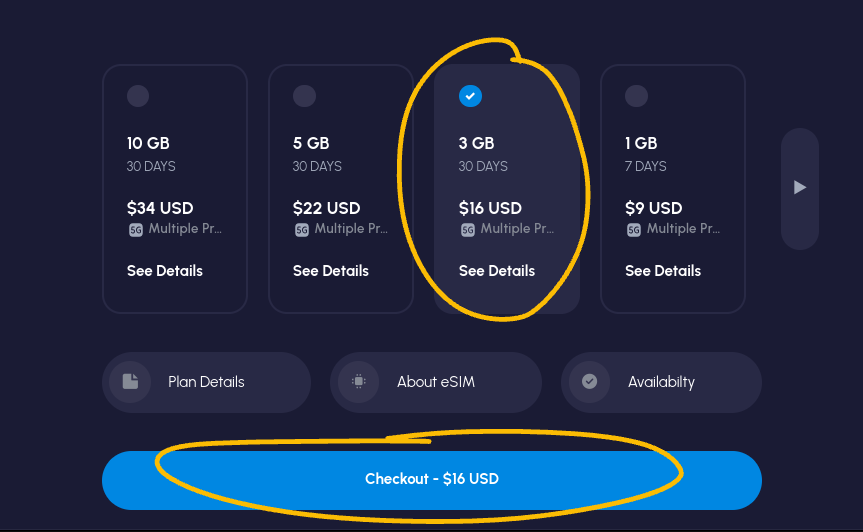
Scroll down or search for “Middle East (7)” and click on it (the “7” means that the plan covers 7 countries). (For countries where “Middle East” is unavailable, search “Global.”)
-
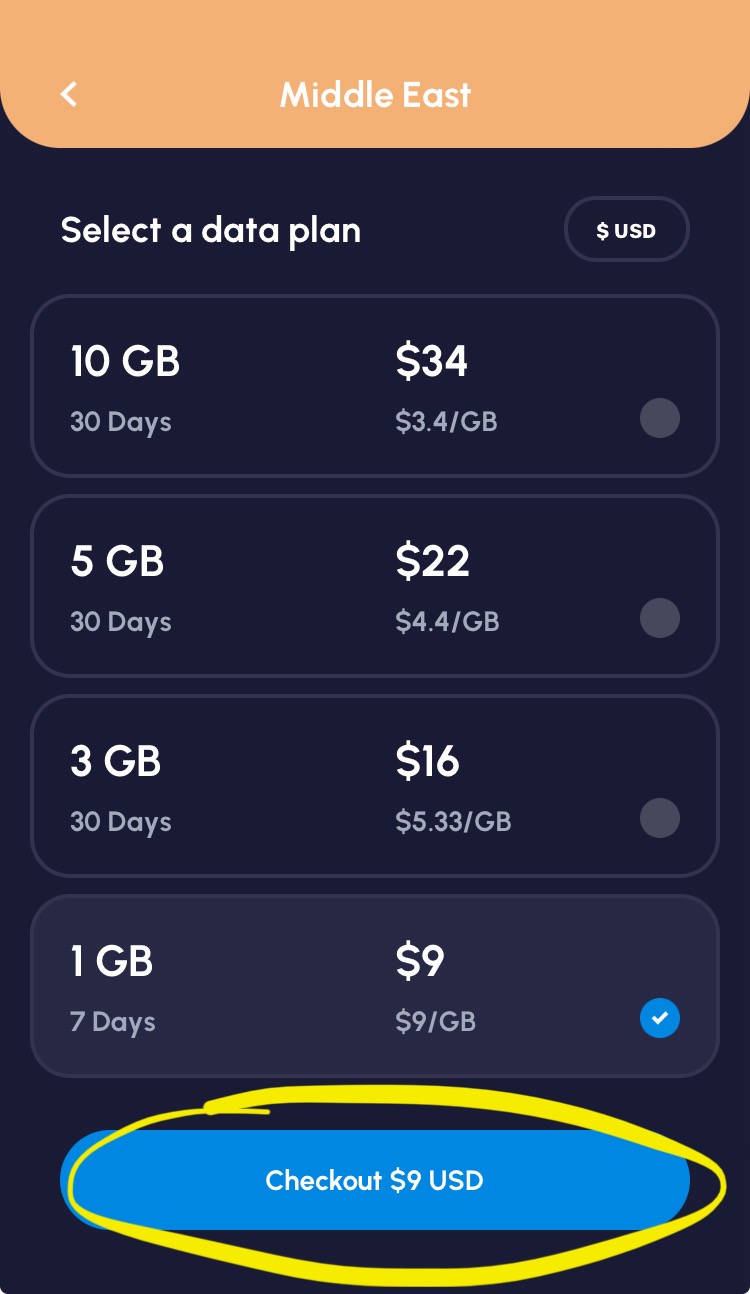
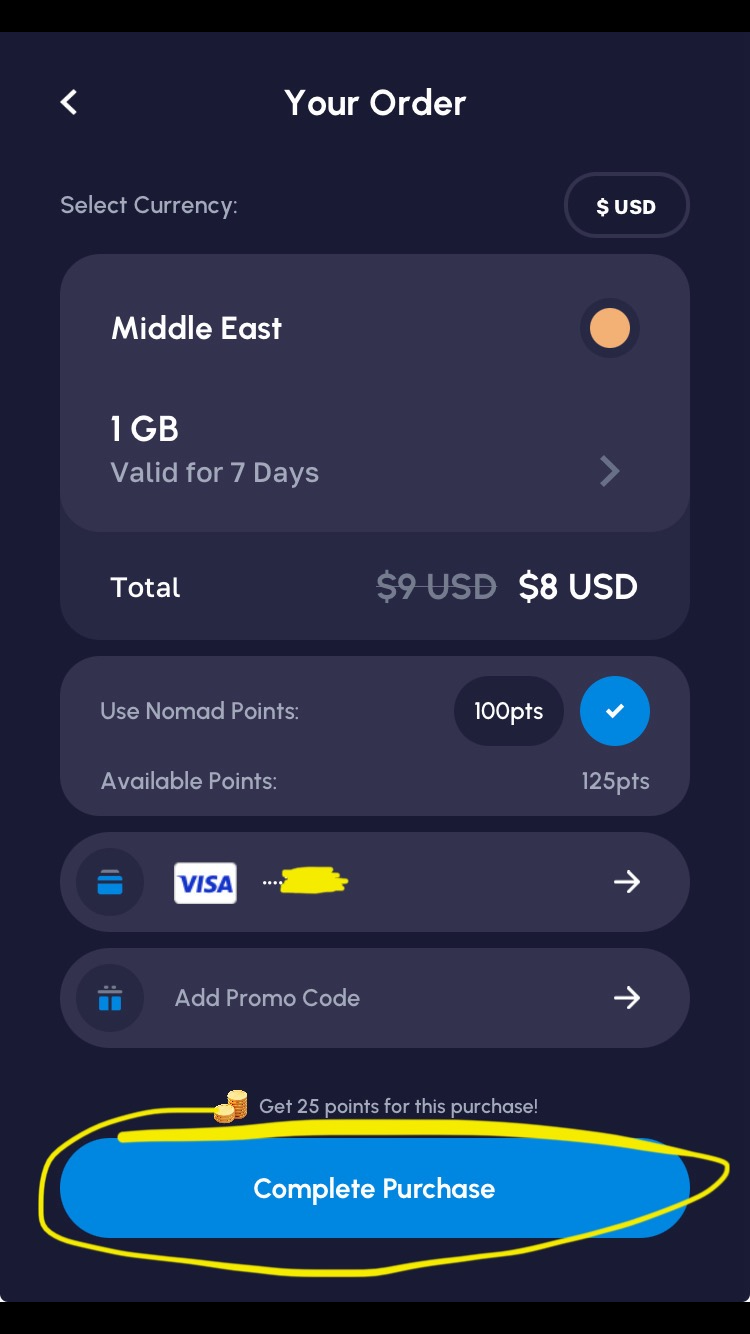
Select a data plan, then click the blue button that says “Checkout” on the bottom of the screen. Enter the information requested. On the next screen, click the blue button that says “Complete purchase” at the bottom of the screen.
-
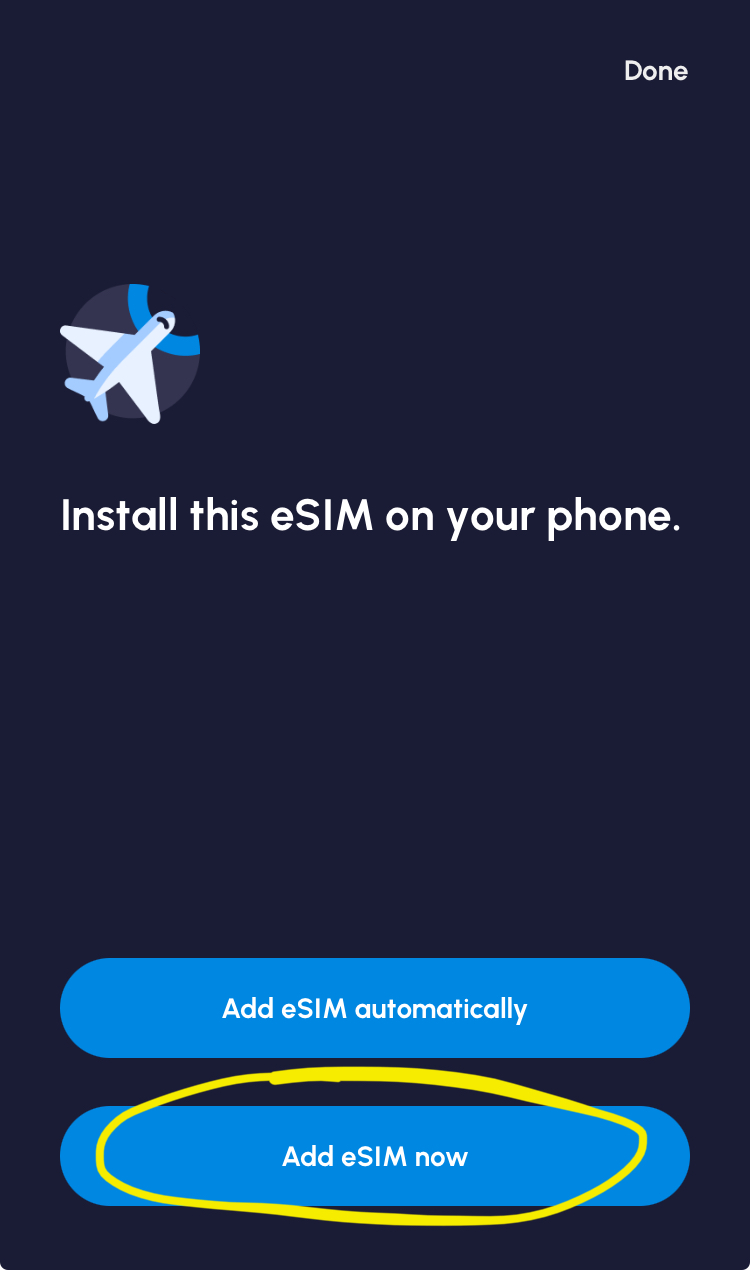
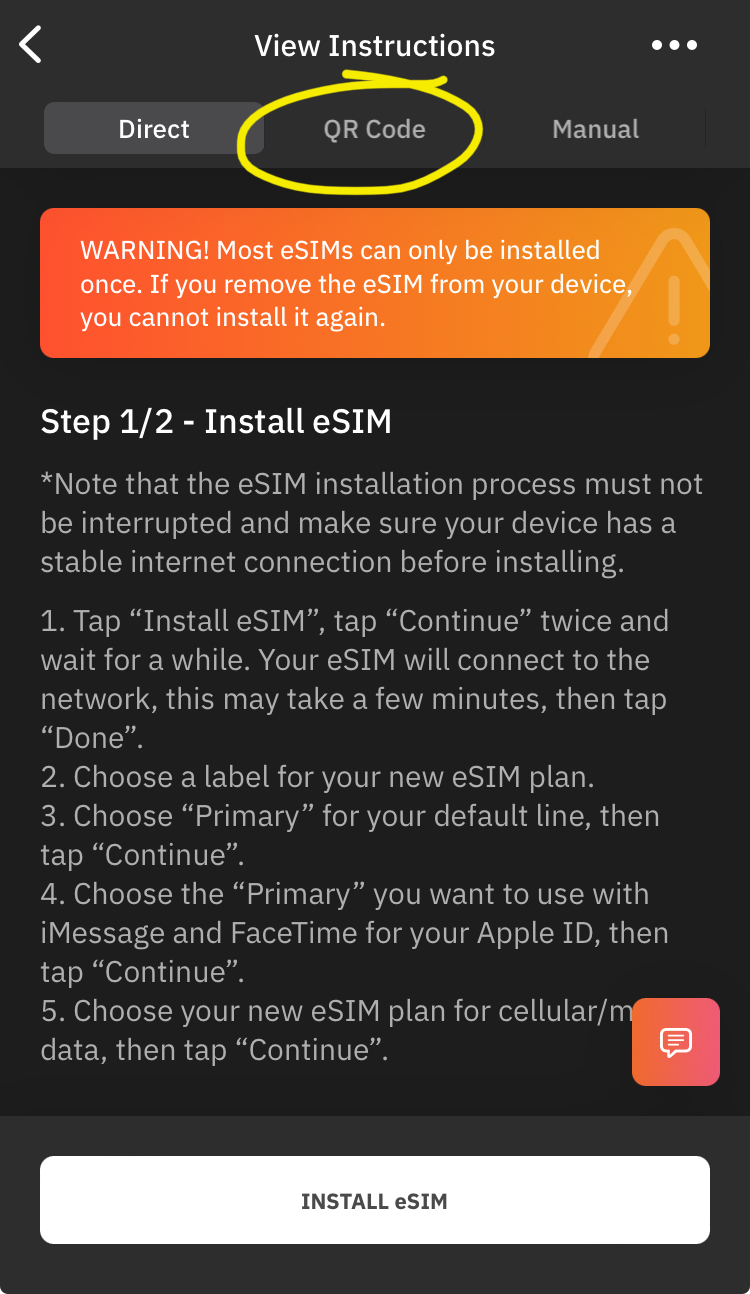
You will be taken to a screen asking you to “Install this eSIM on your phone.” To get the QR code for this eSim, either:
-
Wait to get a confirmation email, and screenshot the QR code in that email.
-
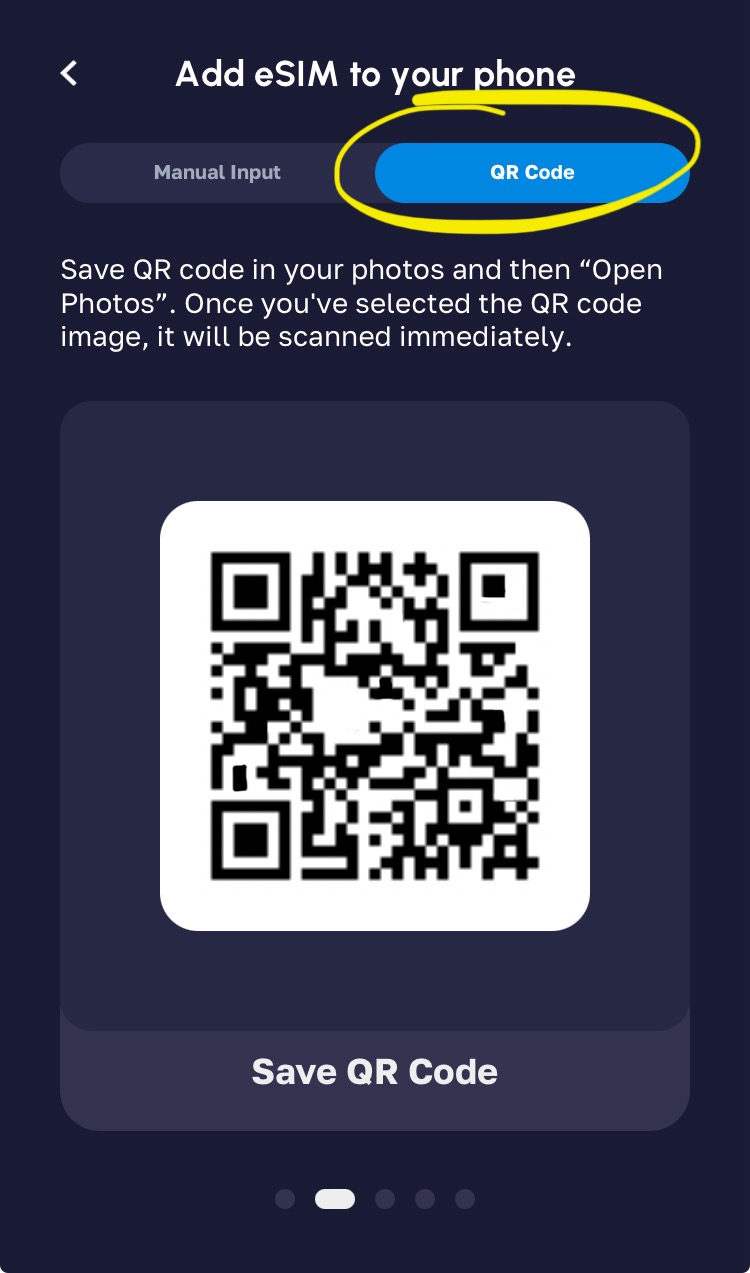
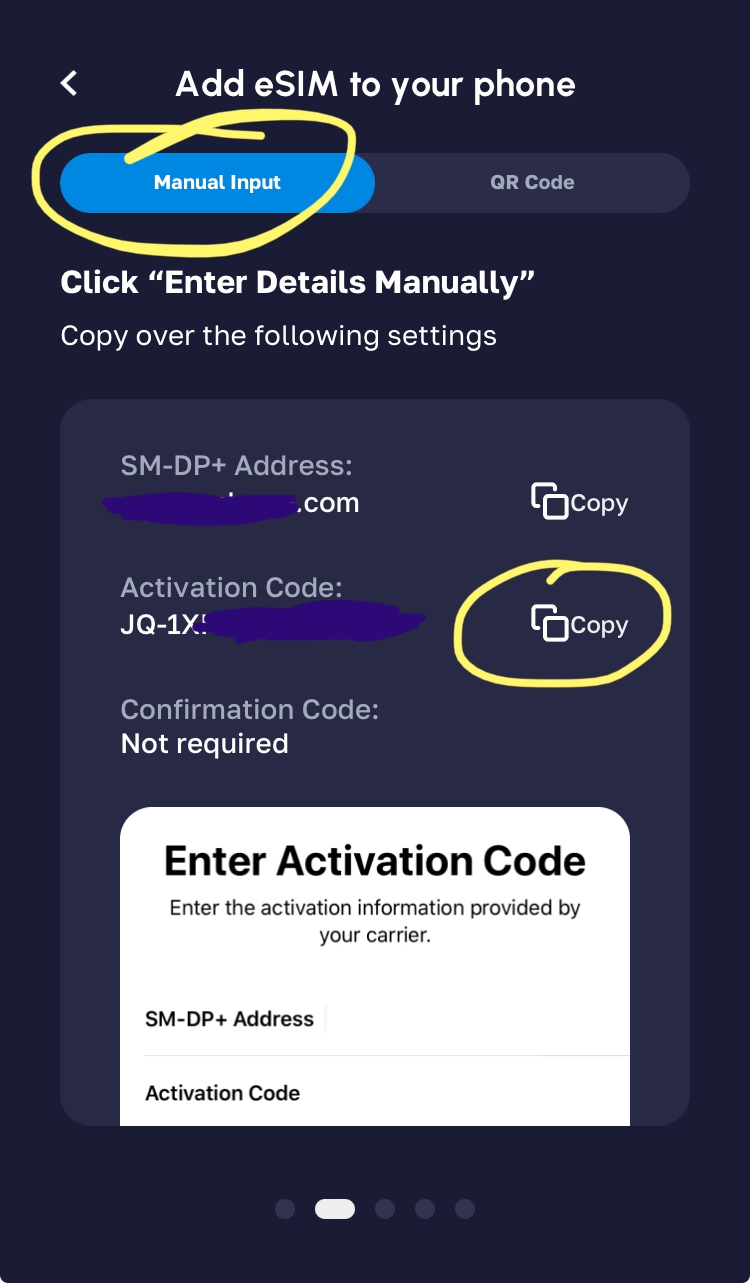
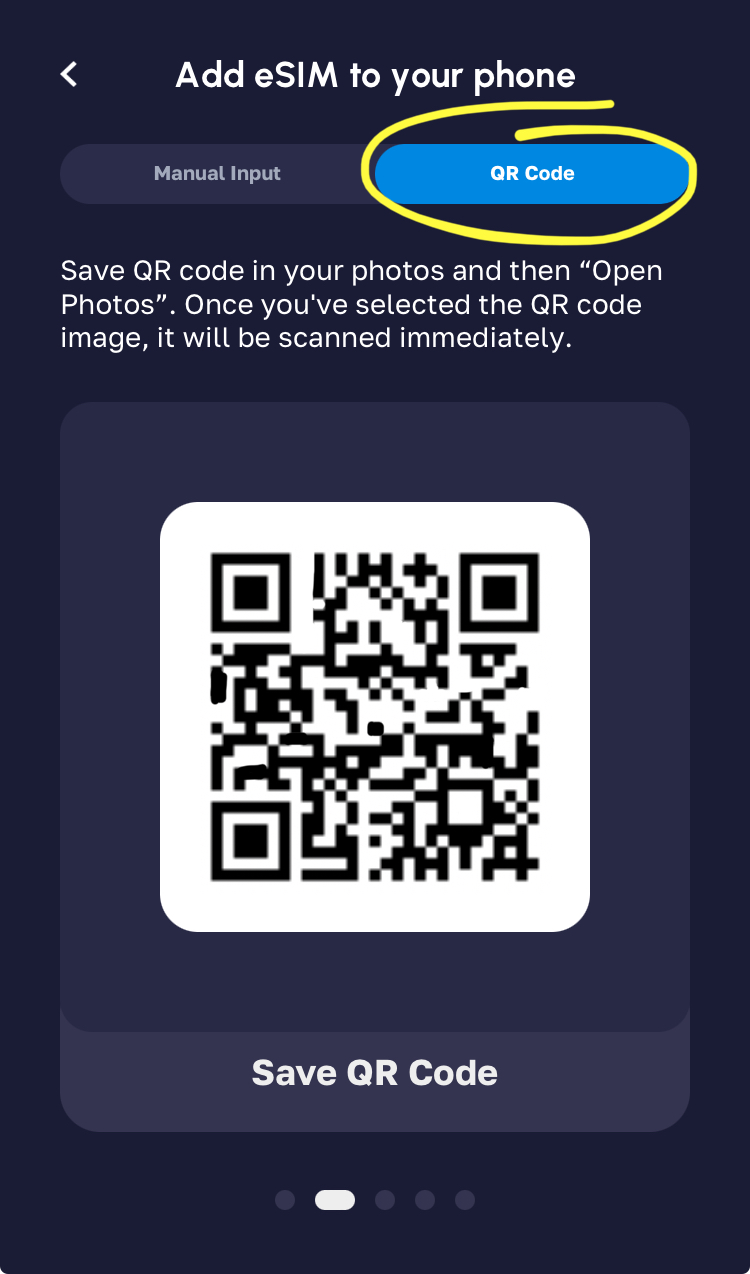
Click the button at the bottom that says “Add eSIM now”; then, swipe right to get to a screen with two tabs at the top, “Manual input” and “QR code.” Click the “QR code” tab and save or screenshot the QR code.
-
Send the screenshot to gazaesims@gmail.com. Include the words “Nomad esim,” and the amount of data in the plan, in the subject line of your email (e.g. Nomad esim 3GB).
-
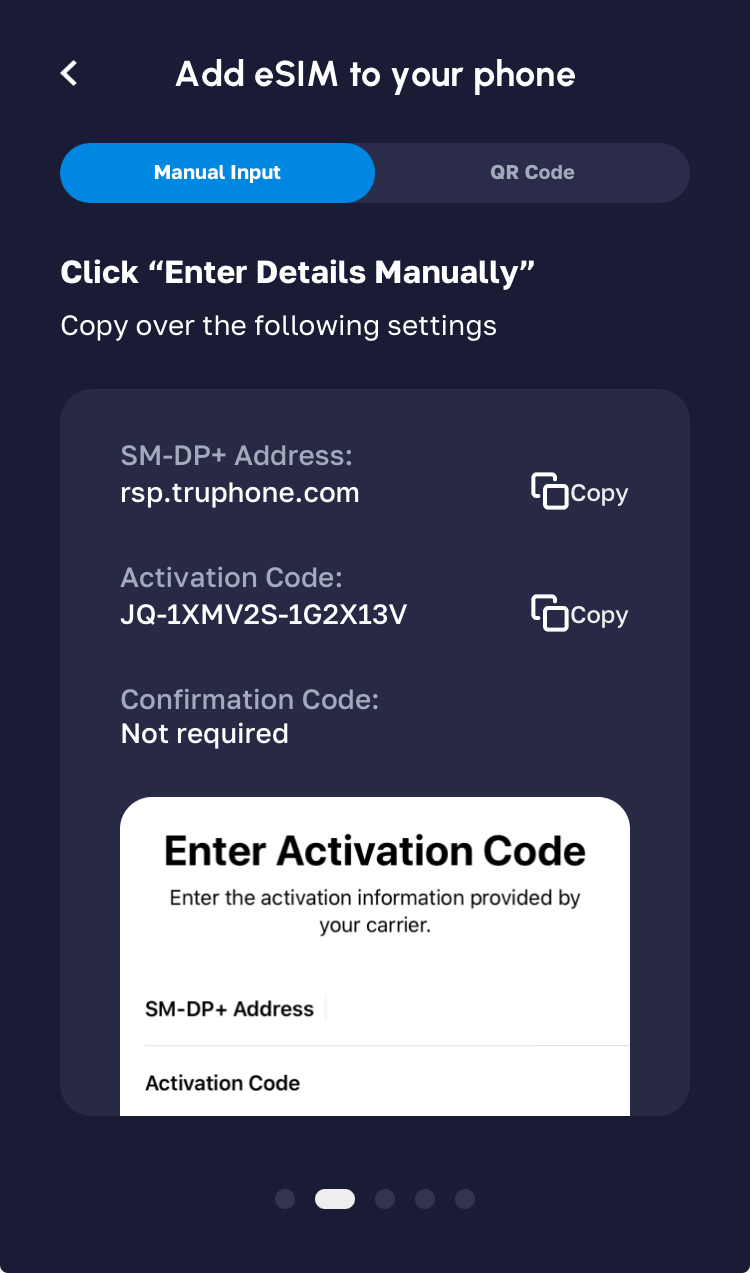
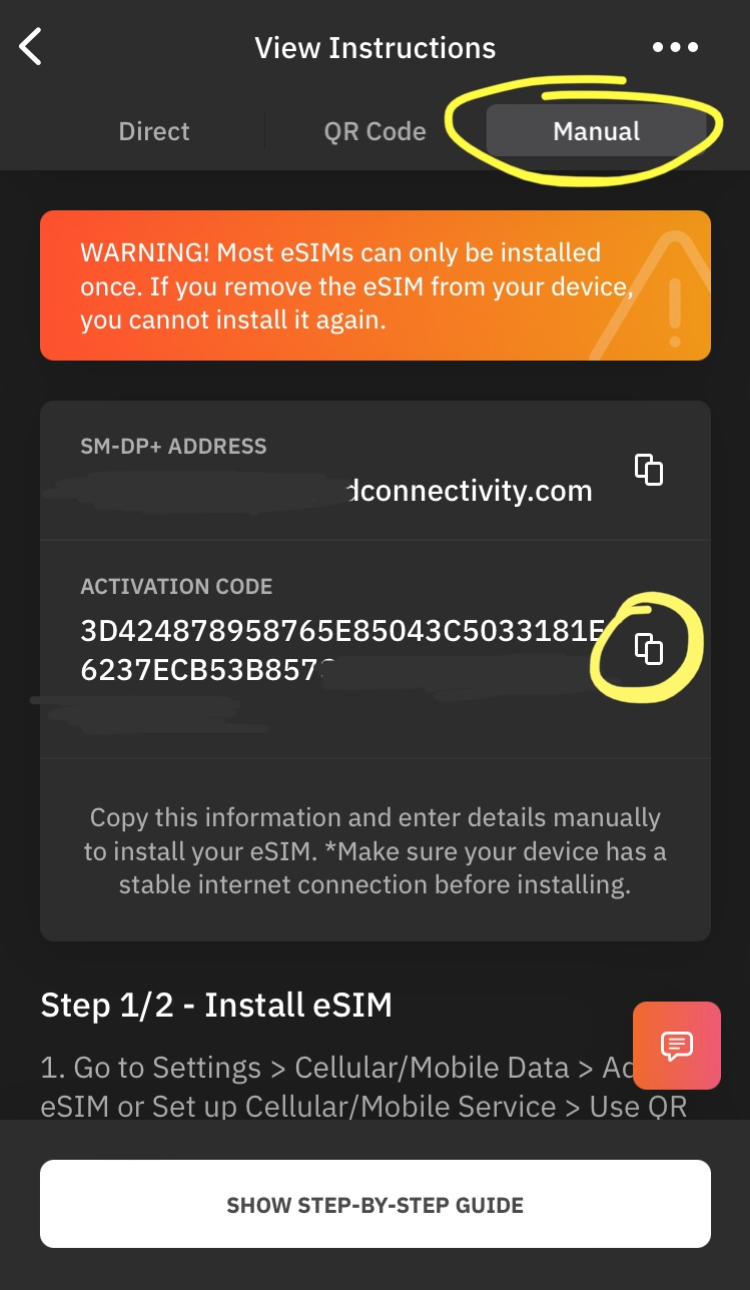
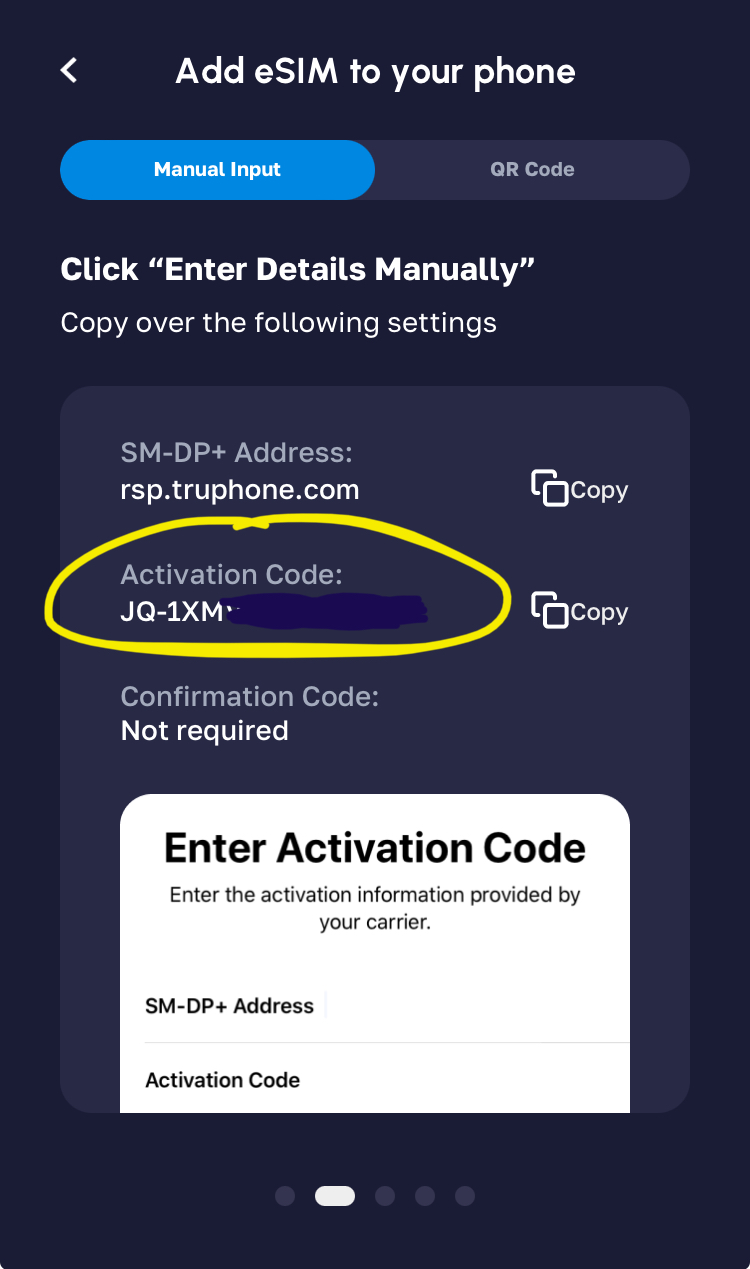
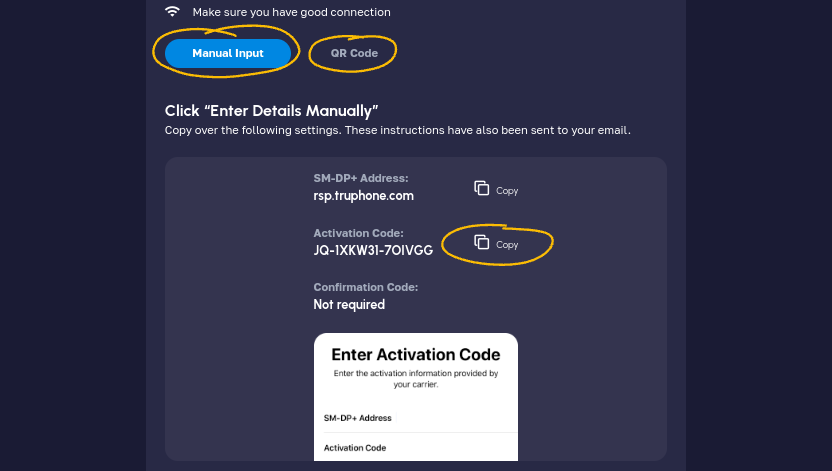
If you will be sending several eSims from the same app, it is useful for later reference to include the activation code in the body of the email. Get the activation code by tabbing back over to “Manual Input” and copying it (right under “SM-DP+ Address”).
🖥️ Desktop #
-
Navigate to https://www.getnomad.app/ on your web browser.
-
Click the blue button in the ribbon at the top right that says “Log In / Sign Up” and choose an email address and password.
-
Navigate to https://www.getnomad.app/en/middle-east-eSIM.
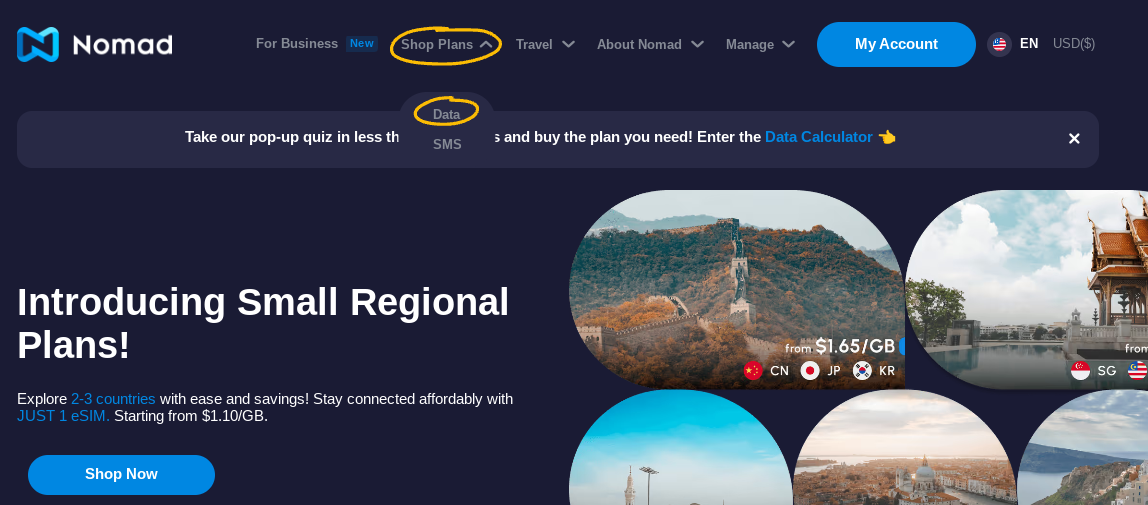
-
You can also get here by clicking “Shop Plans” in the ribbon menu at the top. In the dropdown menu that comes up, select “Data.” Then, in the search bar in the middle of the screen, search “Middle East.”
-
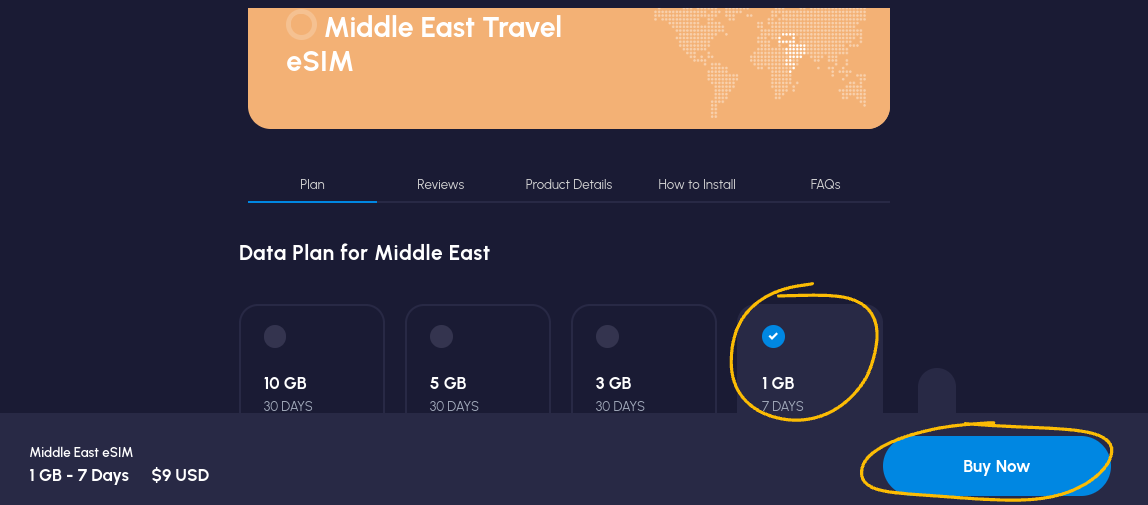
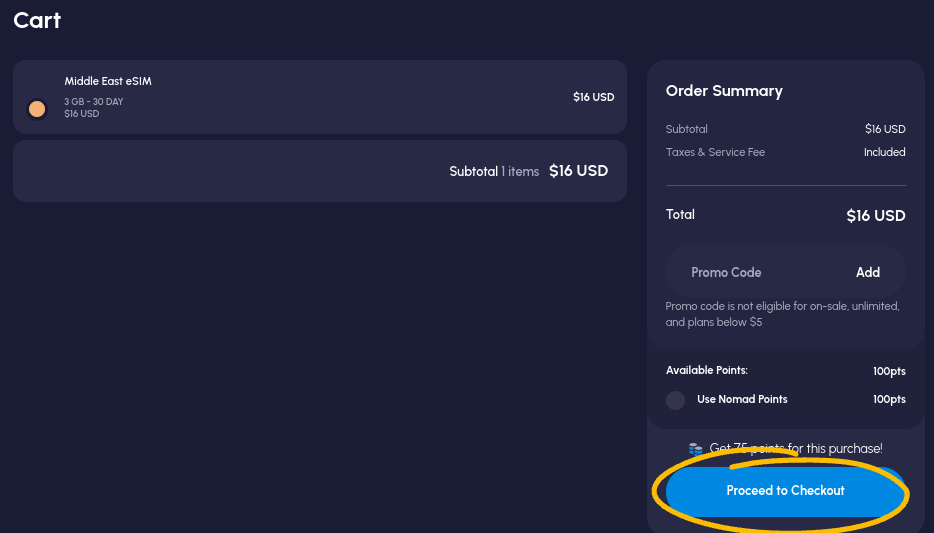
Scroll down to select a data plan, then click the blue button at the bottom right that says “Buy Now” to be taken to your cart.
-
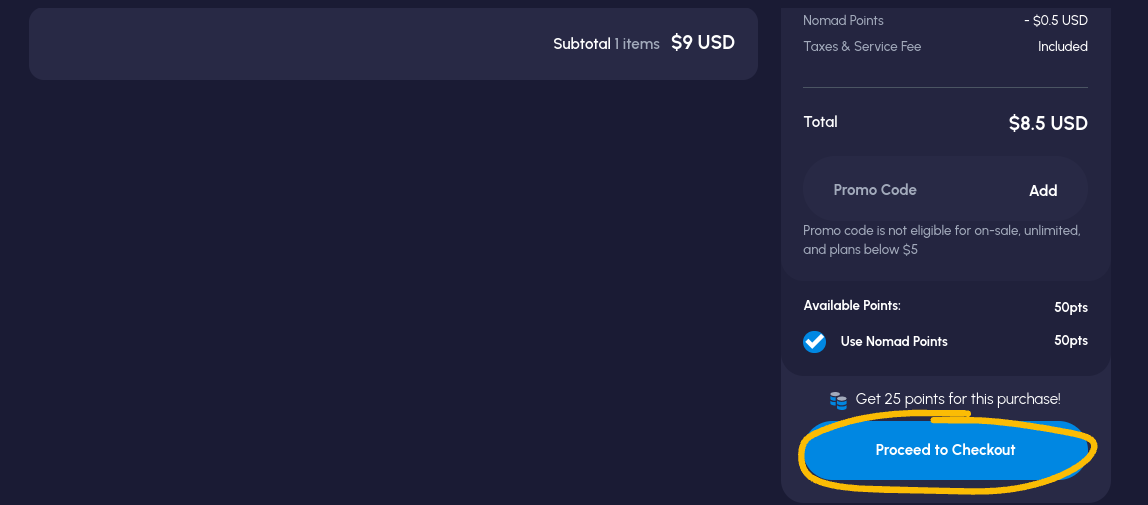
Click the blue button at the bottom right that says “Proceed to Checkout,” then enter your payment information and click “Checkout.”
-
To get the QR code for this eSim, either:
-
Wait to get a confirmation email, and screenshot the QR code in that email.
-
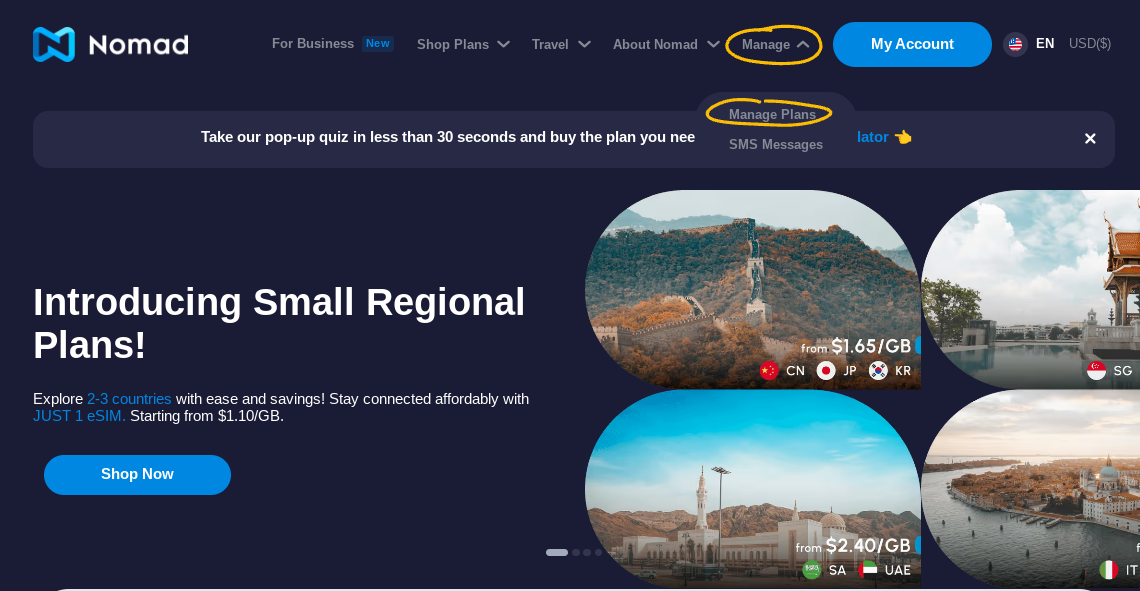
Click the button in the ribbon menu at the top of the screen that says “Manage,” then click “Manage Plans” in the dropdown menu that appears. Click on the rectangle for the plan you just purchased, then click “Installation Instruction” in the center of the screen. Scroll down. Under where it says “Add eSim to your phone,” expand the menu titled “Install eSIM via QR code or Manual Input.” Scroll down a bit. To the right of the blue button that says “Manual Input” is a greyed-out button that says “QR code.” Toggle over to the QR code. The QR code for this plan will appear right under the menu.
-
Send the screenshot to gazaesims@gmail.com. Include the words “Nomad esim,” and the amount of data in the plan, in the subject line of your email (e.g. Nomad esim 3GB).
-
If you will be sending several eSims from the same app, it is useful for later reference to include the activation code in the body of the email. Get the activation code by tabbing back over from “QR code” to “Manual Input” and copying it (right under “SM-DP+ Address”).
🟠 Simly #
📱 App #
-
Download “Simly - eSIM Internet Plans” from the App Store.
-
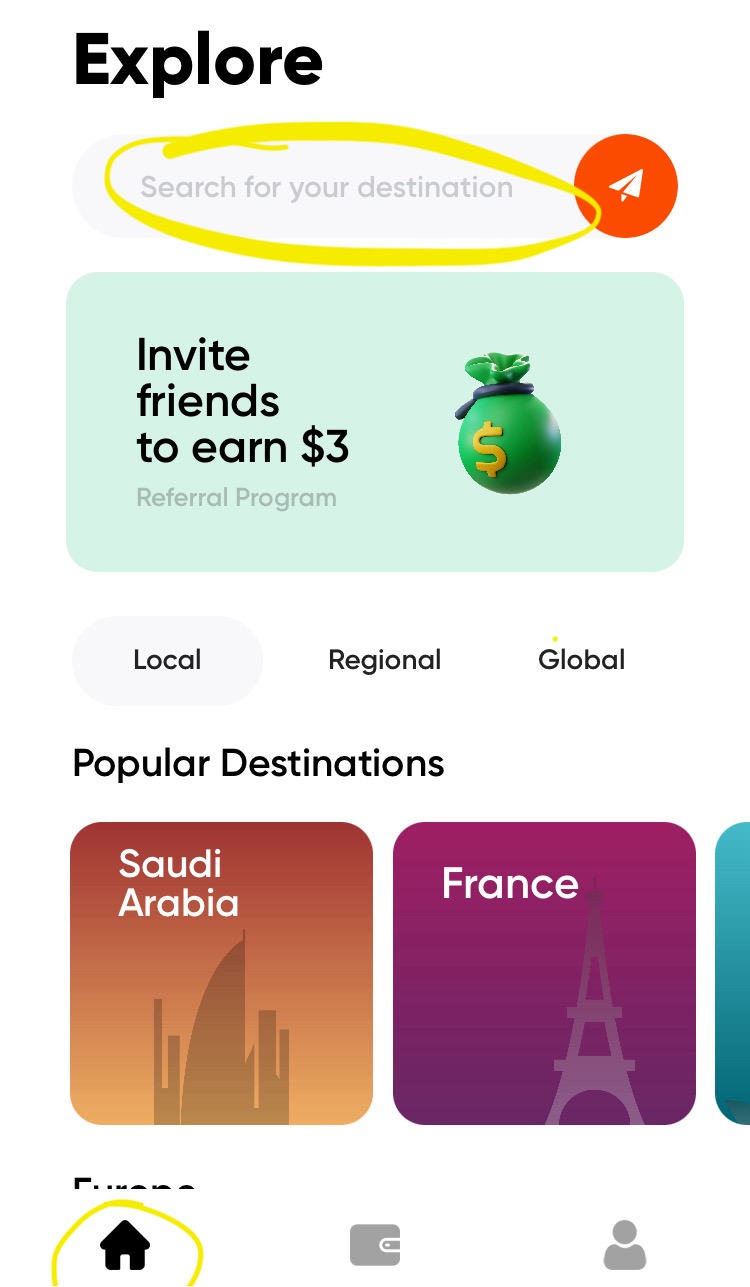
Open the app. You should be on the “Explore” page—if not, click the house icon on the bottom left of the screen.
-
At the top of the screen will be a search bar that says “Search for your destination.” Search “Palestine” or “Middle East.”
-
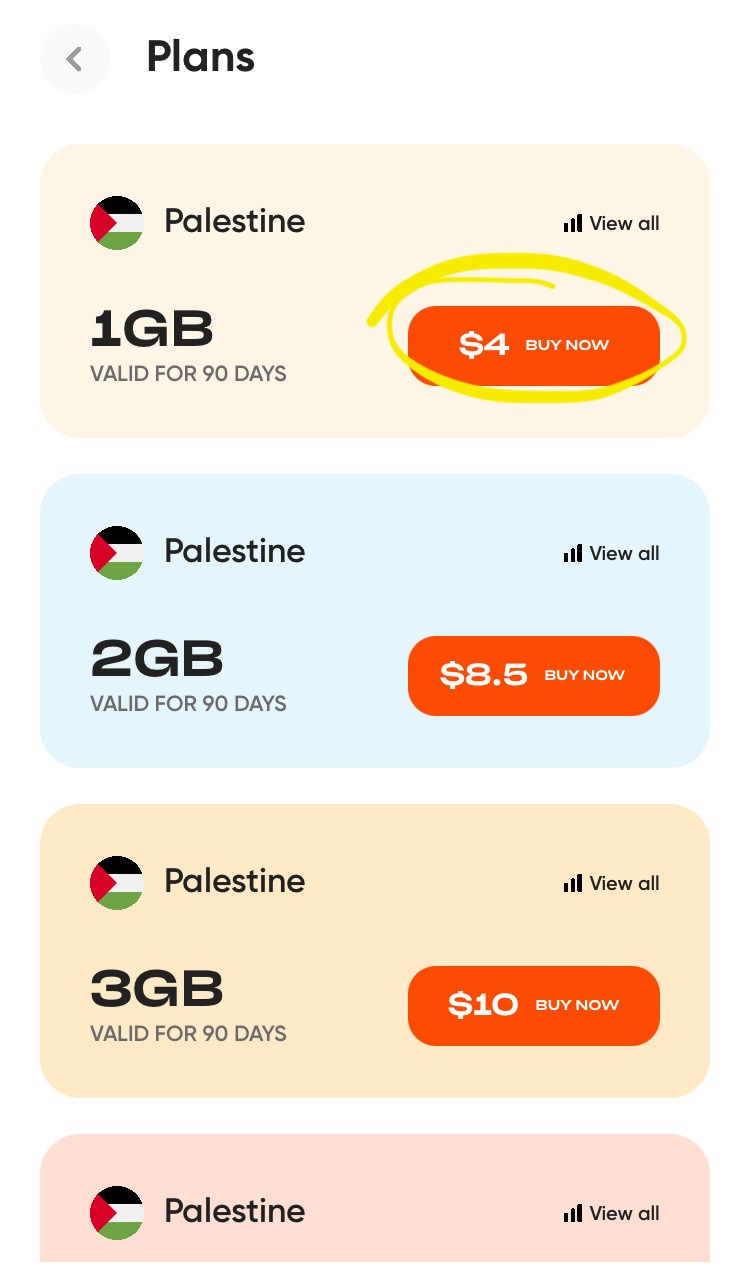
Select an amount of data (remember that Palestine plans can be topped up, while Middle East ones cannot; it is most strategic to get smaller Palestine plans and top them up once they are activated, or to get larger Middle East plans). Click the orange button that says “buy now.” Enter your payment information and click “Pay” to complete the purchase.
-
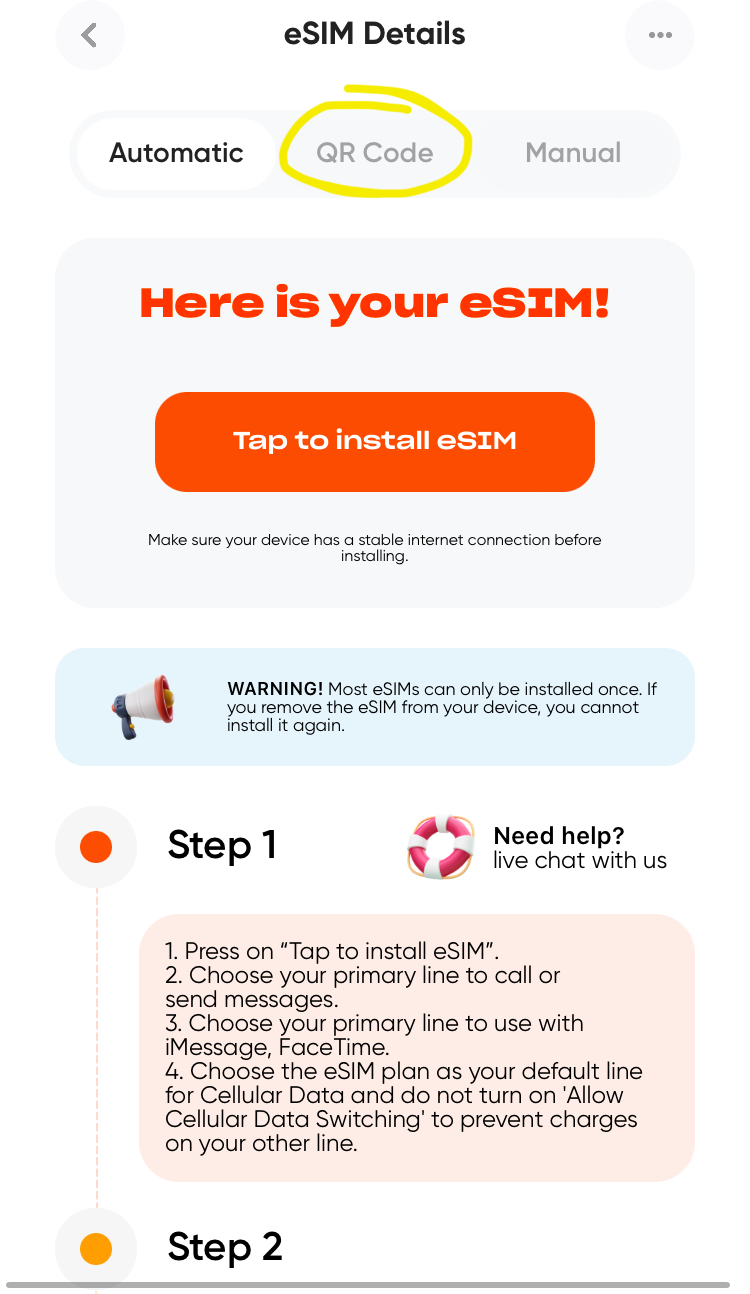
A confirmation screen titled “Your eSIM” will pop up, with three tabs at the top for “Automatic,” “QR code,” and “Manual” installation. You should be on the “Automatic” tab; tab over to the “QR code” tab, and the code will appear under the orange text reading “Here is your eSIM!” Screenshot the QR code.
-
If you’ve navigated away from this screen, you can get back to it by clicking the icon that looks like a sim card in the center bottom of the screen to get to the “My eSIMs” page; then, at the bottom right of the details for the eSim you bought, click “View.”
-
Send the screenshot to gazaesims@gmail.com. Include the words “Simly esim,” the type of plan (“Palestine” or “Middle East”), and the amount of data in the plan, in the subject line of your email (e.g. Simly Palestine esim 1GB).
-
If you will be sending several eSims from the same app, it is useful for later reference to include the activation code in the body of the email. Get the activation code by again clicking “View”; switch over to the “Manual” tab at the top, and copy the activation code (right under “SM-DP+ Address”).

🟠 Desktop #
Simly eSims cannot be purchased on desktop at this time.
🔴 Holafly #
📱 App #
Note that you can purchase up to 90 days of data on the desktop site, but only 20 days on the app.
-
Download “Holafly: Prepaid eSIM Card” from the App Store.
-
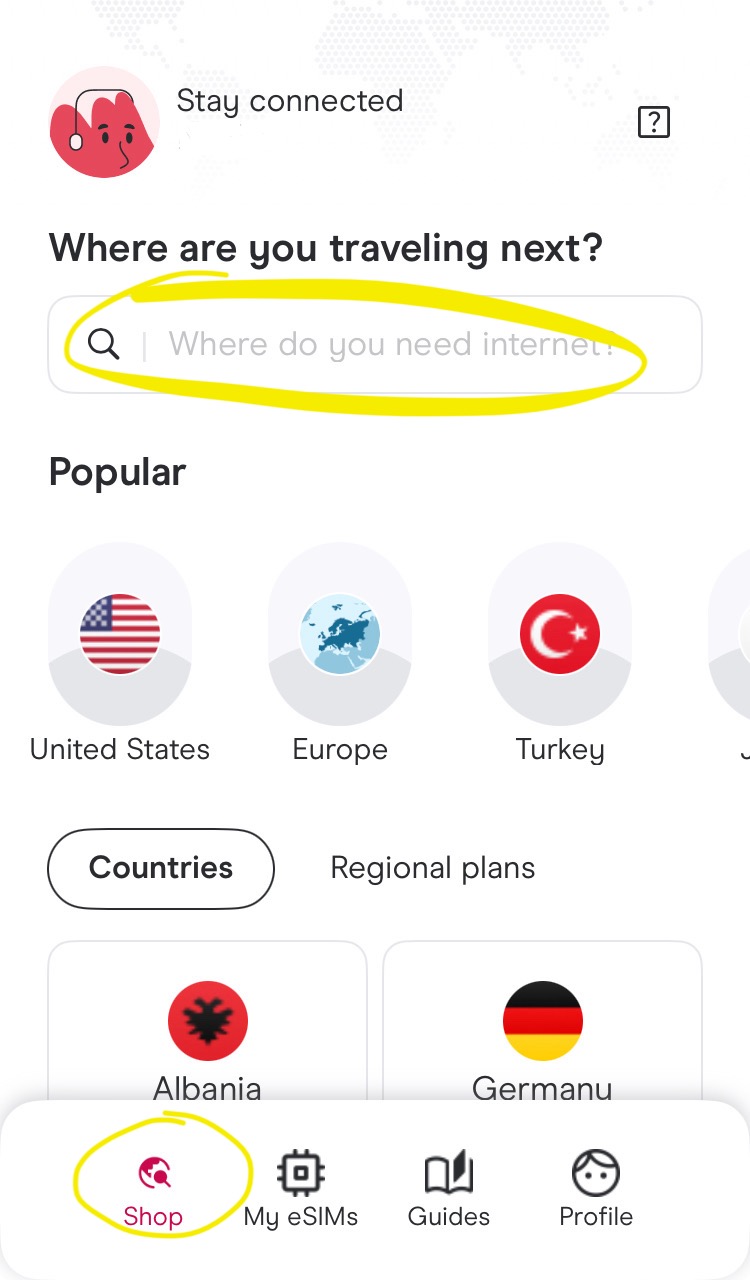
Open the app. You should be on the “Shop” page; if not, click the globe icon that says “Shop” in the ribbon menu at the bottom left of the screen.
-
At the top of the screen is text reading “Where are you traveling next?” with a search bar reading “Where do you need internet?” Search for “Egypt” or “Israel.”
-
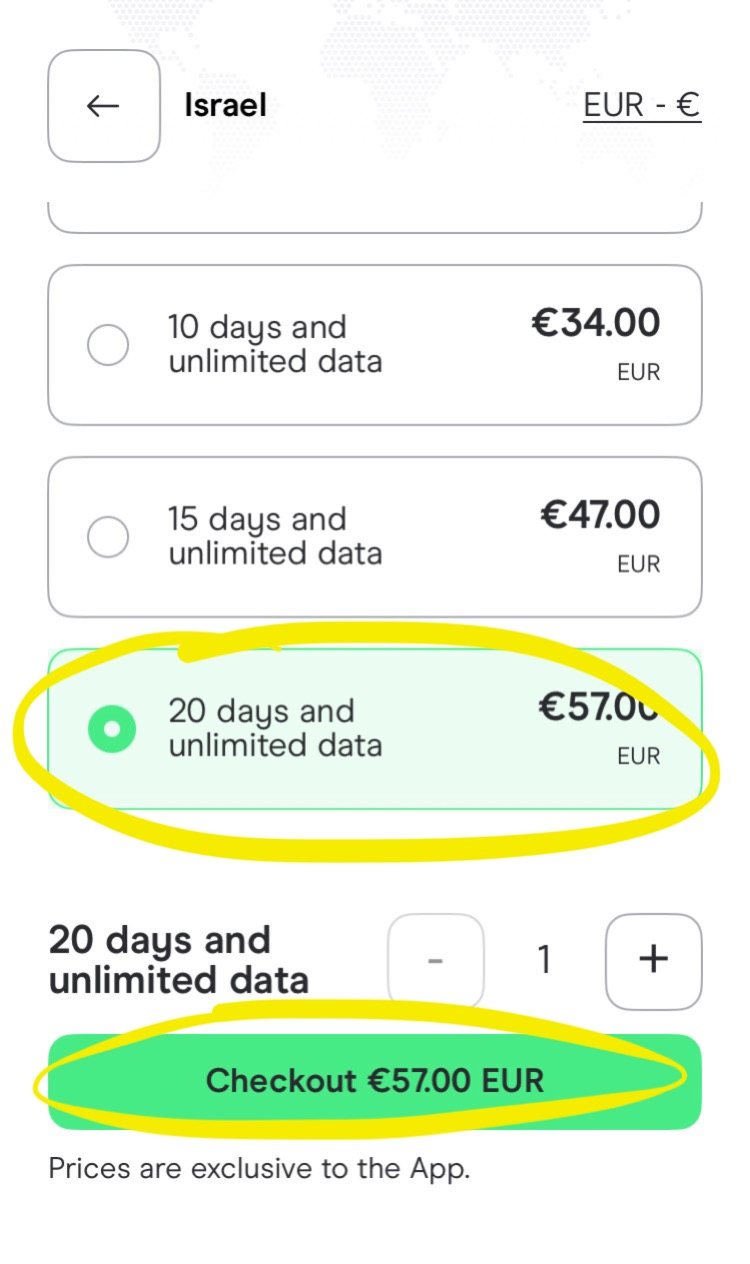
Select a plan, then click the green button that says “Checkout” at the bottom of the screen. (Remember that Holafly plans cannot be topped up at this time.)
-
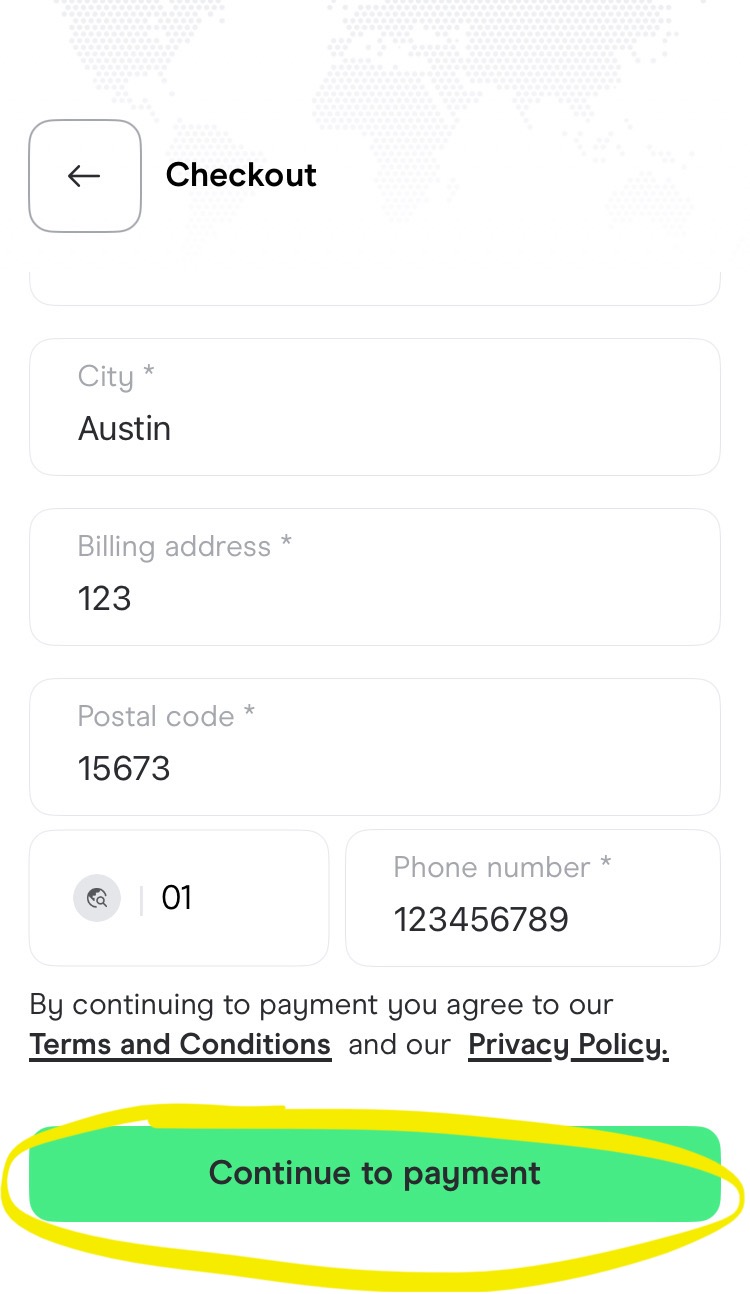
Enter your email and billing address and then hit the green button that says “Continue to payment” at the bottom of the screen. Select a payment method (“Apple Pay” or “Credit Card”) and enter your payment information, then click the blue button at the bottom of the screen that says “Pay.”
-
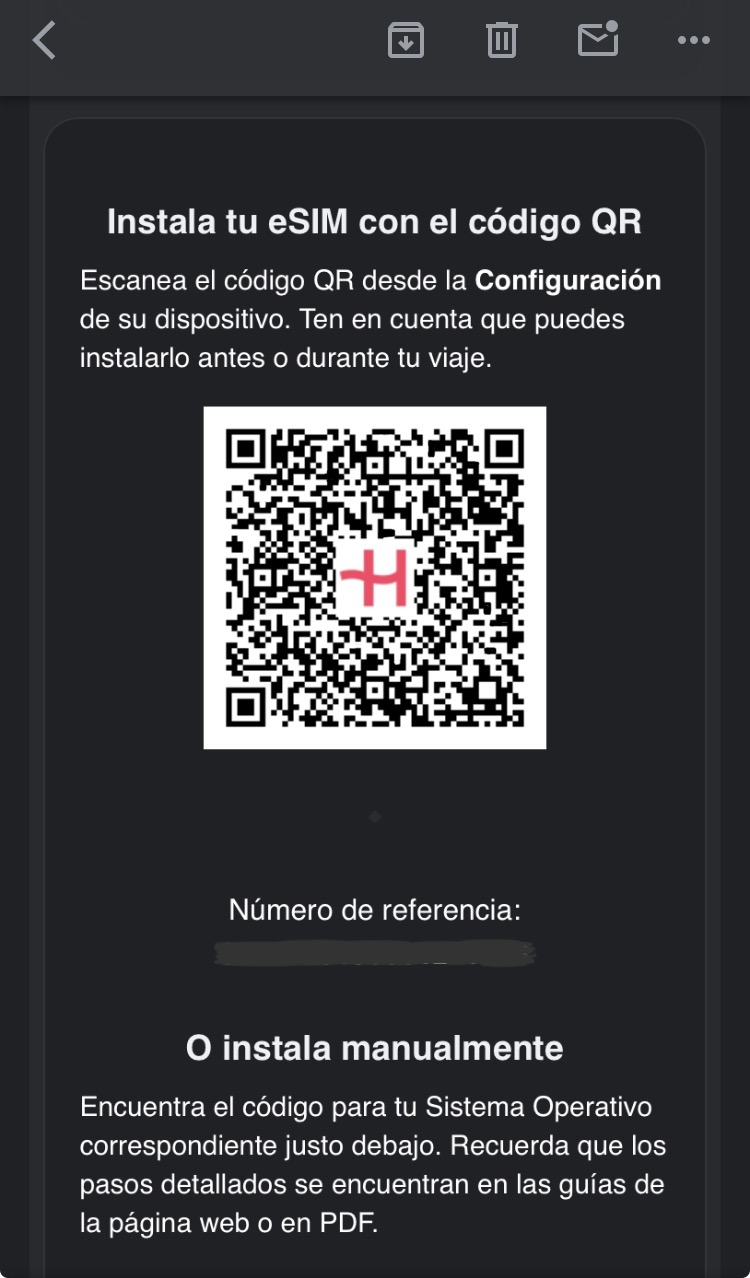
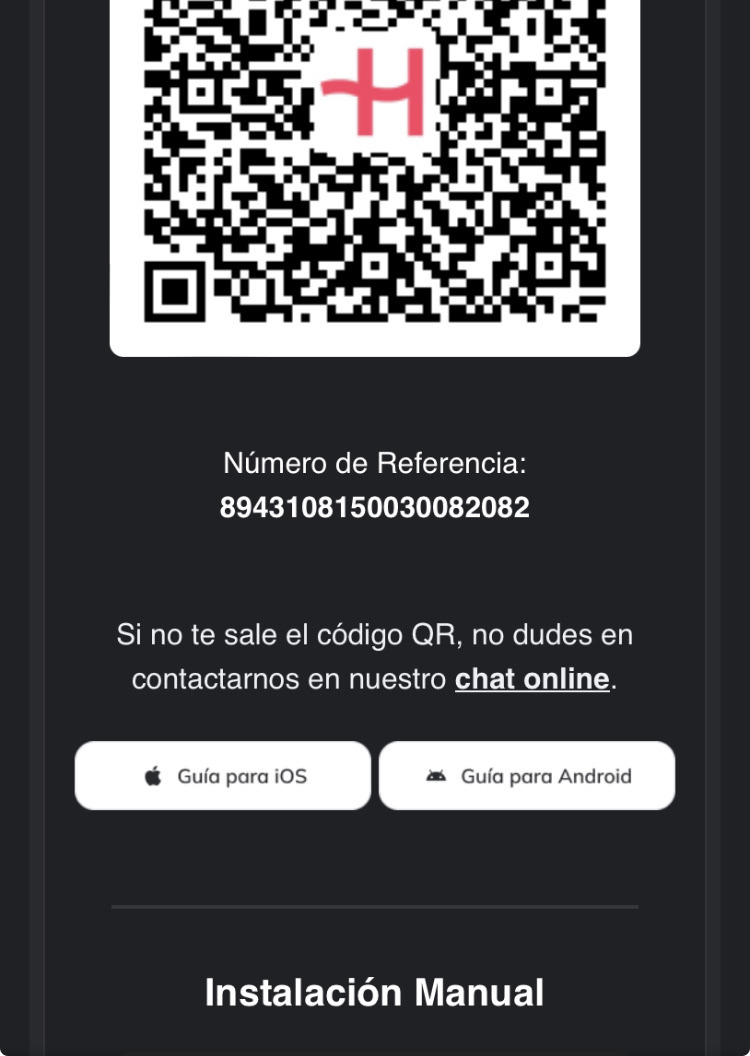
Wait to get a confirmation email with the subject line “tu eSIM para Egipto esta lista!” or “tu eSIM para Israel esta lista!” Scroll down to the section titled “Instala tu eSIM con el código QR,” and screenshot the QR code.
-
Send the screenshot to gazaesims@gmail.com. Include the words “Holafly esim,” the type of plan (“Israel” or “Egypt”), and the amount of time on the plan, in the subject line of your email (e.g. Holafly Israel esim 20 days).
-
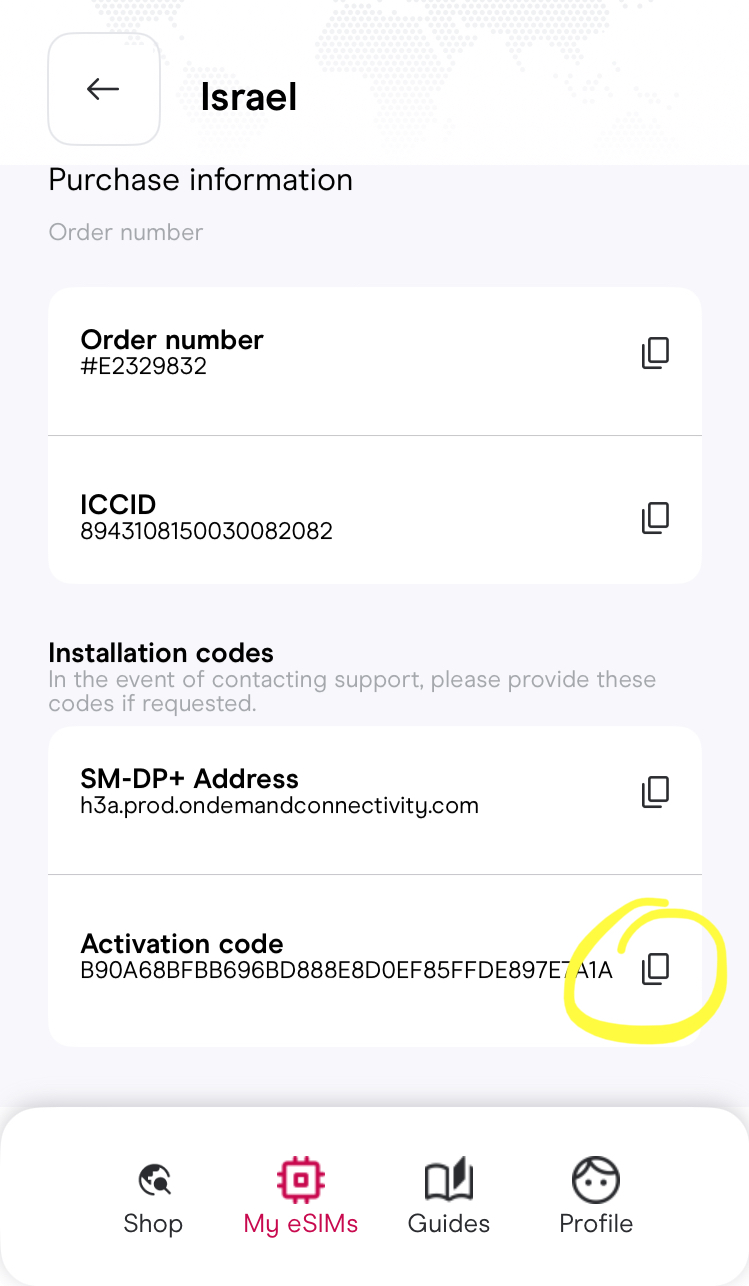
If you will be sending several eSims from the same app, it is useful for later reference to include the activation code in the body of the email. Get the activation code by clicking the button that says “My eSIMs” in the ribbon menu at the bottom; then click on a plan and scroll all the way down to “Activation code” (in the section titled “Installation codes”).
🖥️ Desktop #
-
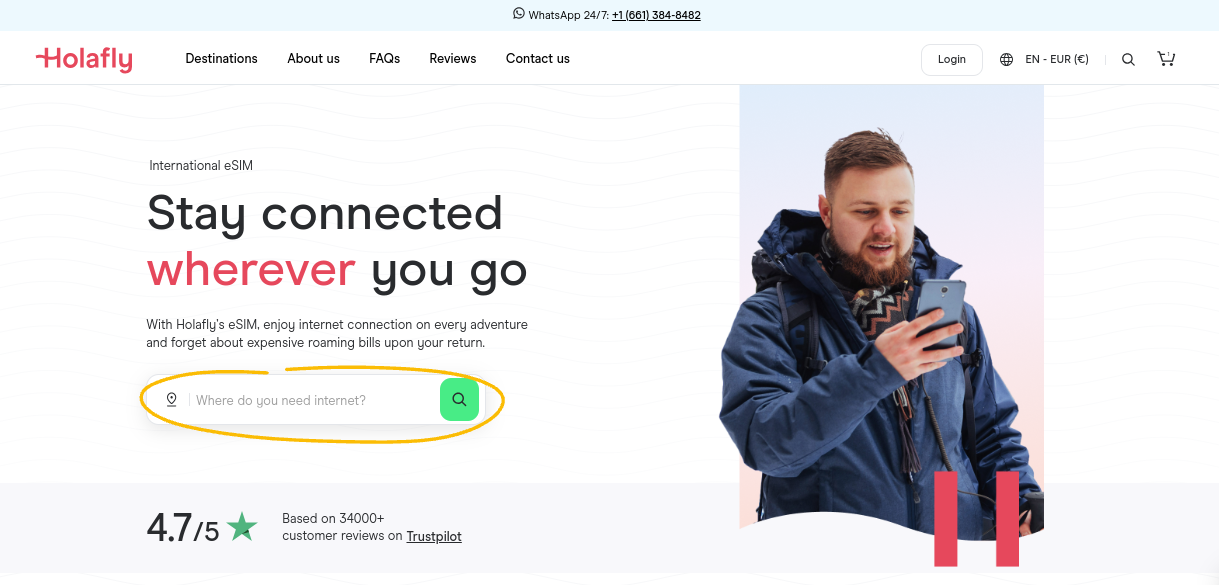
Navigate to https://esim.holafly.com/on your web browser (for Spanish: https://esim.holafly.com/es/).
-
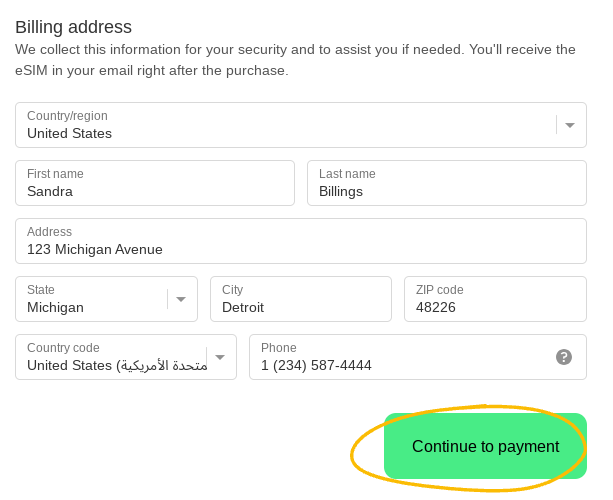
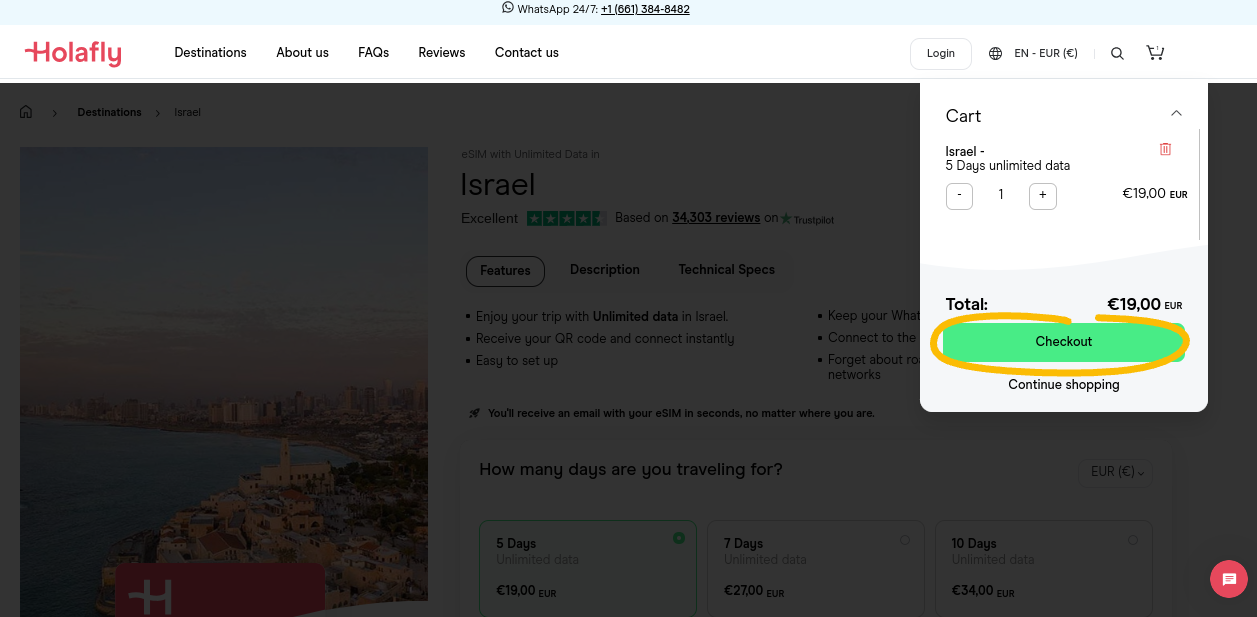
Under the text reading “Stay connected wherever you go” is a search bar that says “Where do you need internet?” Search “Israel” or “Egypt” and click the rectangle that comes up.
-
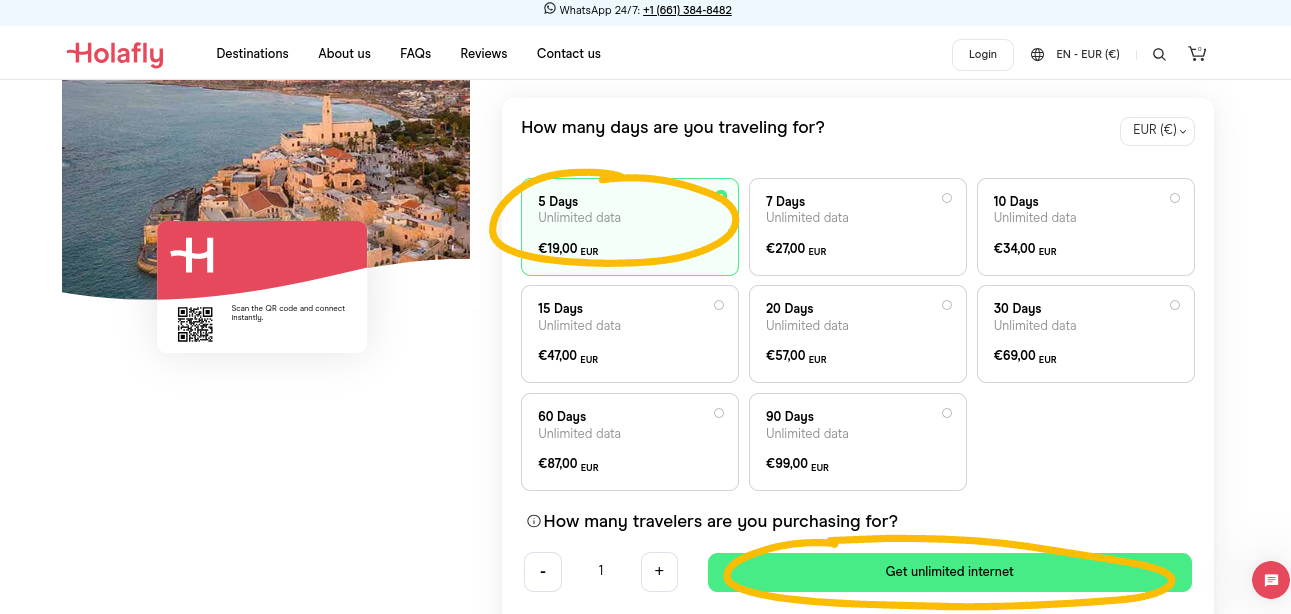
Scroll down to the menu headed with the text “How many days are you traveling for?” and select a plan, then click the green button that says “Get unlimited internet” at the bottom of the page.
-
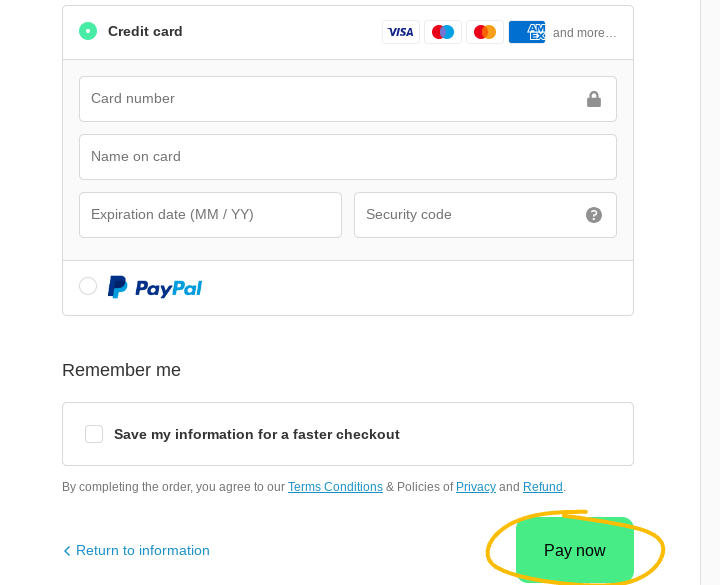
In your cart, click the green button that says “Checkout.” Enter your email and billing address, then click the green button at the bottom of the screen that says “Continue to payment.” Enter your payment information, then click the green button at the bottom right that says “Pay now.”
-
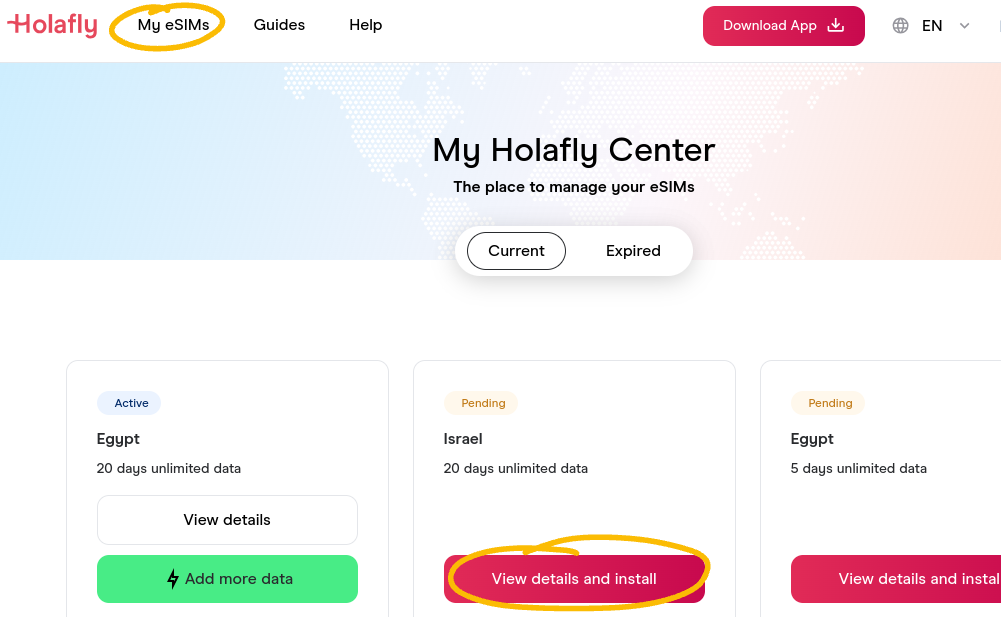
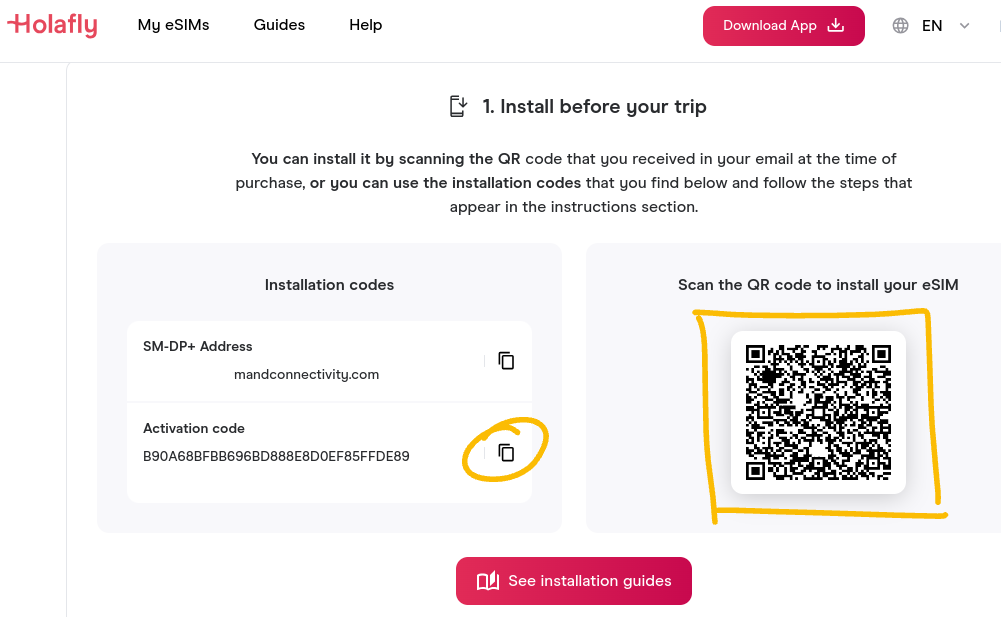
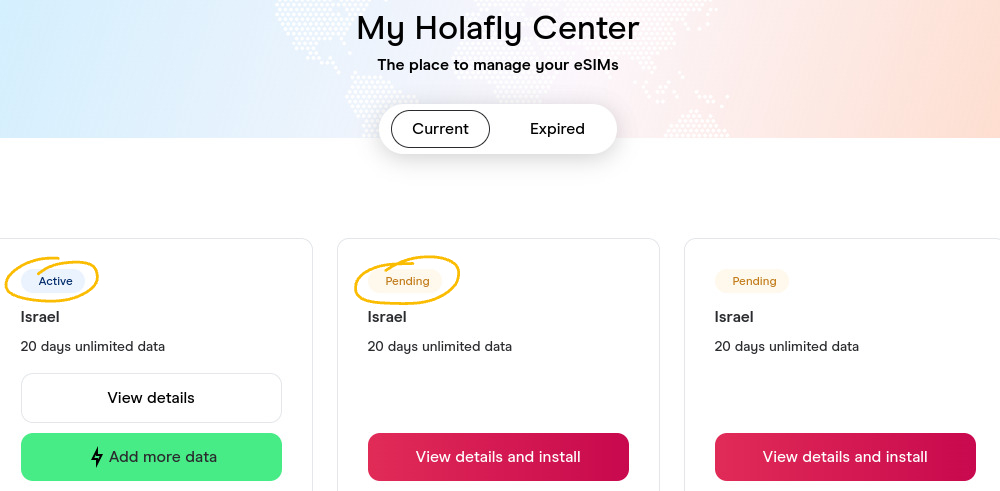
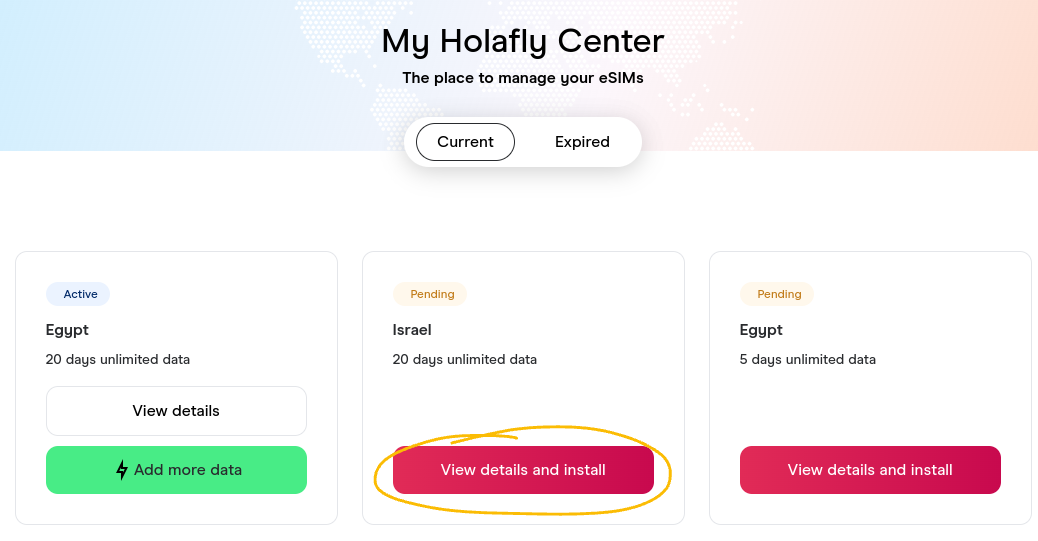
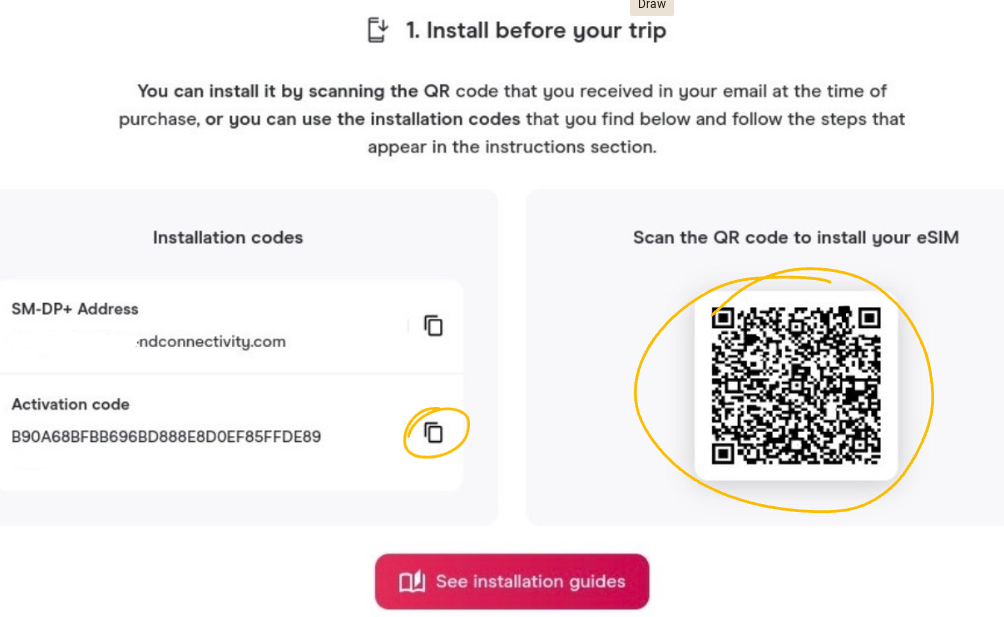
Get the QR code by clicking “My eSIMs” at the top left of the screen to get to “My Holafly Center.” Click the red button that says “View details and install” on the plan you just purchased. Scroll down to the section titled “1. Install before your trip.” The QR code will be to the right, under the title “Scan the QR code to install your eSIM.” Screenshot the QR code.
-
You can also get the QR code by waiting to get a confirmation email with the subject line “tu eSIM para Egipto esta lista!” or “tu eSIM para Israel esta lista!” Scroll down to the section titled “Instala tu eSIM con el código QR,” and screenshot the QR code.
-
Send the screenshot to gazaesims@gmail.com. Include the words “Holafly esim,” the type of plan (“Israel” or “Egypt”), and the amount of time on the plan, in the subject line of your email (e.g. Holafly Israel esim 20 days).
-
If you will be sending several eSims from the same app, it is useful for later reference to include the activation code in the body of the email. To get the activation code, follow step 5 above; then copy the activation code at the left, under the title “Installation codes.”
🟣 Airalo #
📱 App #
- Download “Airalo: eSIM Travel & Internet” from the App Store.
-
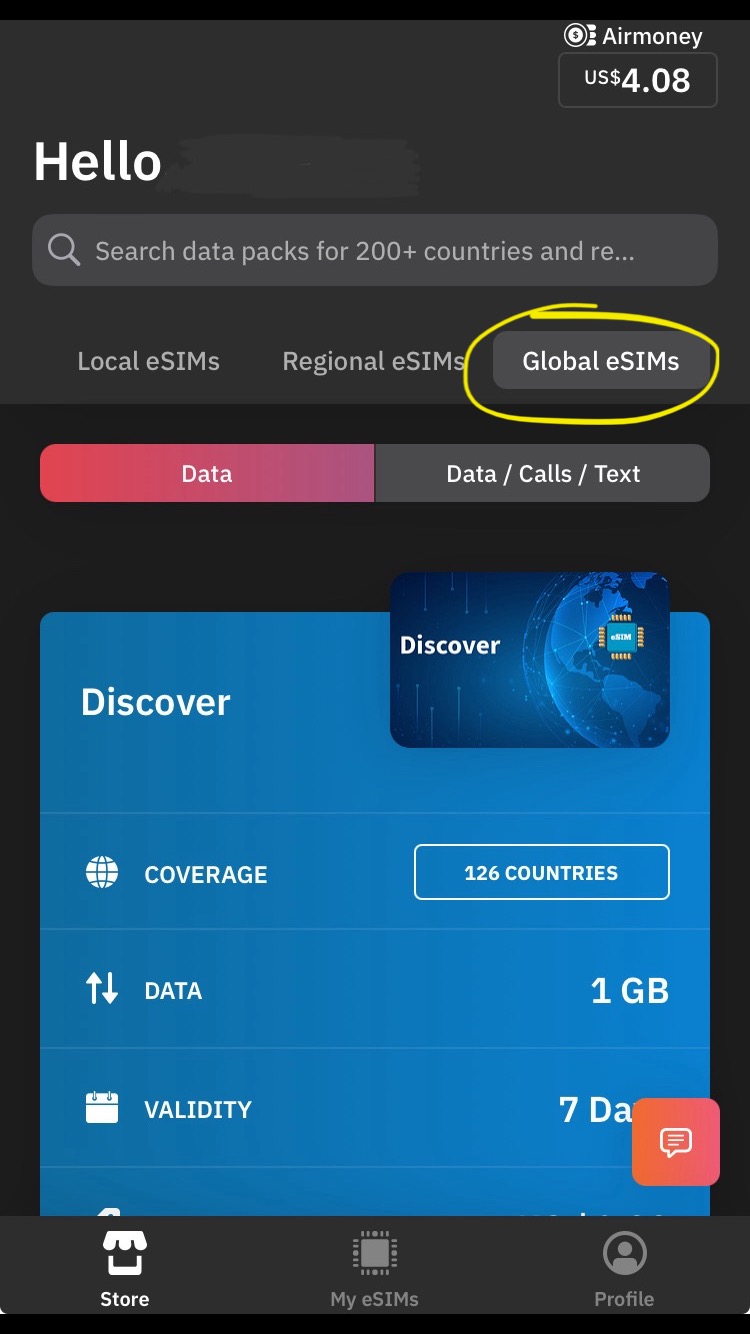
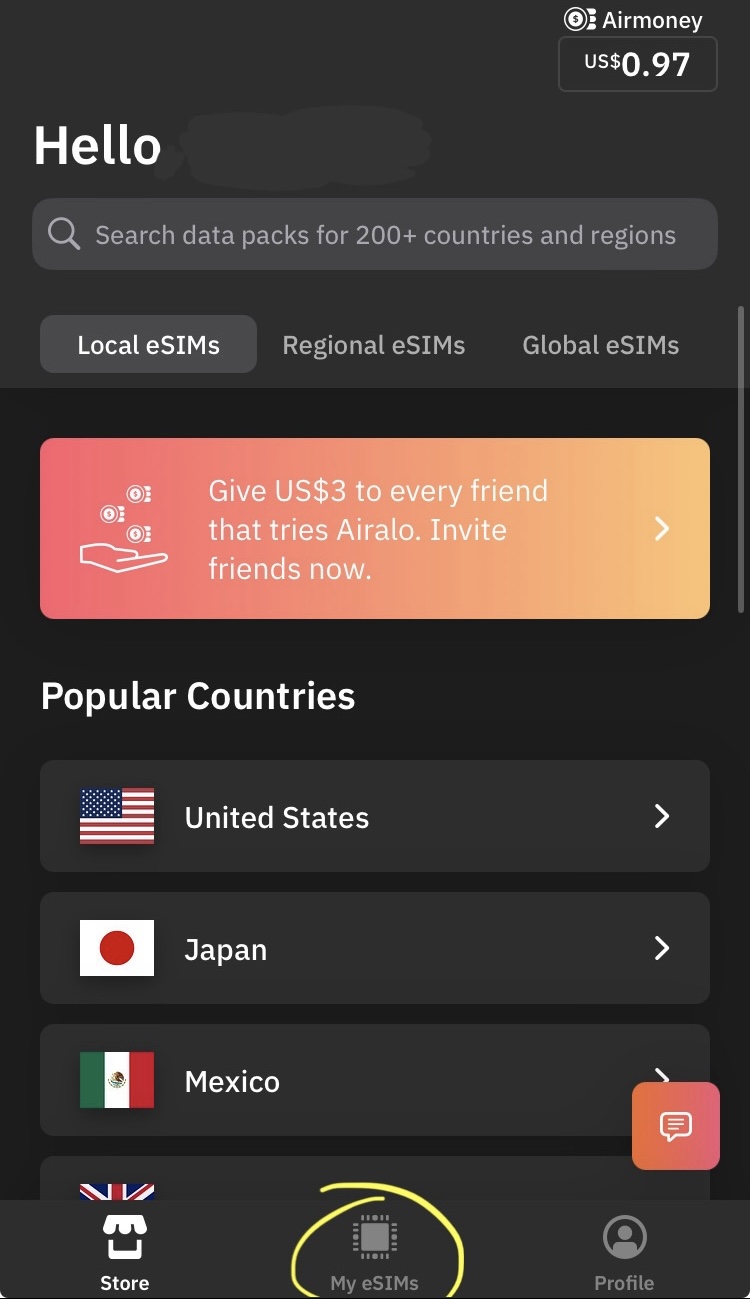
Open the app. You should be on the “Store” page; if not, click the icon of a storefront that reads “Store” in the ribbon menu at the bottom left of the screen.
-
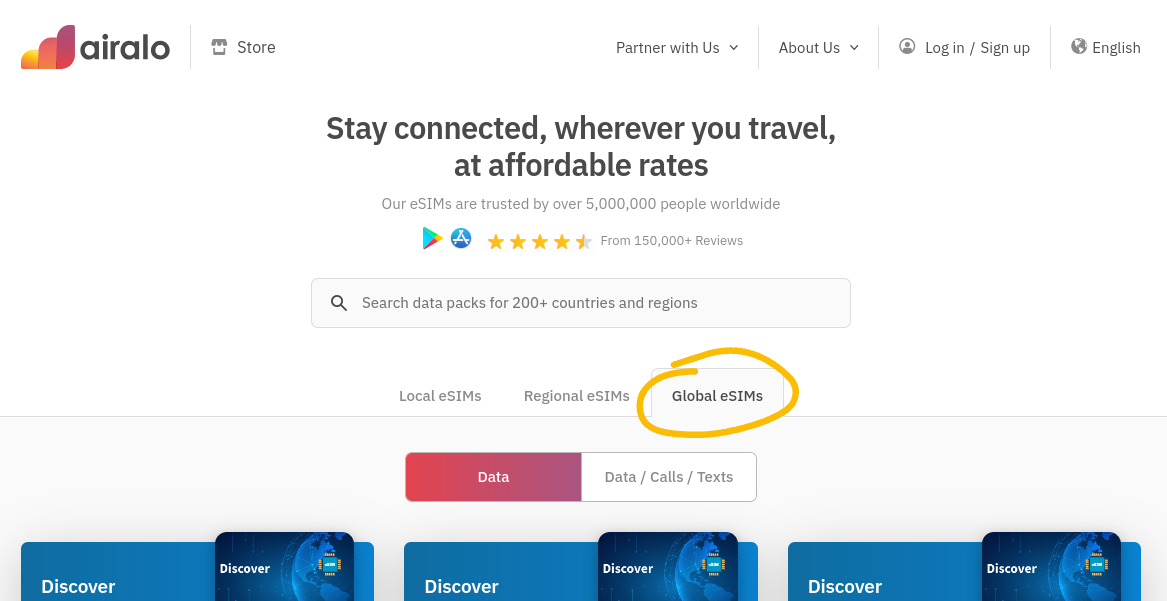
At the top, there is a search bar with text reading “Search data packages for 200+ countries and regions.” Underneath this are three tabs reading “Local eSIMs,” “Regional eSIMs,” and “Global eSIMs”; tab over to “Global eSIMs.” Note that Airalo Palestine plans have unreliable connections and are not used by the team.
-
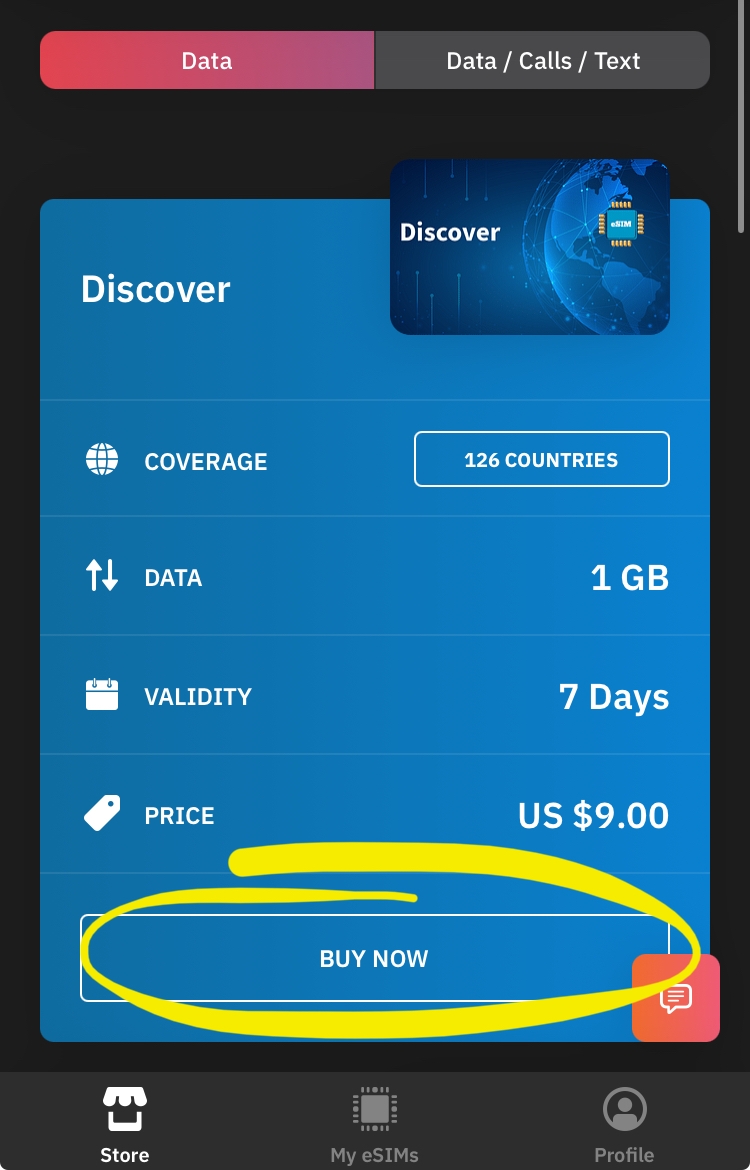
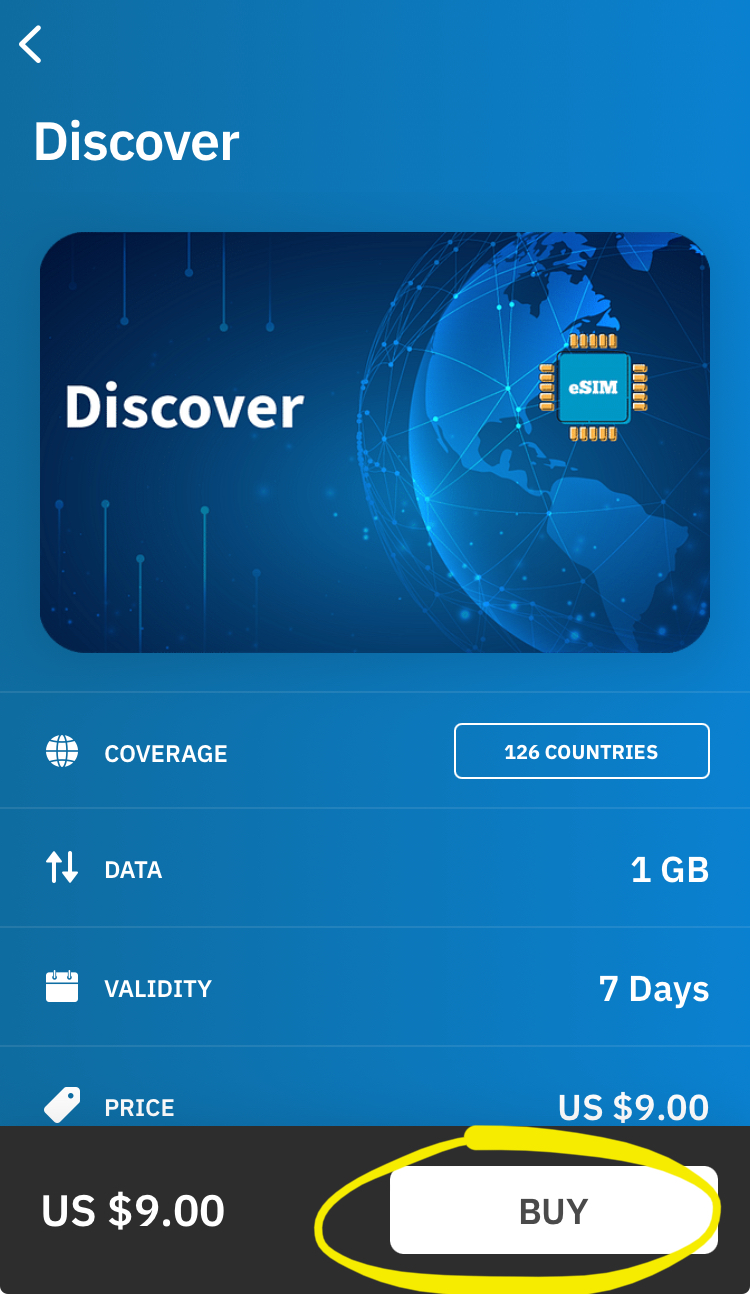
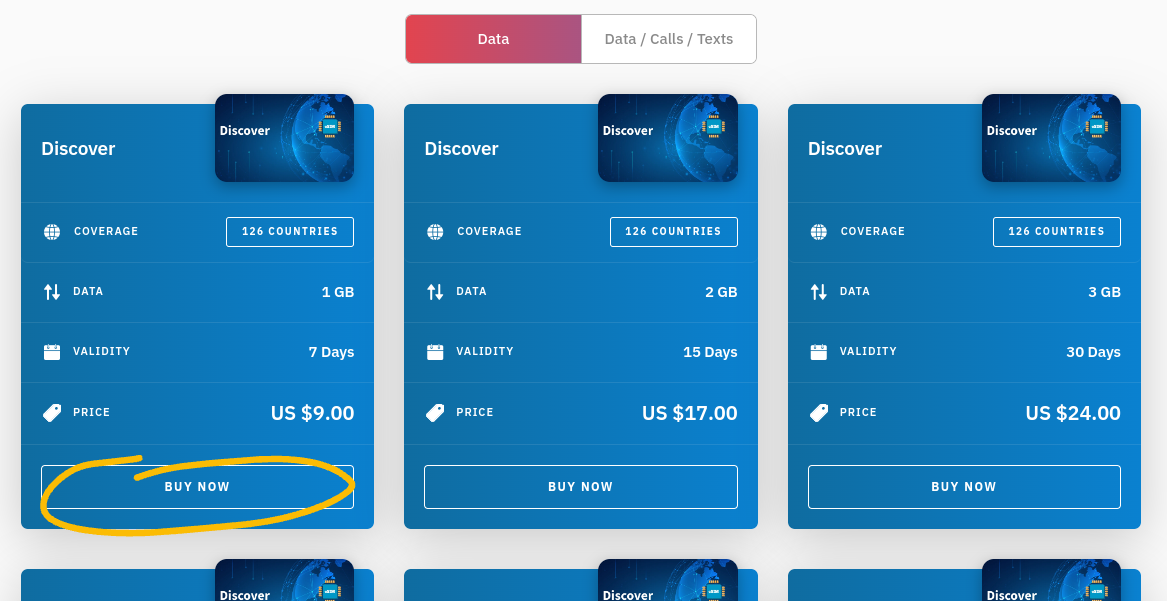
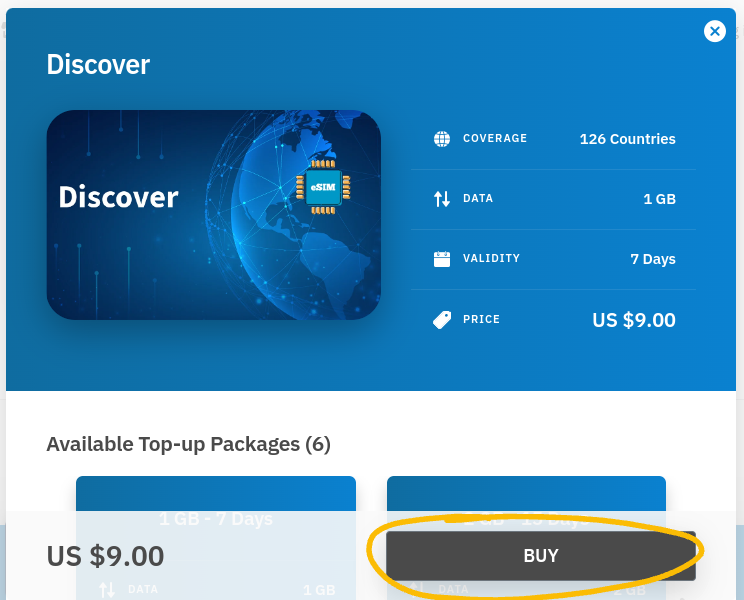
Scroll down and select a plan (a smaller plan is recommended, as this plan can be topped up with more data once it is activated). Click the rectangular button that says “Buy Now.”
-
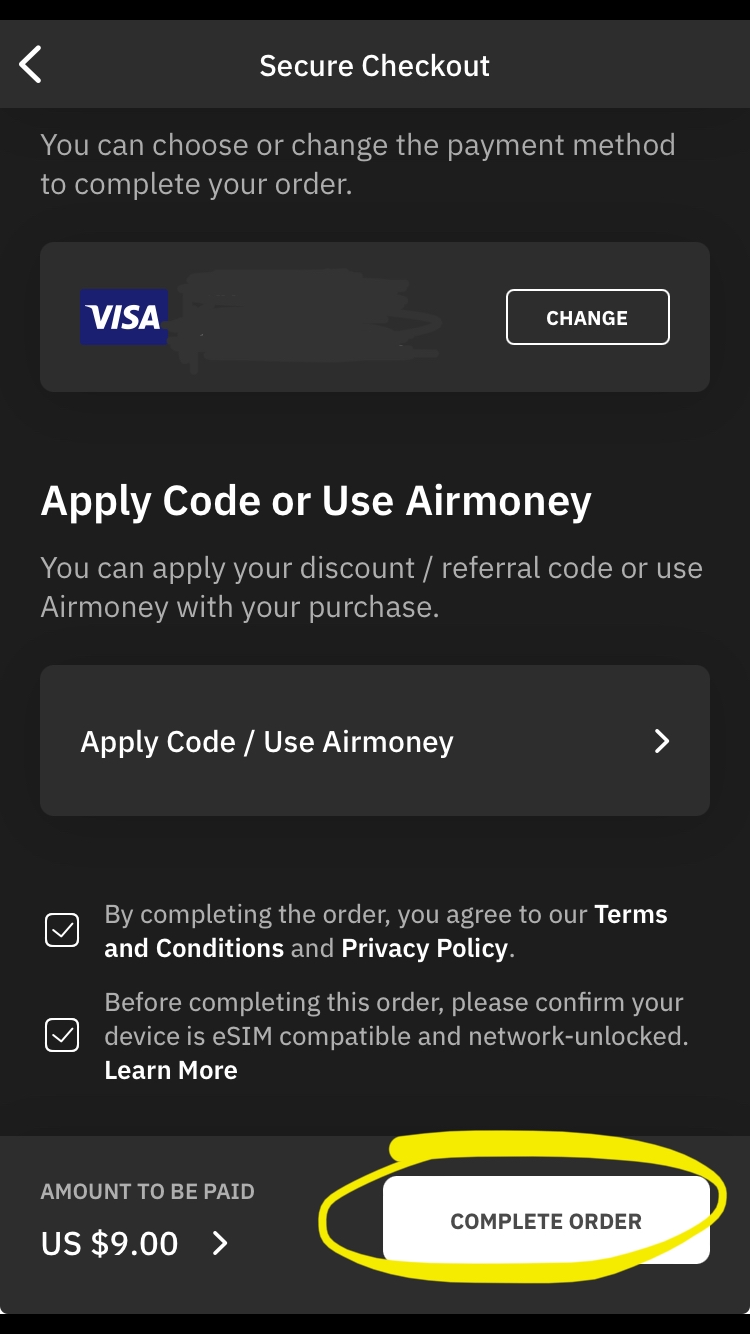
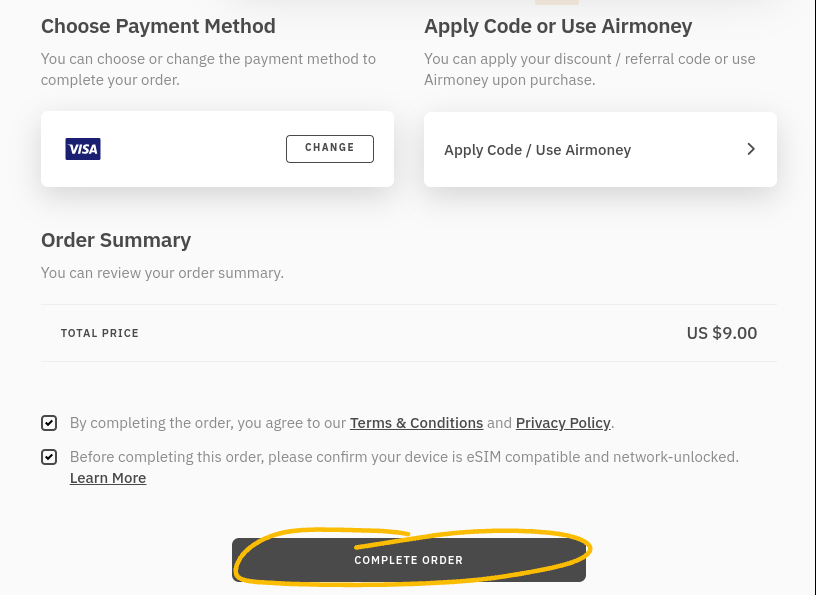
Click the grey button at the bottom right that says “Buy.” On the “Secure Checkout” page, enter your payment information. Scroll down and check the two boxes that read “By completing the order, you agree to our Terms and Conditions…” and “Before completing this order, please confirm your device is eSIM compatible…”. Click the grey button that says “Complete Order” at the bottom right.
-
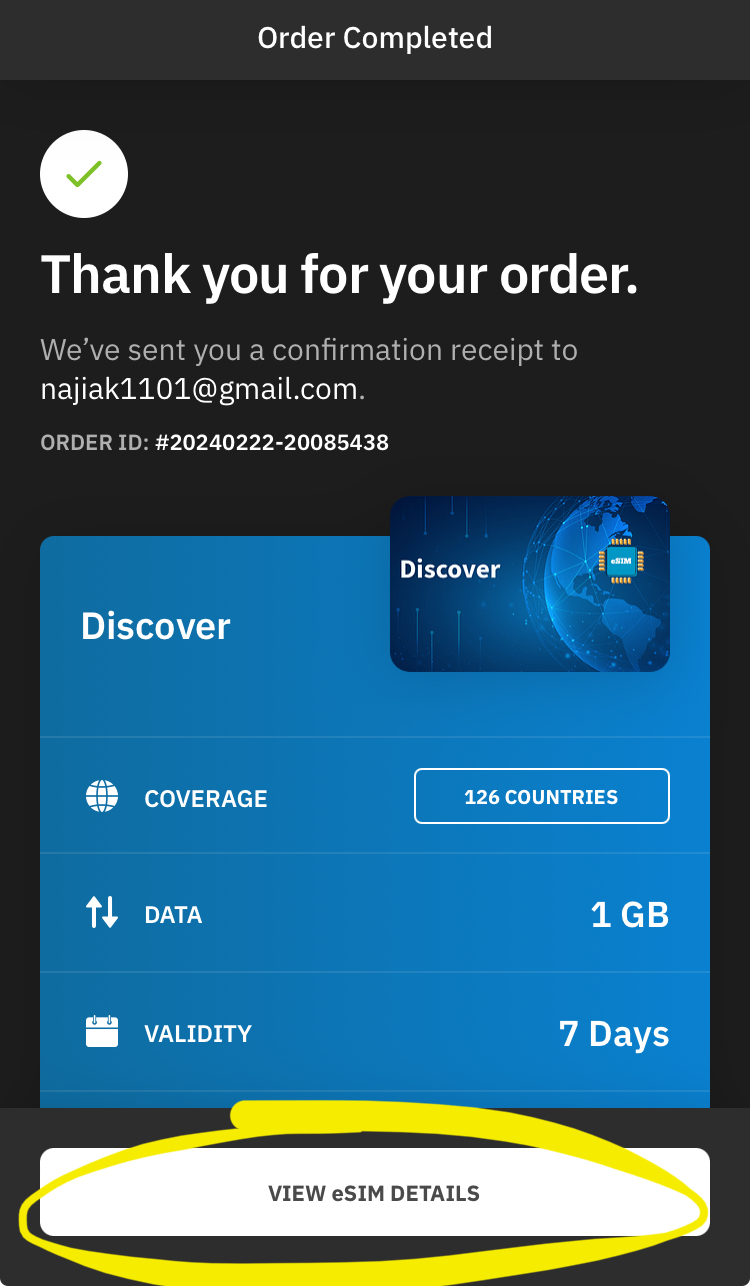
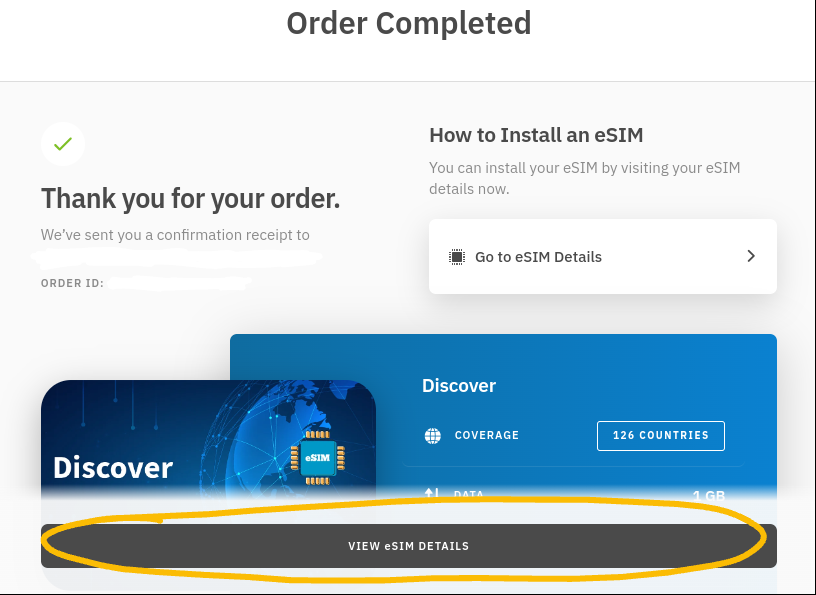
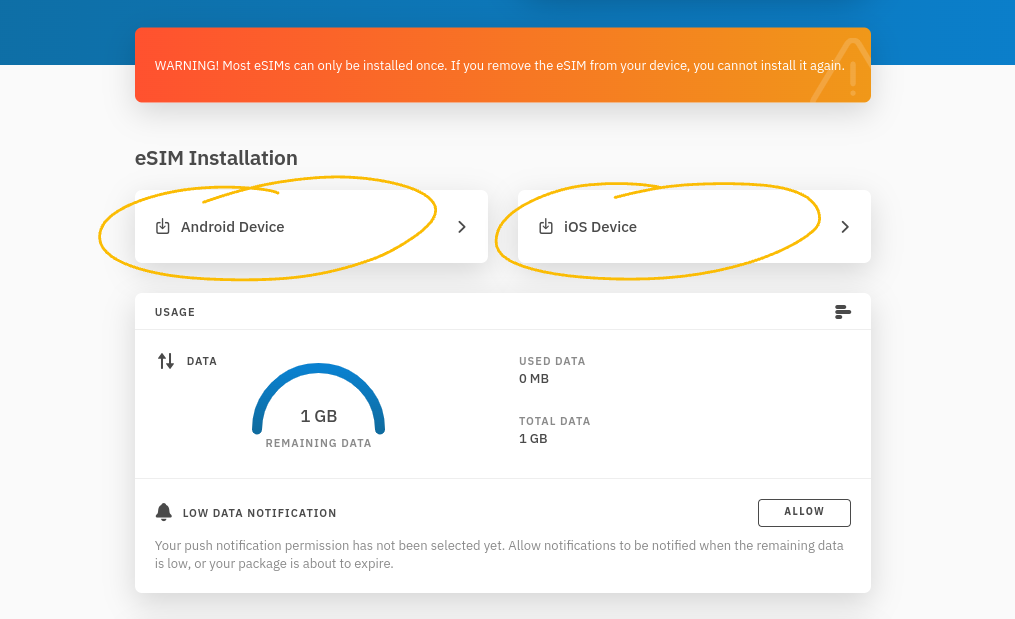
You will be taken to an “Order Completed” page. Click “View eSIM Details” at the bottom of the page.
-
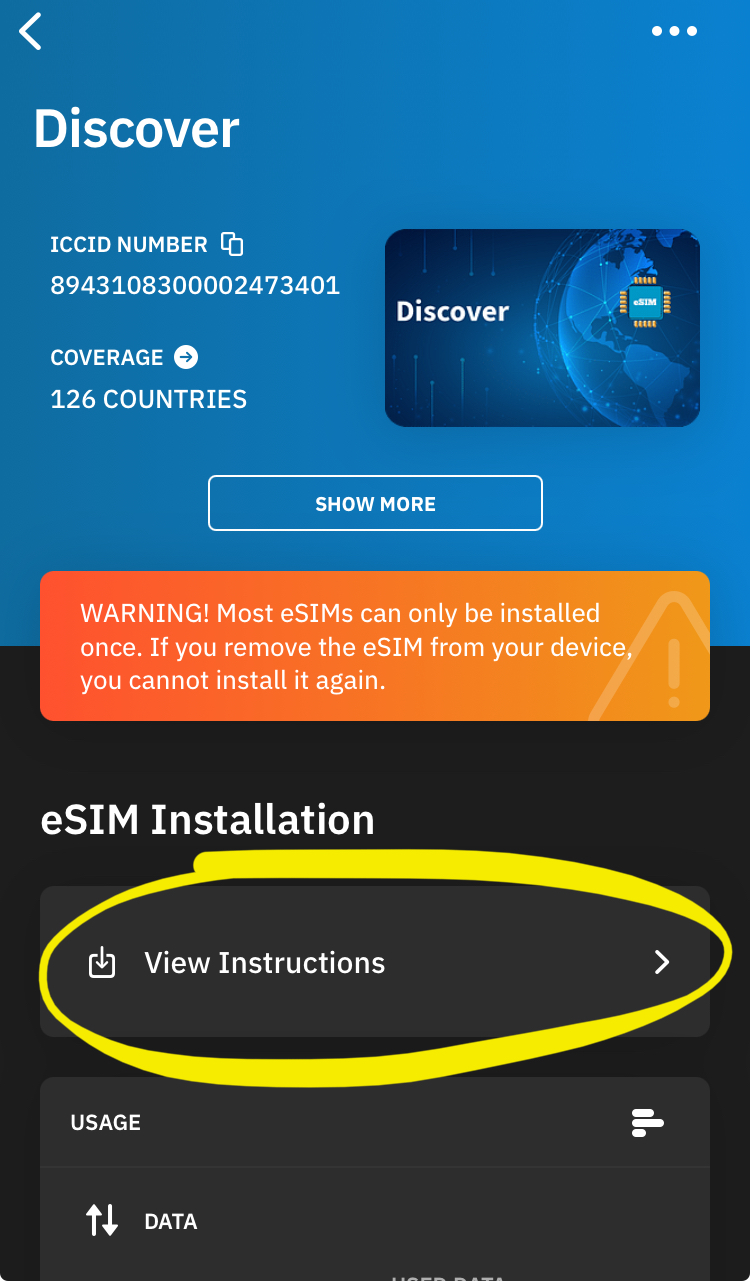
Under “eSIM Installation,” click “View Instructions.” At the top of the new screen that appears, click the middle tab that says “QR Code.” Screenshot the QR code.
-
Send the screenshot to gazaesims@gmail.com. Include the words “Airalo esim,” the type of plan (“Discover”), and the amount of data on the plan, in the subject line of your email (e.g. Airalo Discover esim 1 GB).
-
If you will be sending several eSims from the same app, it is useful for later reference to include the activation code in the body of the email. Get the activation code by tabbing over to “Manual” and copying it (right under “SM-DP+ Address”).
🖥️ Desktop #
-
Navigate to https://www.airalo.com/.
-
At the top, there is a search bar with text reading “Search data packages for 200+ countries and regions.” Underneath this are three tabs reading “Local eSIMs,” “Regional eSIMs,” and “Global eSIMs”; tab over to “Global eSIMs.” Note that Airalo Palestine plans have unreliable connections and are not used by the team.
-
Scroll down and select a plan (a smaller plan is recommended, as this plan can be topped up with more data once it is activated). Click the rectangular button that says “Buy Now.”
-
Click the grey button at the bottom right that says “Buy.” You will be prompted to create an account or sign in.
-
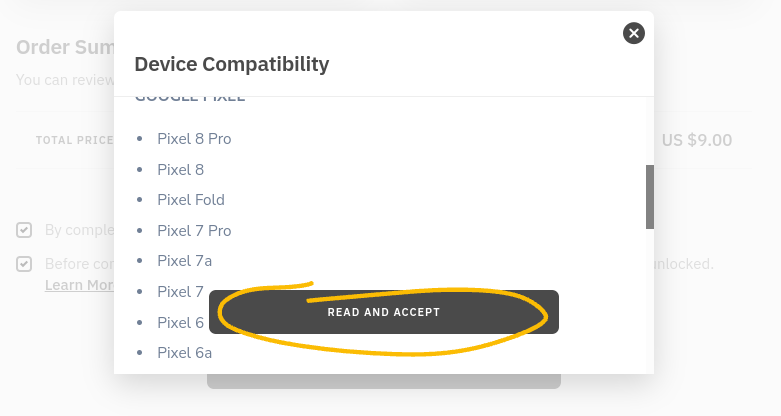
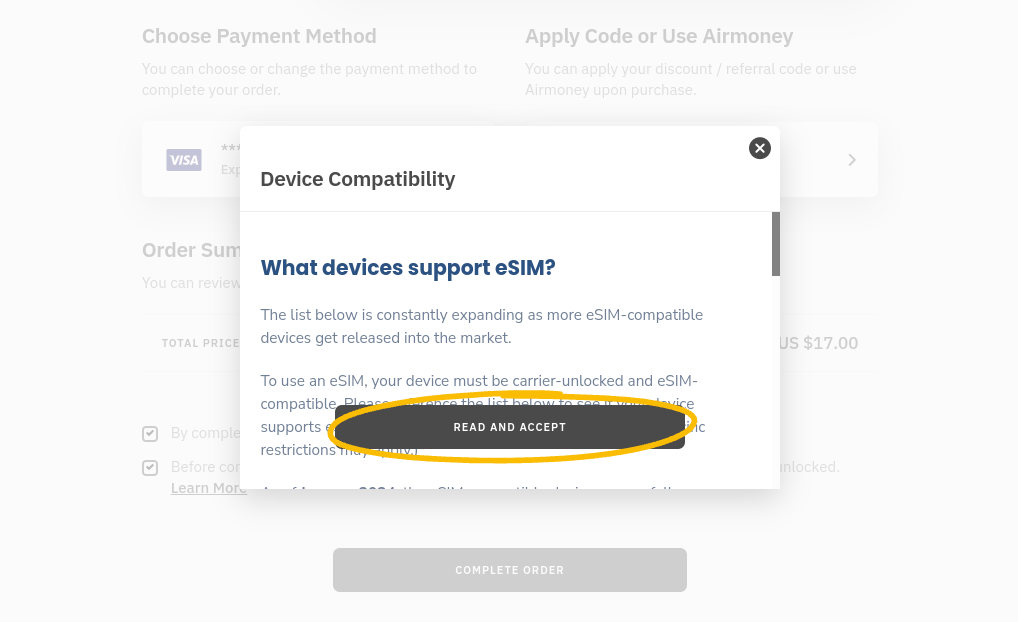
On the “Secure Checkout” page, enter your payment information. Scroll down and check the two boxes that read “By completing the order, you agree to our Terms and Conditions…” and “Before completing this order, please confirm your device is eSIM compatible…”. On the “Device Compatibility” pop-up, click “Read and Accept.” Click the grey button that says “Complete Order” at the bottom right.
-
You will be taken to an “Order Completed” page. Click the dark grey button that says “View eSIM Details” at the bottom of the page.
-
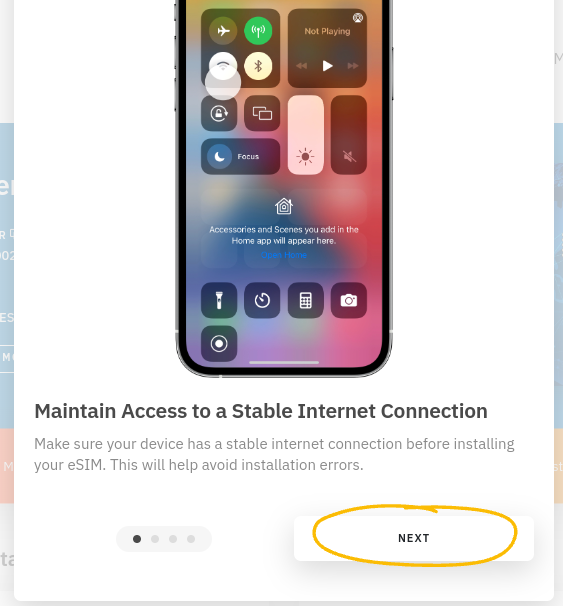
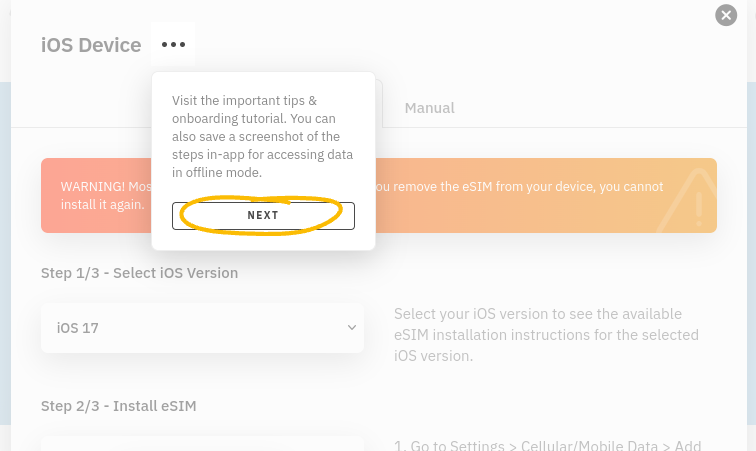
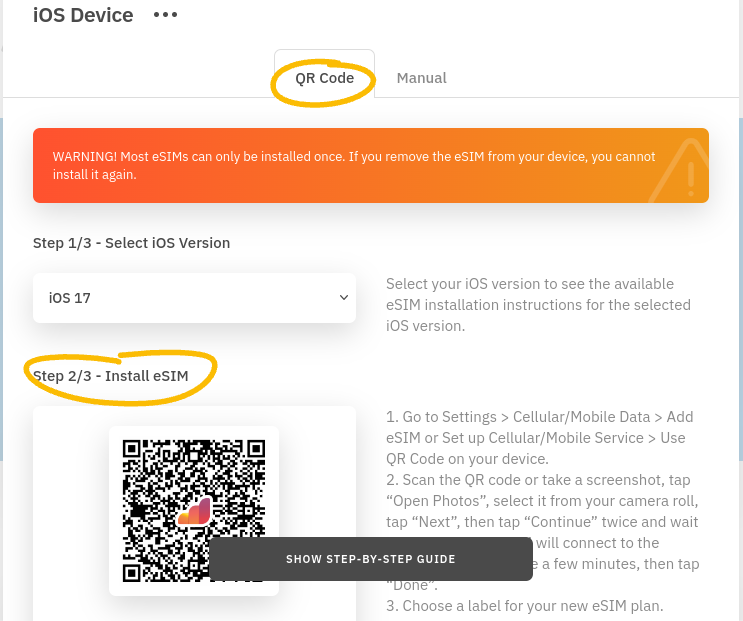
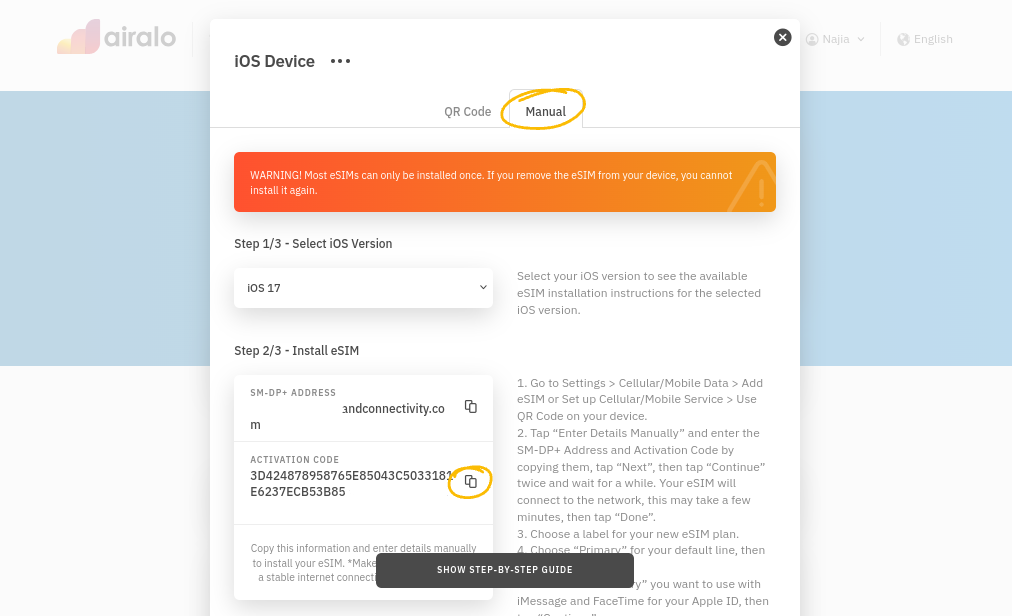
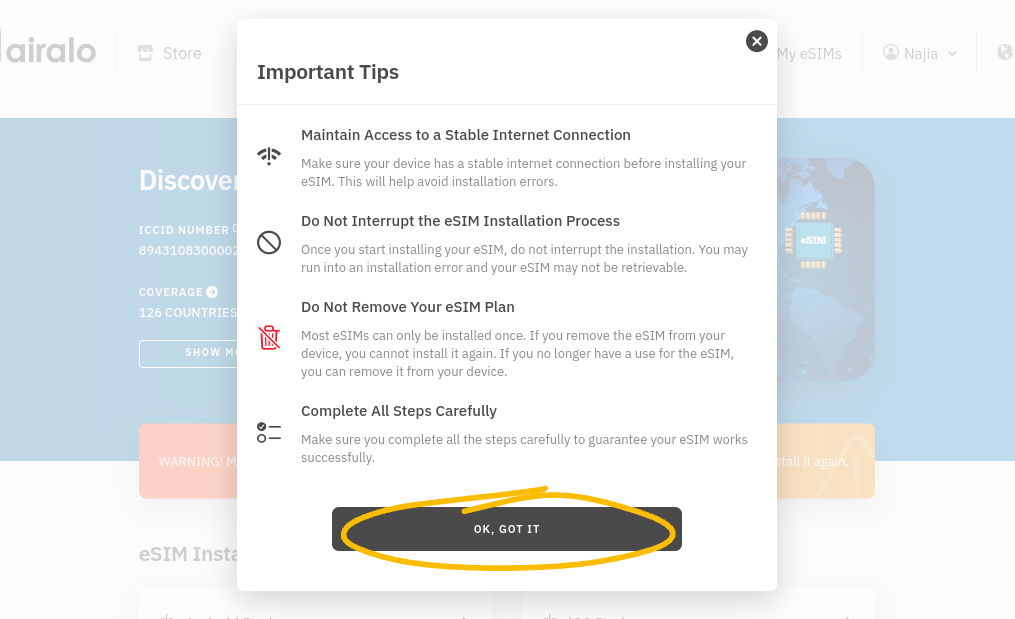
Under “eSIM Installation,” click “Android Device” or “iOS Device” (it doesn’t matter which). A pop-up with “Important Tips” will pop up. Keep hitting “Next” at the bottom right until the pop-up disappears.
-
In the onboarding tutorial, keep hitting “Next” until the page is no longer greyed out. There are two tabs at the top, “QR Code” and “Manual”; you should be tabbed over to “QR Code.”
-
Your QR code will appear under where it says “Step 2/3 - Install eSIM.” Screenshot the QR code.
-
Send the screenshot to gazaesims@gmail.com. Include the words “Airalo esim,” the type of plan (“Discover”), and the amount of data on the plan, in the subject line of your email (e.g. Airalo Discover esim 1 GB).
-
If you will be sending several eSims from the same app, it is useful for later reference to include the activation code in the body of the email. Get the activation code by tabbing over to “Manual” and copying it from the section titled “Step 2/3 - Install eSIM.”
🔵 Mogo #
📱 App #
-
Download “Mogo - Global Travel Assistant” from the App Store.
-
Open the app. Make an account by entering an email, entering the verification code you will get in your inbox, then choosing a password.
-
Click the star icon that says “Store” in the ribbon menu at the bottom of the screen.
-
In the search bar at the top of the screen, search “Israel.” Click the light blue rectangle under the text “eSim.”
-
Select a data package and click the blue button that says “Submit” at the bottom right of the screen.
-
Scroll down and select a payment method (Visa, MasterCard, PayPal, or Apple Pay). Click “Submit” again.
-
Enter your payment information, then click the blue button at the bottom that says “Confirm to Pay.”
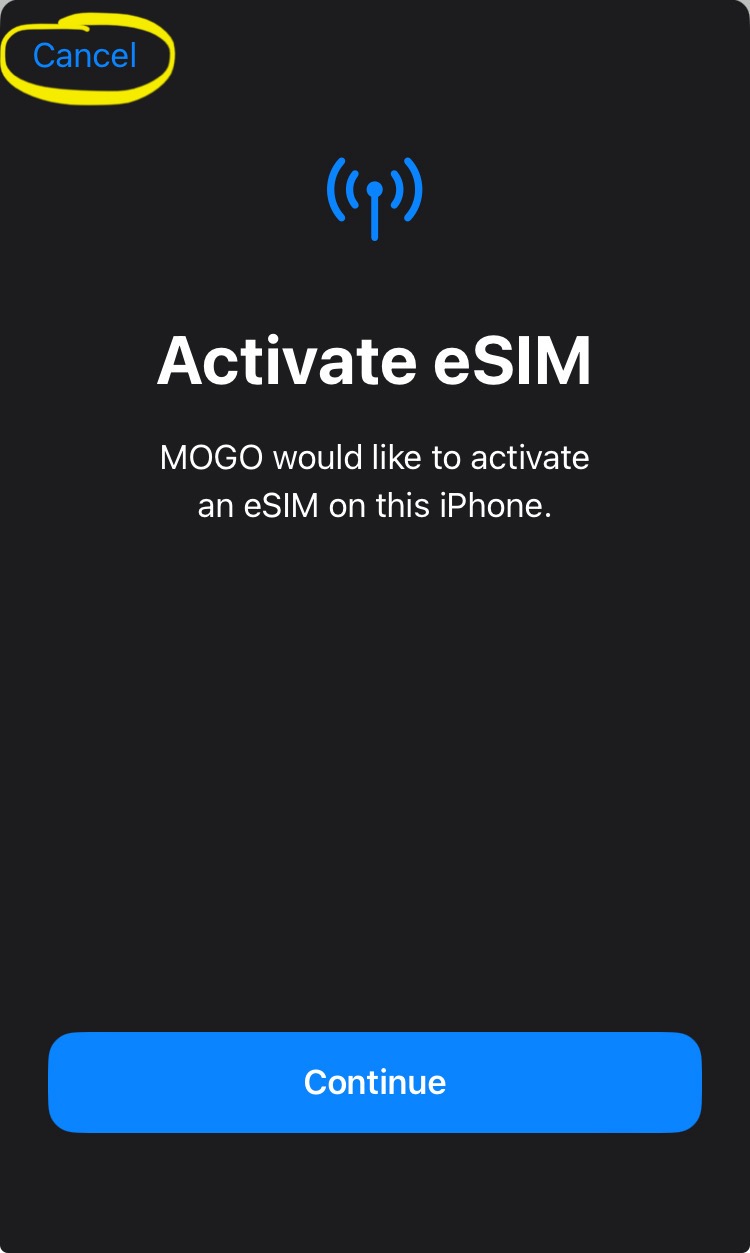
-
A page will come up with the text “Activate eSIM: MOGO would like to activate an eSIM on this phone.” Do not click “Continue.” Click “Cancel” at the top left of the screen.
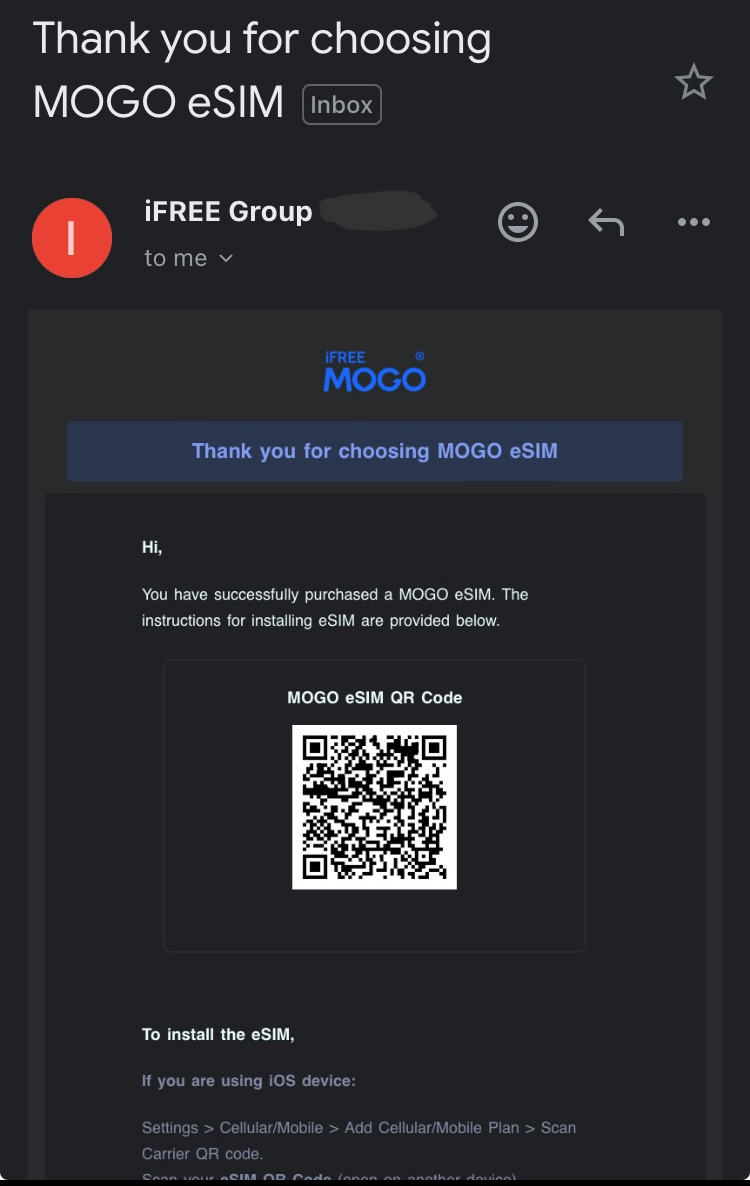
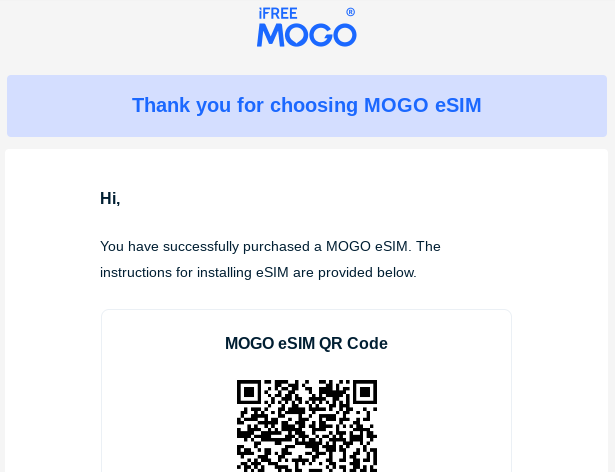
-
Close the app and wait to receive a confirmation email with the subject line “Thank you for choosing MOGO eSIM.” The QR code will be towards the top of the email. Screenshot the QR code.
-
Send the screenshot to gazaesims@gmail.com. Include the words “Mogo esim,” and the amount of data on the plan, in the subject line of your email (e.g. Mogo esim 5 GB).
-
If you will be sending several eSims from the same app, it is useful for later reference to include the eSim’s order number in the body of the email. The order number will be at the bottom of the confirmation email, under the section “Moreover, the order details are provided below”.
-
The order number can also be found on the app by going to “Profile” (the icon of a person at the bottom right of the screen) → “My Orders” (in the menu under “My Devices”) → click on the Sim and look next to “Order No.,” towards the bottom of the screen. The order number cannot be copied from here; if you have a current iOS you can take a screenshot and copy it from the image.
🖥️ Desktop #
-
Navigate to https://esim.ifreemogos.com/.
-
Click the button reading “Data plan” in the ribbon menu at the top of the screen.
-
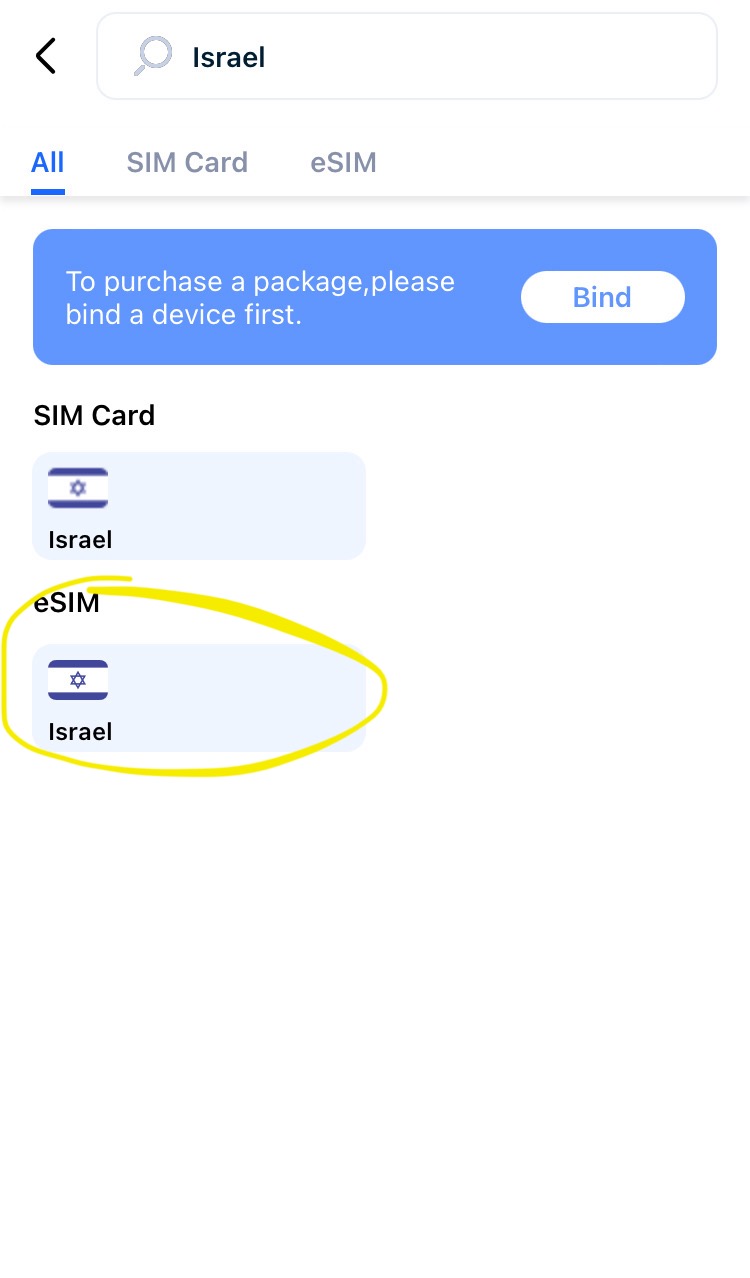
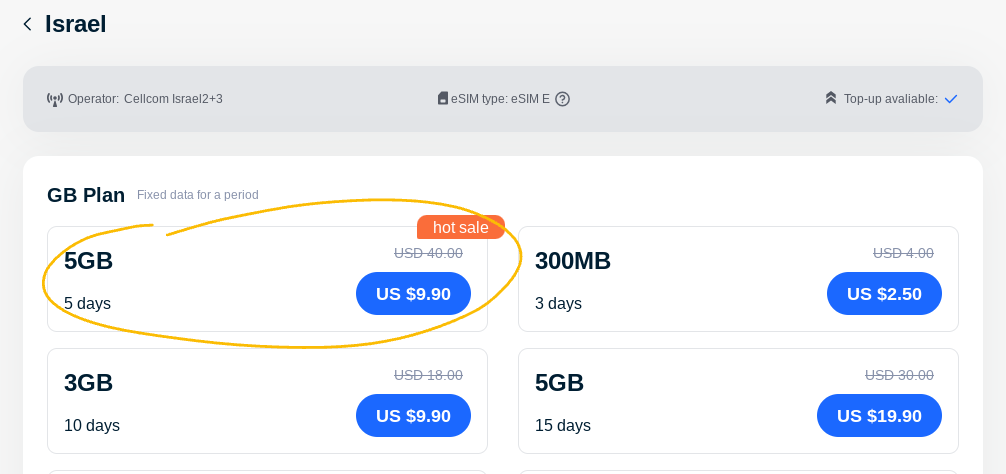
There is a search bar under the text reading “Where are you going?” Search for “Israel,” then click the rectangle that says “Israel” next to the Israeli flag.
-
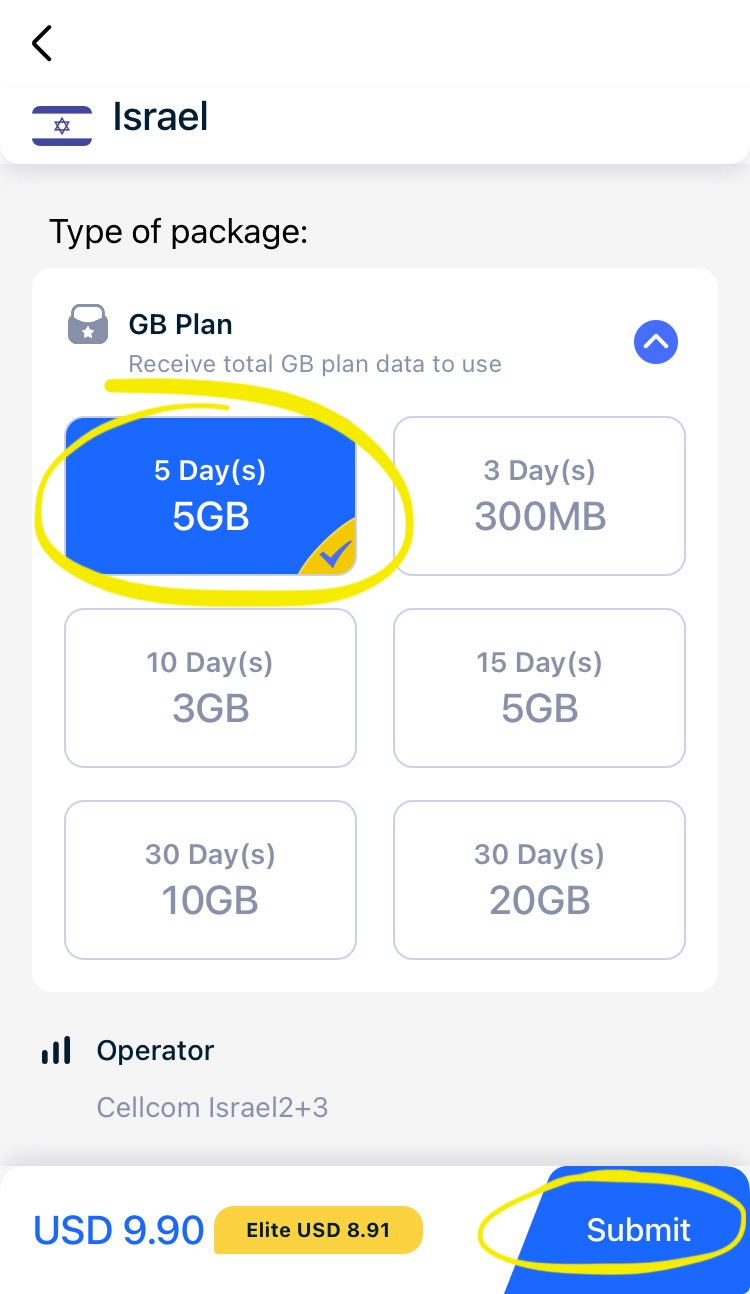
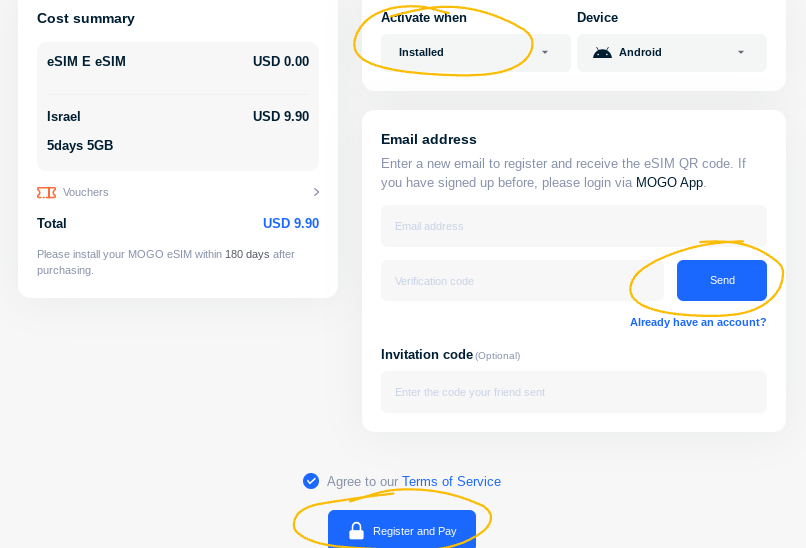
Select a plan. Make sure the dropdown menu to the right under “Activate when” reads “Installed,” not “Date.” Select a device (iPhone or Android).
-
Enter your email address and click the blue button that says “Send.” Type in the activation code that you receive in your email. (Note that if you already have an account, you will instead have to log in.)
-
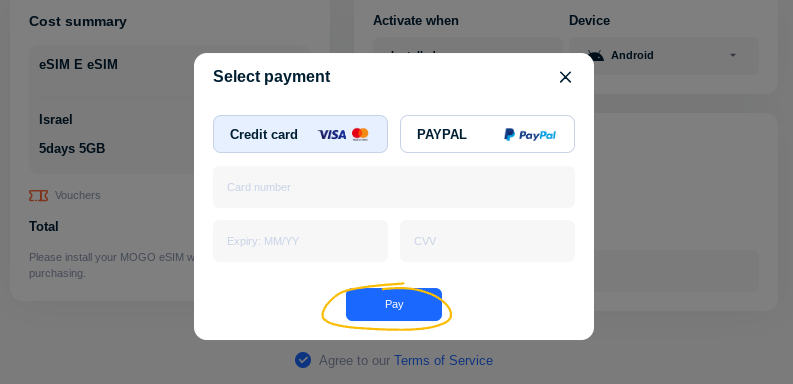
Scroll down and tick the checkbox to “Agree to our Terms of Service.” Click the blue button that says “Register and Pay.”
-
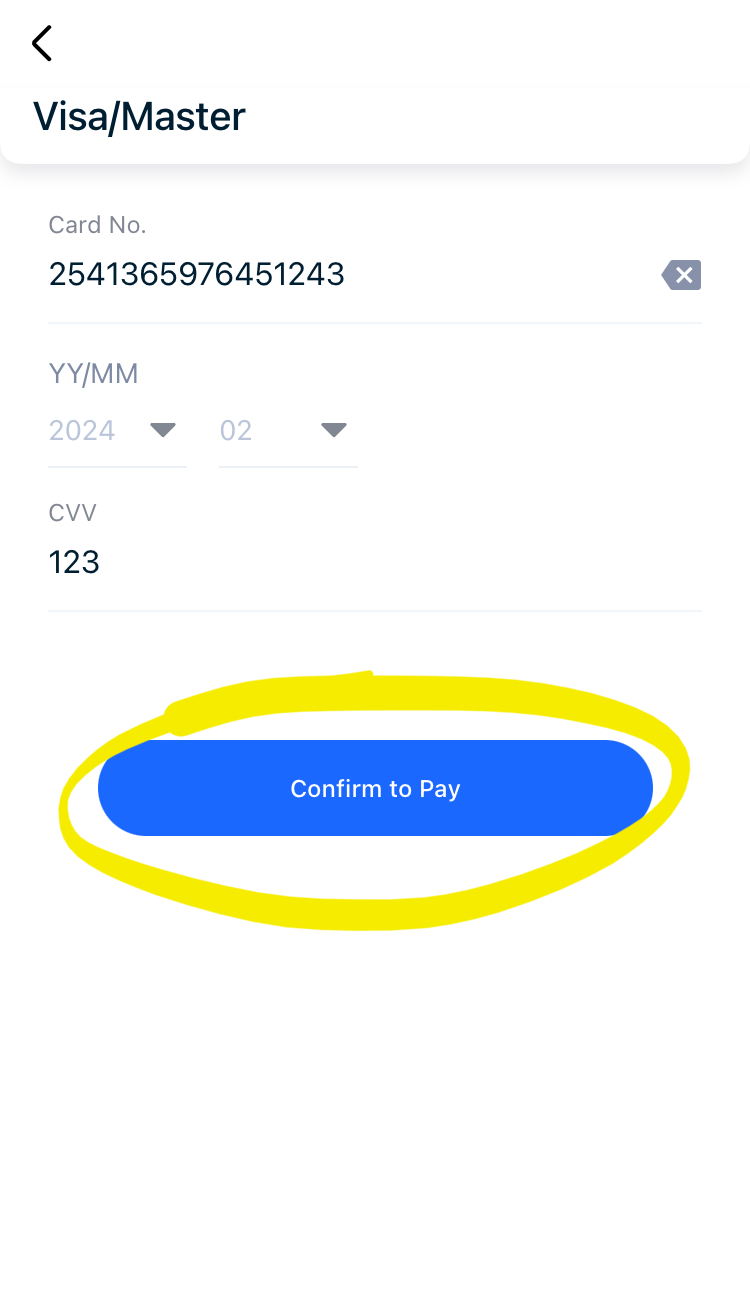
In the pop-up, select a payment method, enter your payment information, and click the blue button at the bottom that says “Pay.”
-
Wait to receive a confirmation email with the subject line “Thank you for choosing MOGO eSIM.” The QR code will be towards the top of the email. Screenshot the QR code.
-
Send the screenshot to gazaesims@gmail.com. Include the words “Mogo esim,” and the amount of data on the plan, in the subject line of your email (e.g. Mogo esim 5 GB).
-
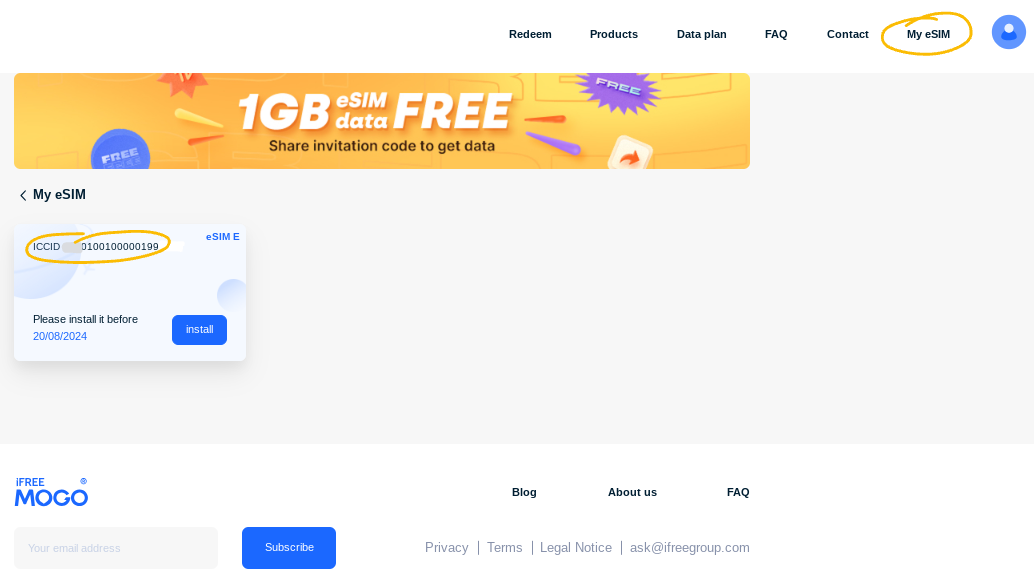
If you will be sending several eSims from the same app, it is useful for later reference to include the eSim’s ICCID in the body of the email. To find the ICCID, log in, then click “My eSIM” at the top right; the ICCID will be at the top left of the eSIM details.


🟣 Numero #
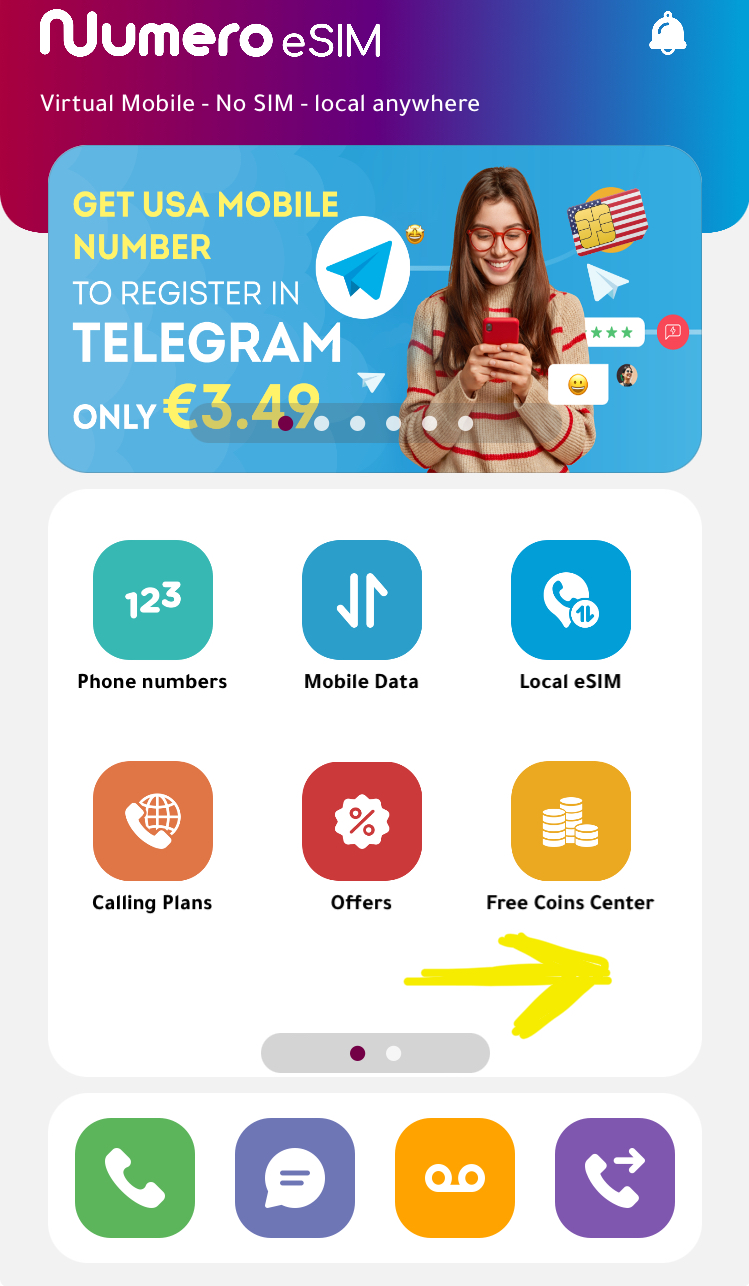
📱 App #
-
Download “Numero eSIM: Virtual Number” from the App Store.
-
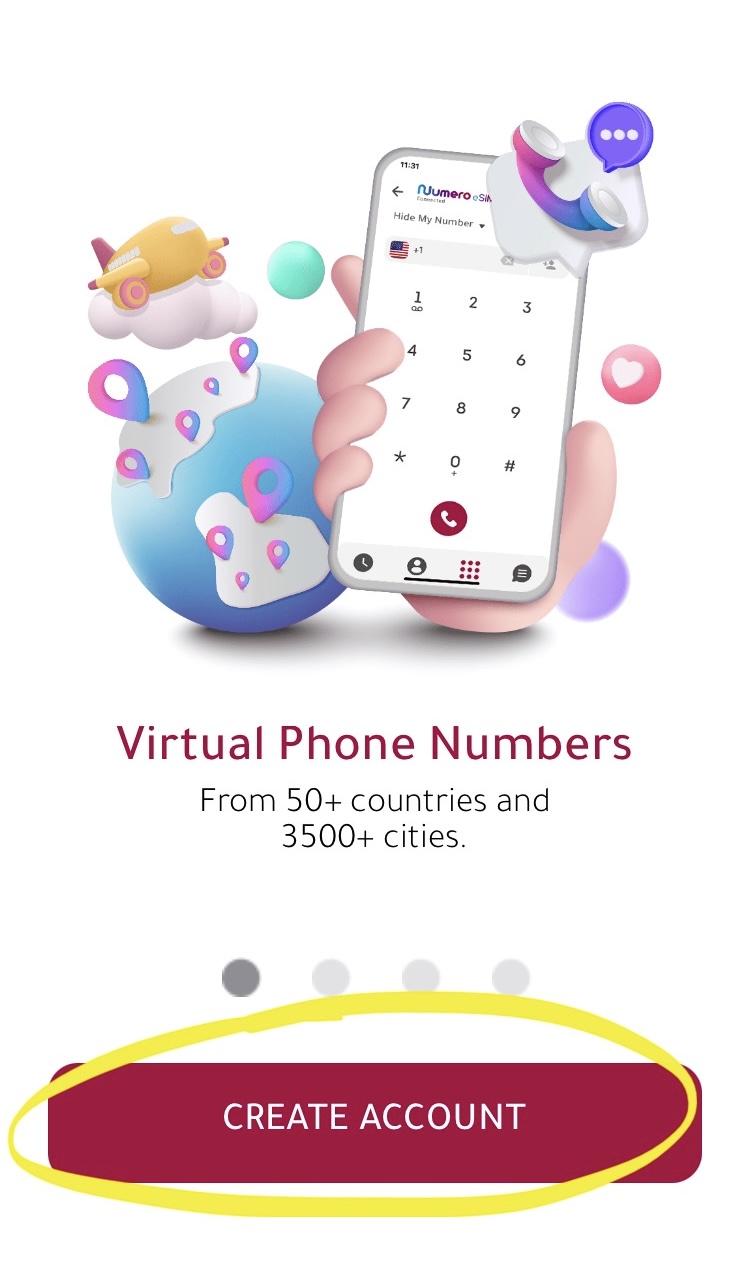
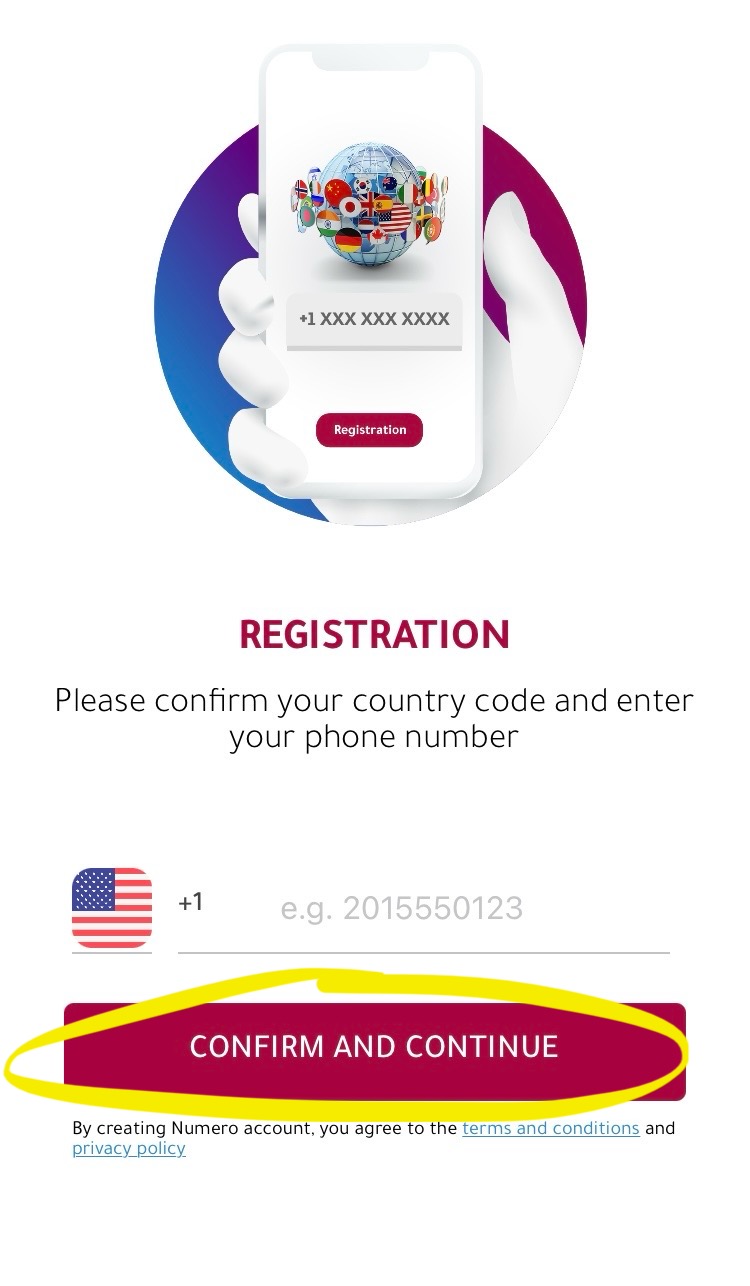
Open the app. Click the red button at the bottom that says “Create Account.” On the “Registration” page, enter your phone number and click “Confirm and Continue.”
-
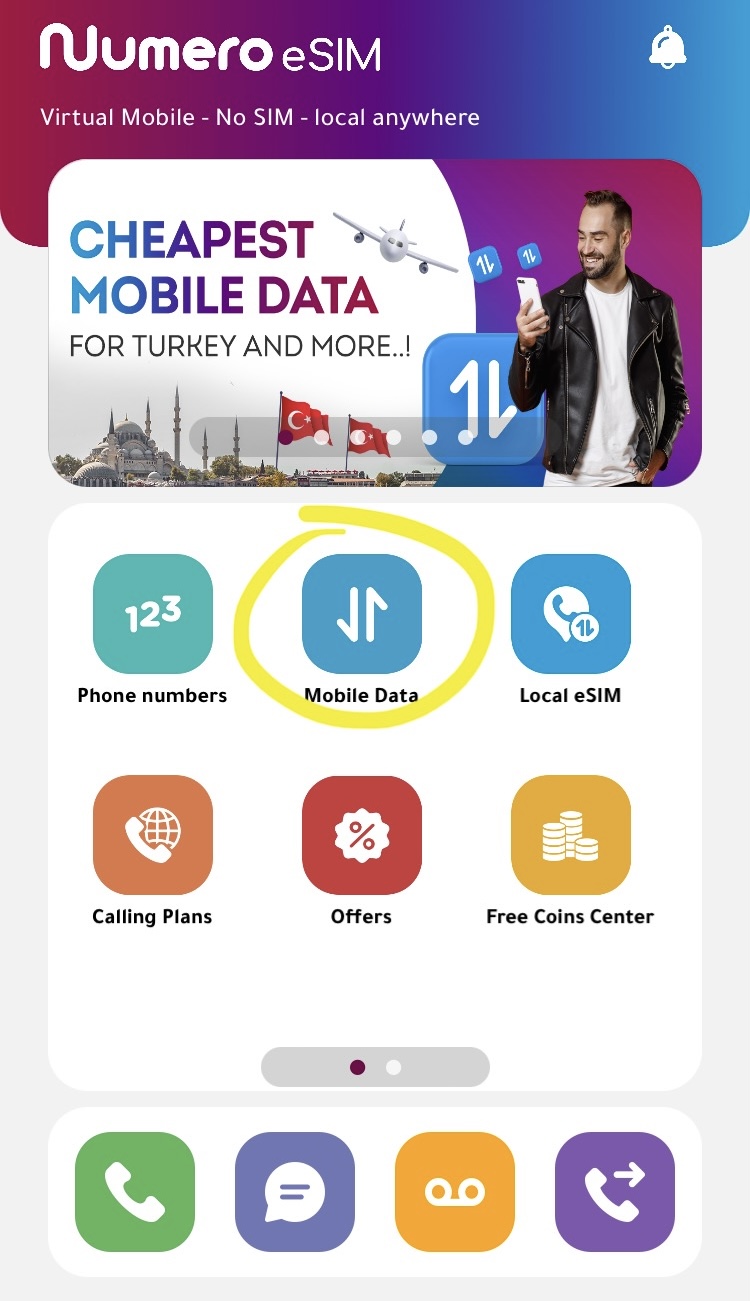
You will be taken to the app’s home page. Click the blue button at the top middle that says “Mobile Data.”
-
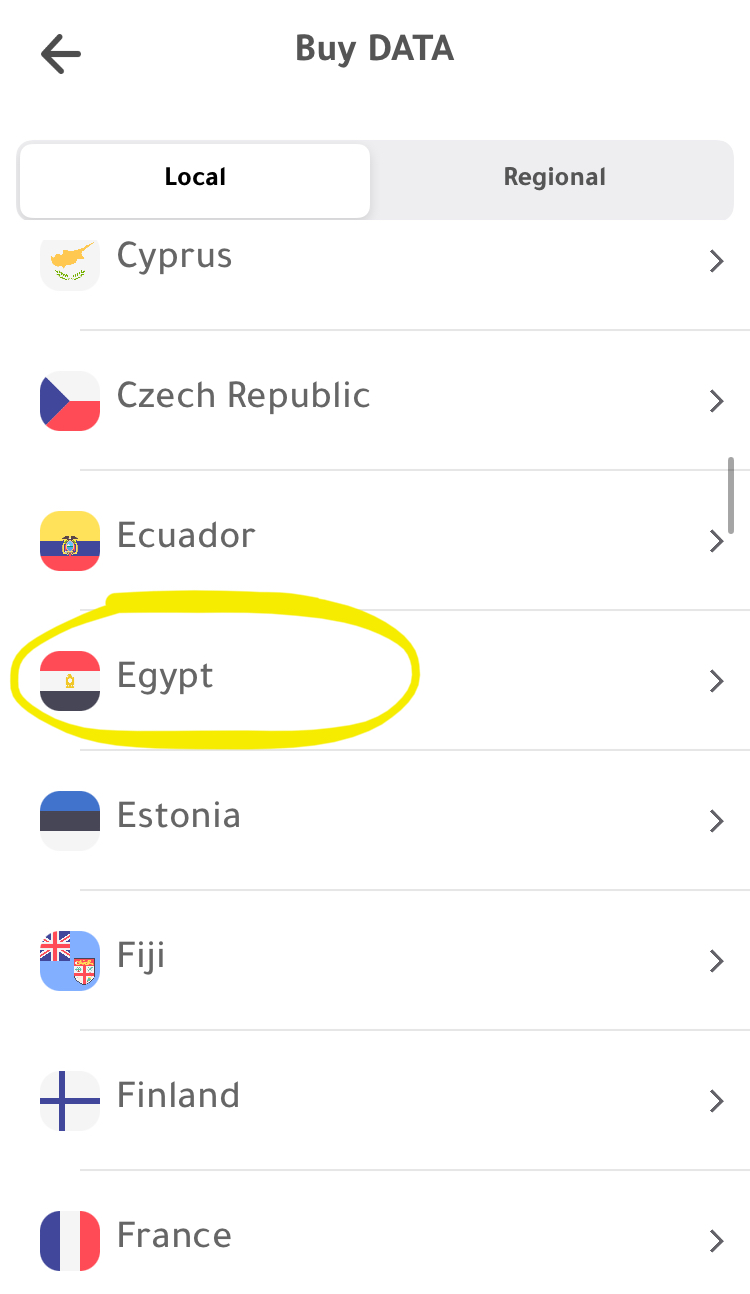
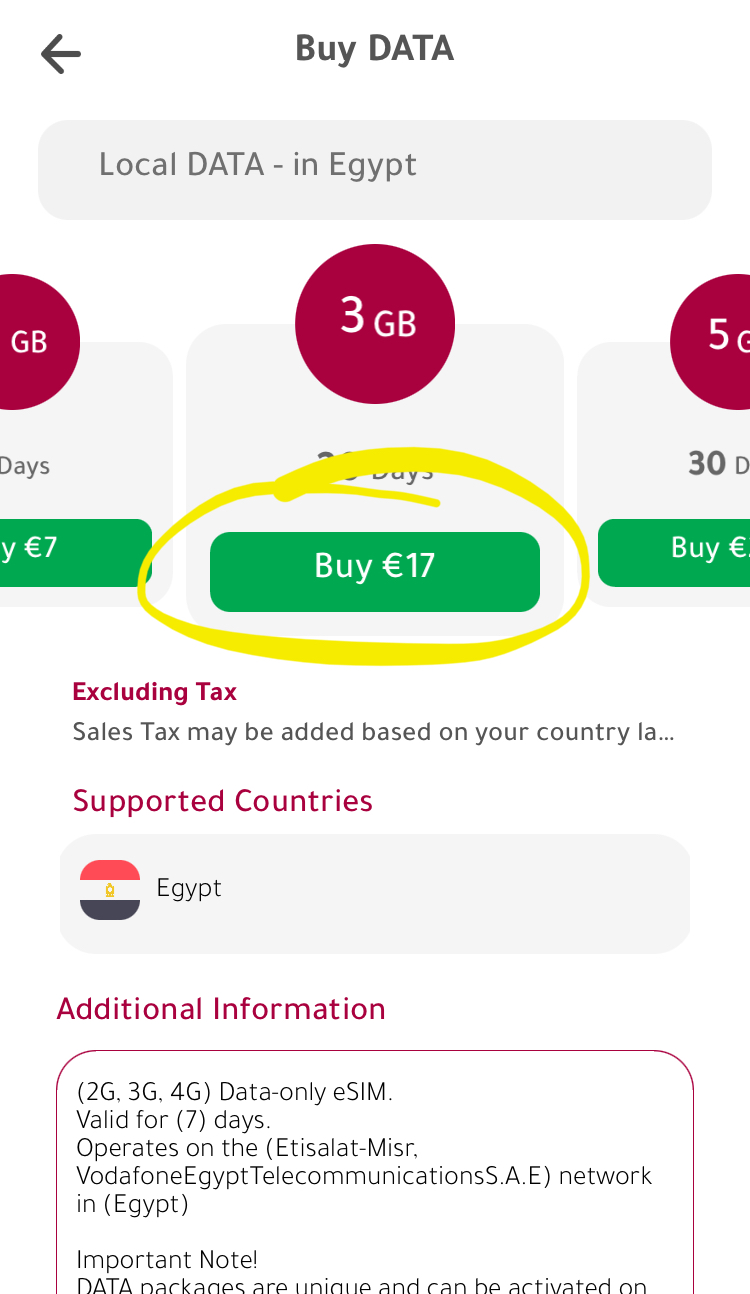
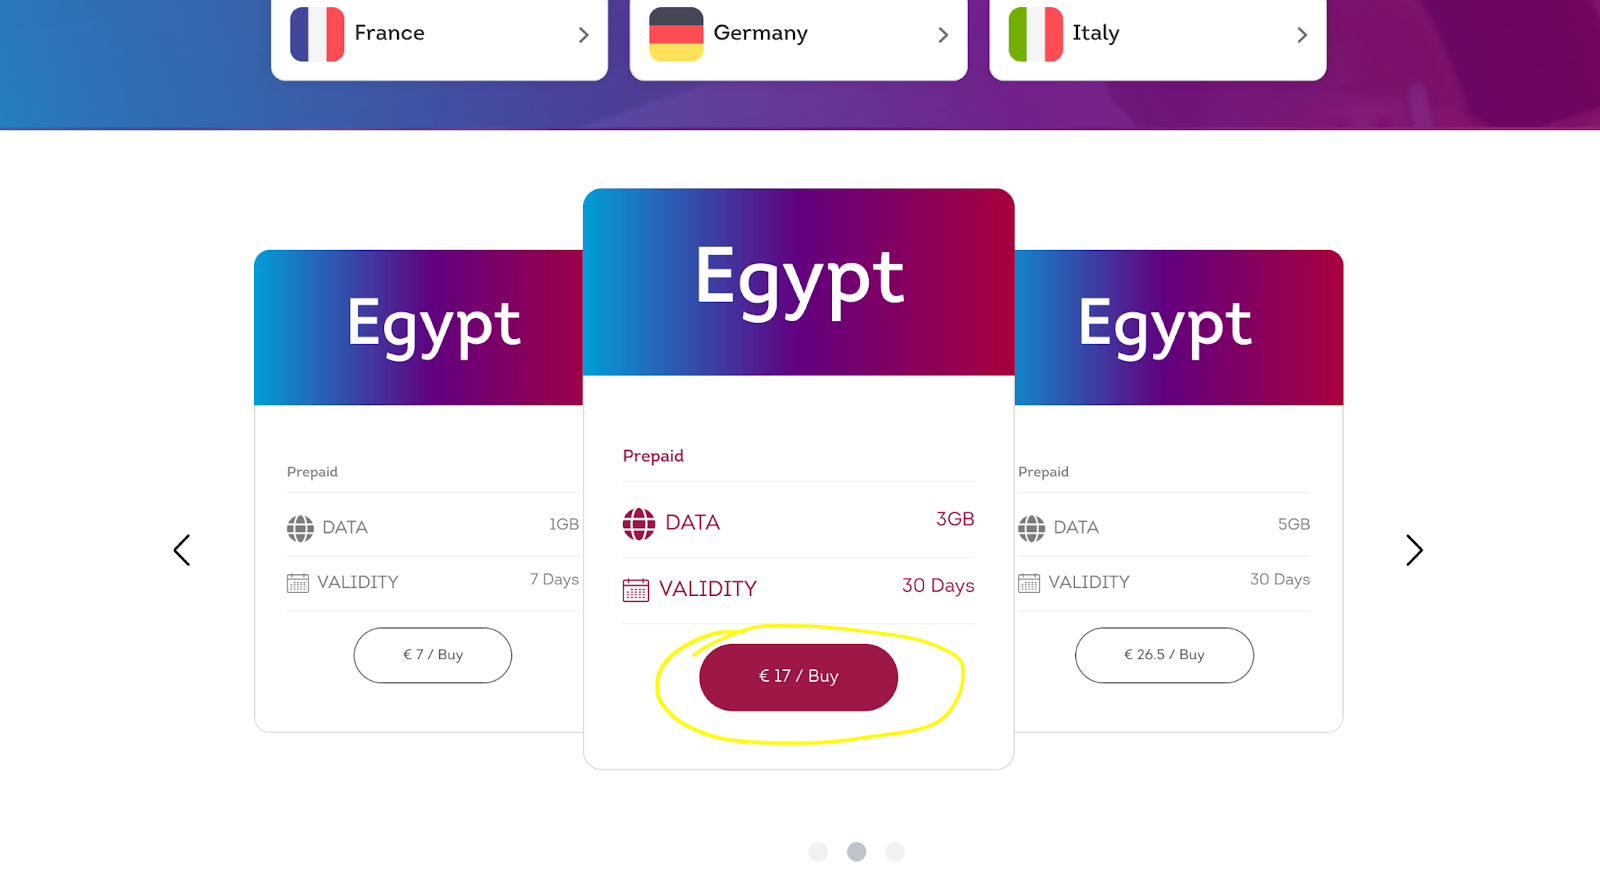
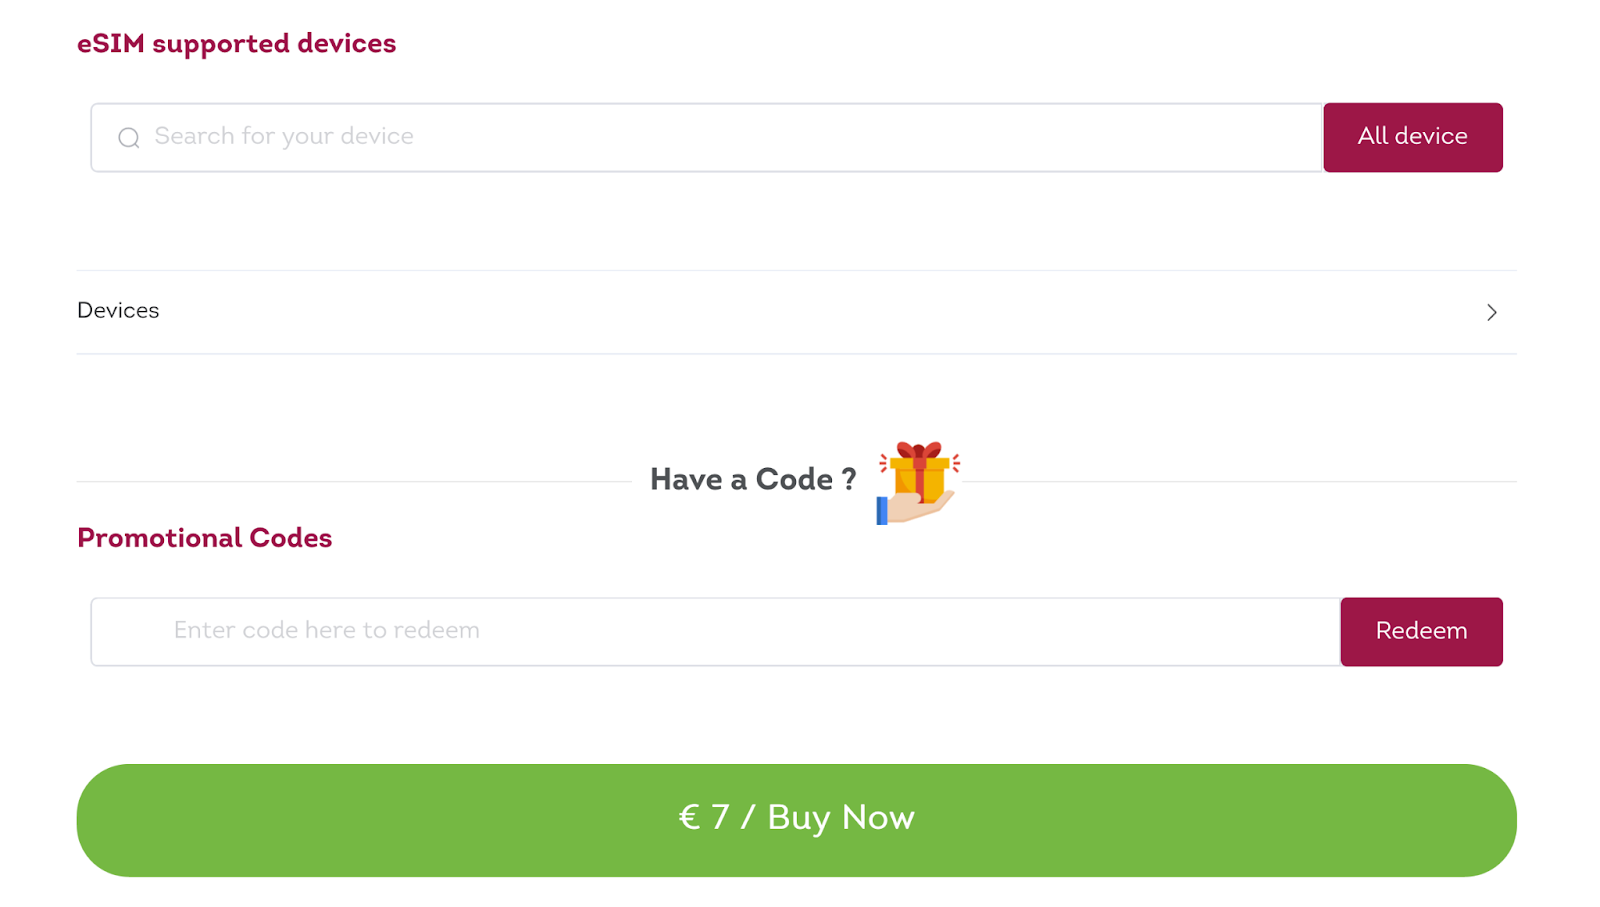
Stay on the “Local” tab. Scroll down to “Egypt,” or type it in the search bar.
-
Choose a data plan and click the green button that says “Buy.”
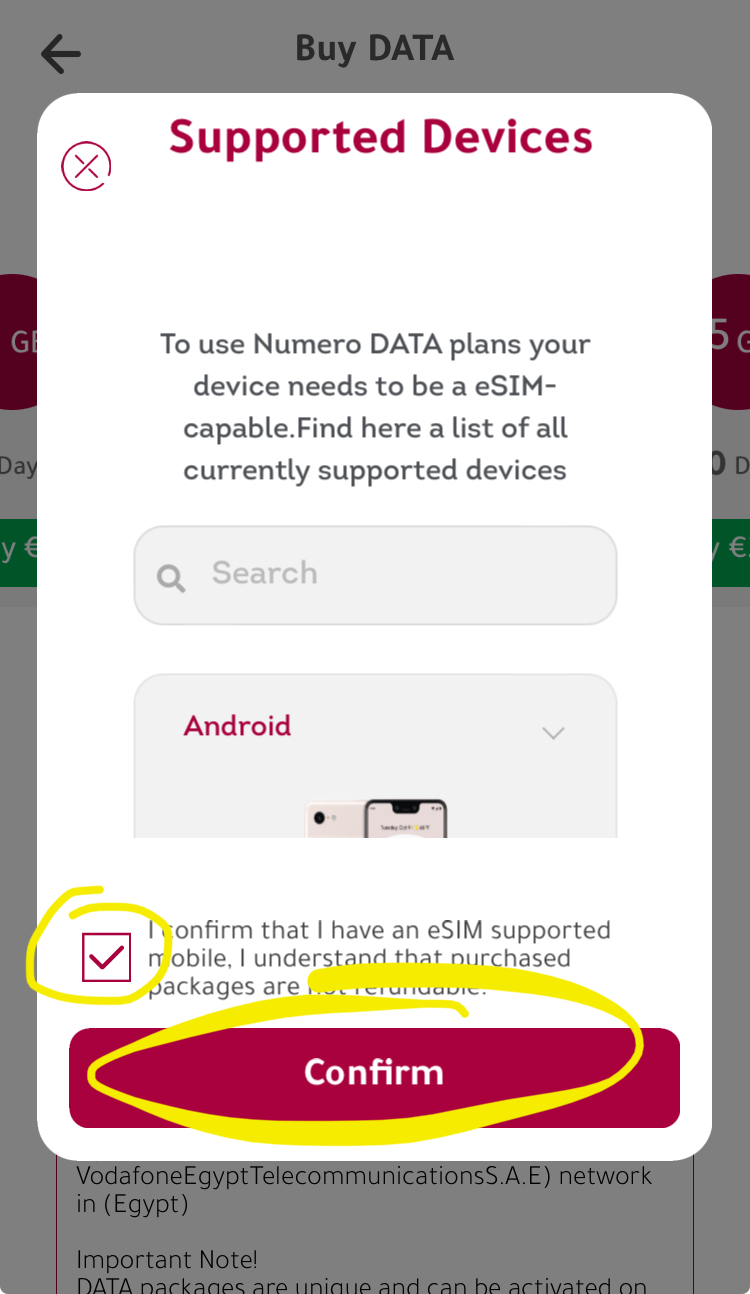
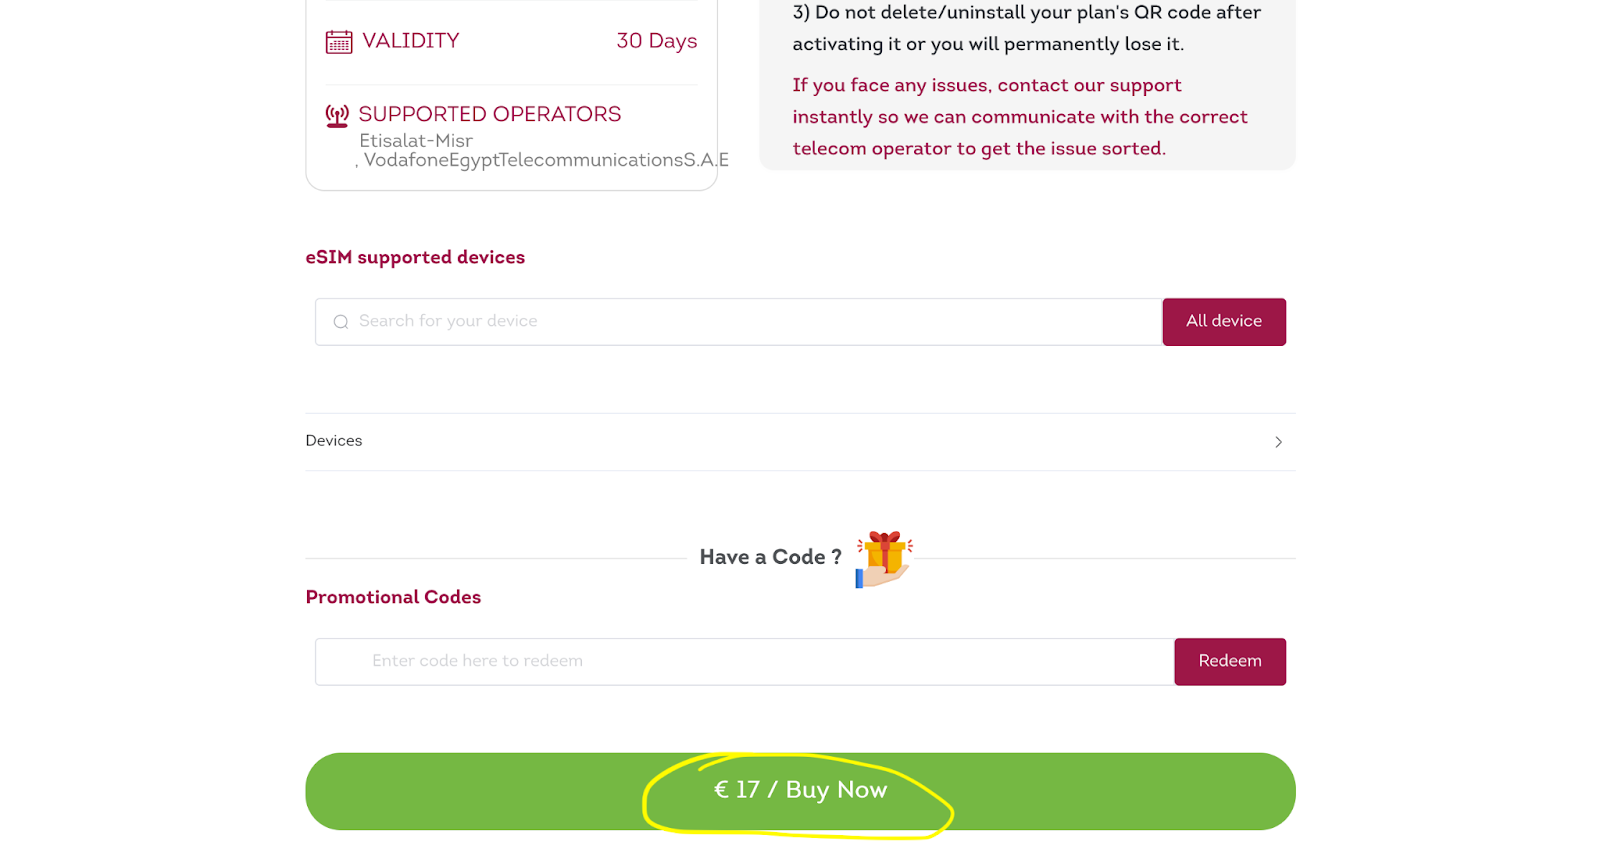
-
A pop-up reading “Supported Devices” will come up. Tick the checkbox next to “I confirm that I have an eSIM supported mobile…” and then click “Confirm.”
-
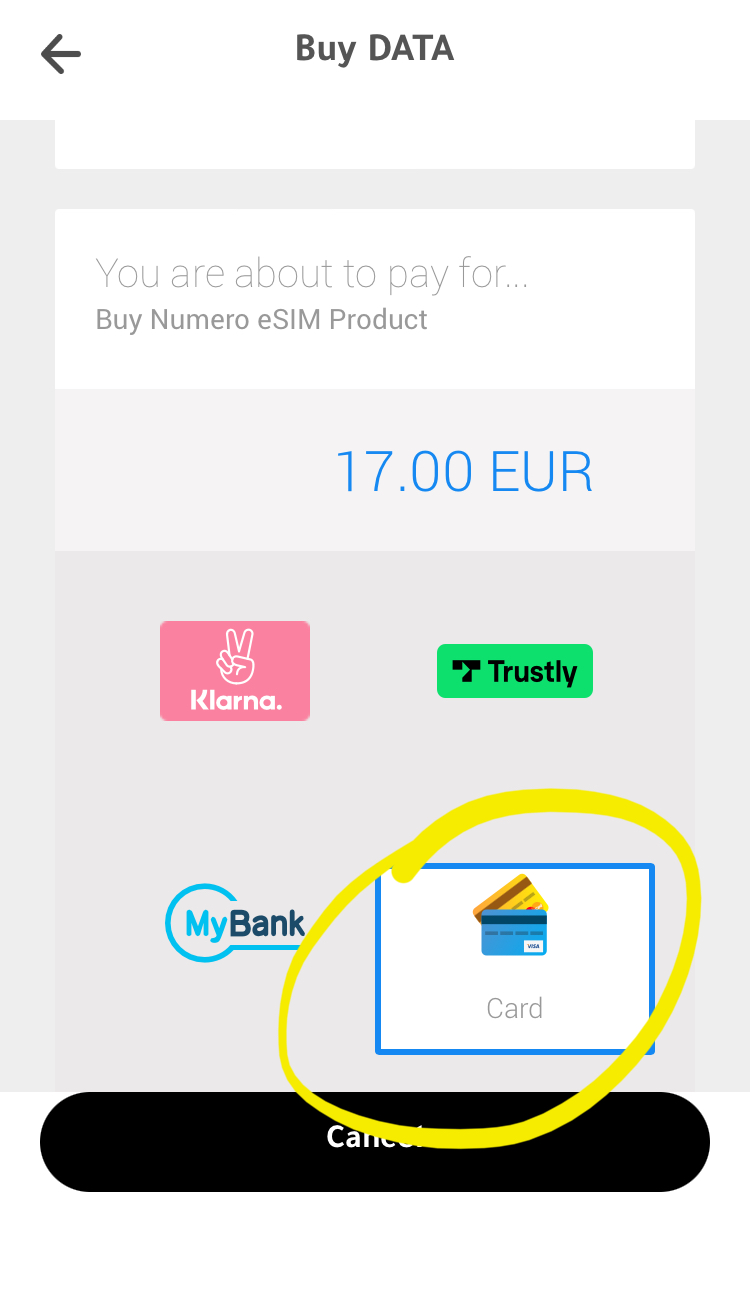
Select a payment method and click the green button at the bottom that says “Buy.”
-
If you chose to pay by card, another page will come up asking to you choose a banking method. Choose a method and enter the required information (I chose “card” and entered credit card information).
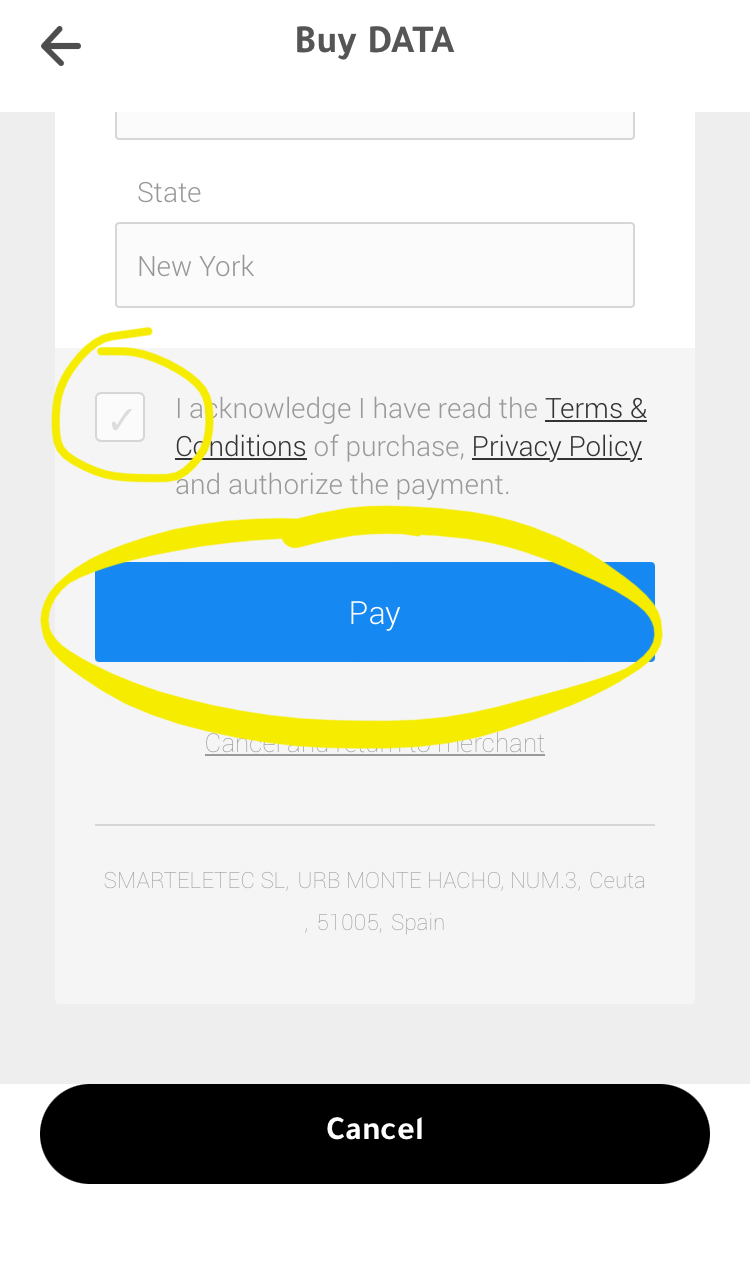
-
Scroll down and tick the checkbox next to “I acknowledge I have read the Terms & Conditions…” and then click the blue button that says “Pay.”
-
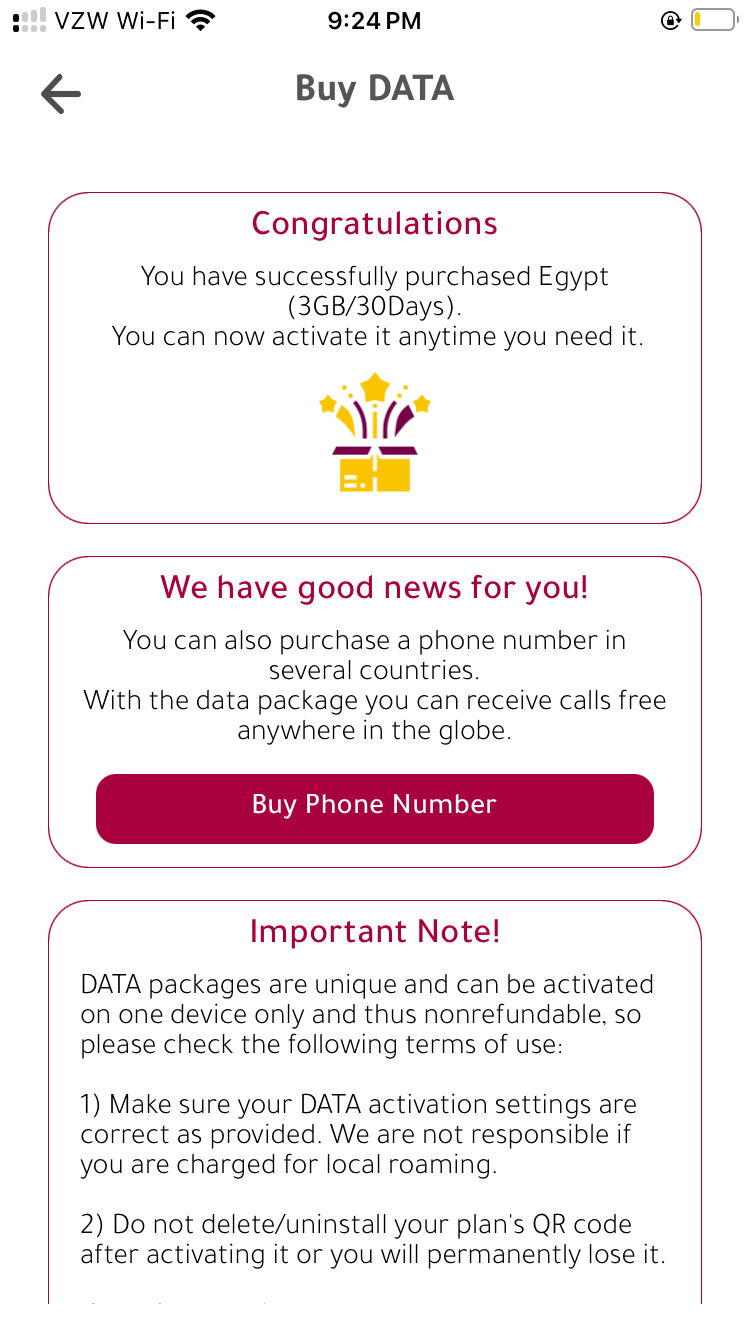
You will be taken to a page that says “Congratulations: You have successfully purchased Egypt (#GB/#Days).” Scroll down under where it says “Important Note!” and click the red button at the bottom that reads “Okay, got it.” You will be taken to a page showing your purchased eSims.
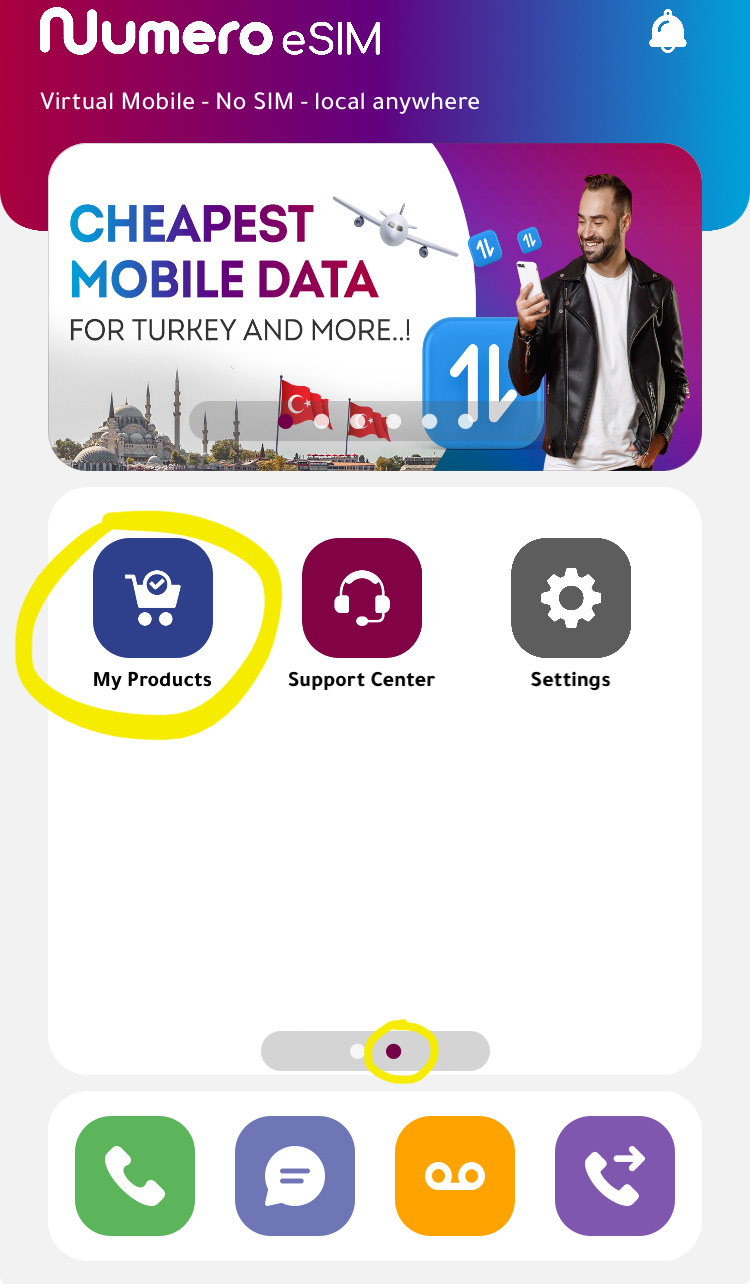
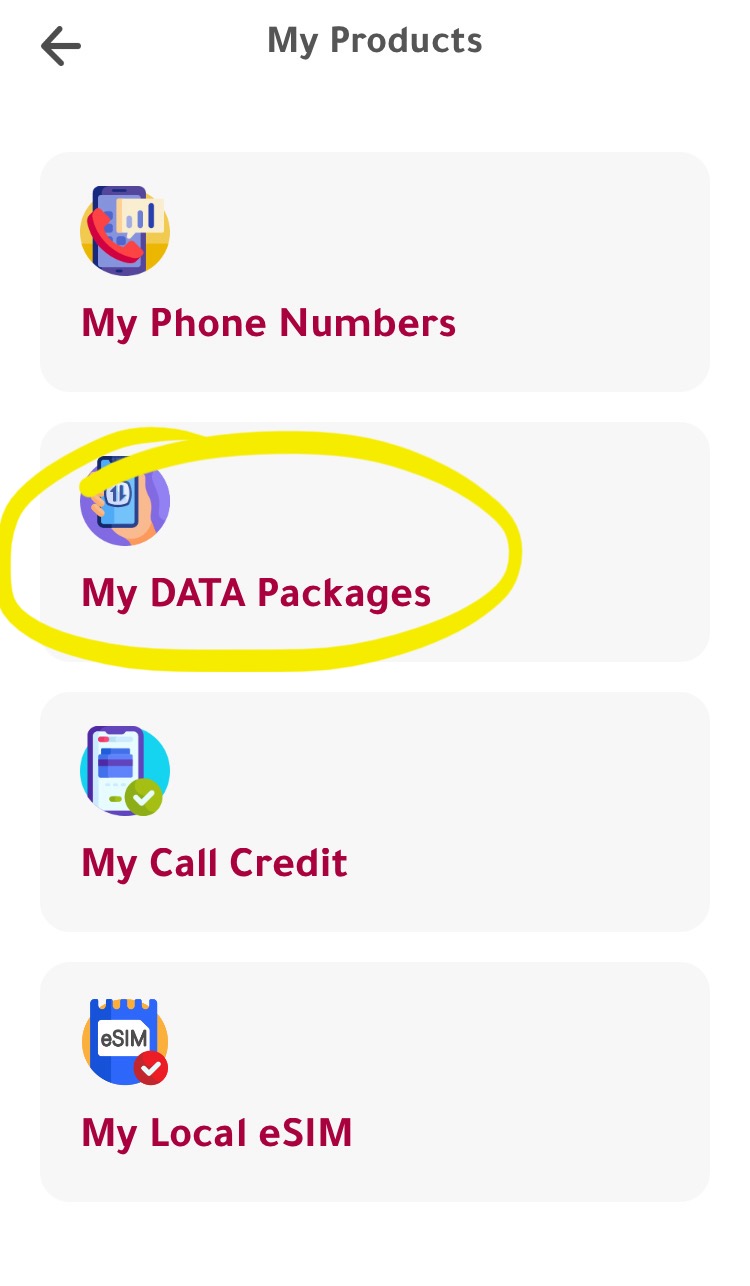
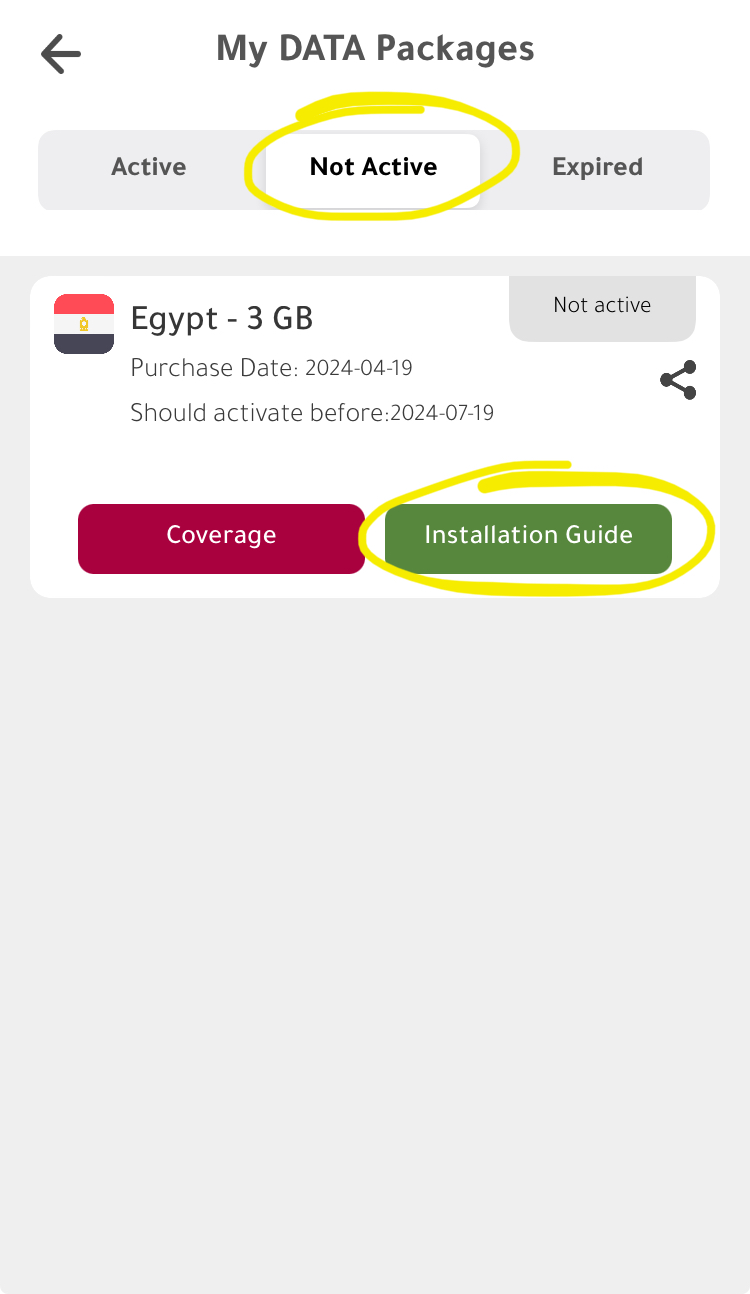
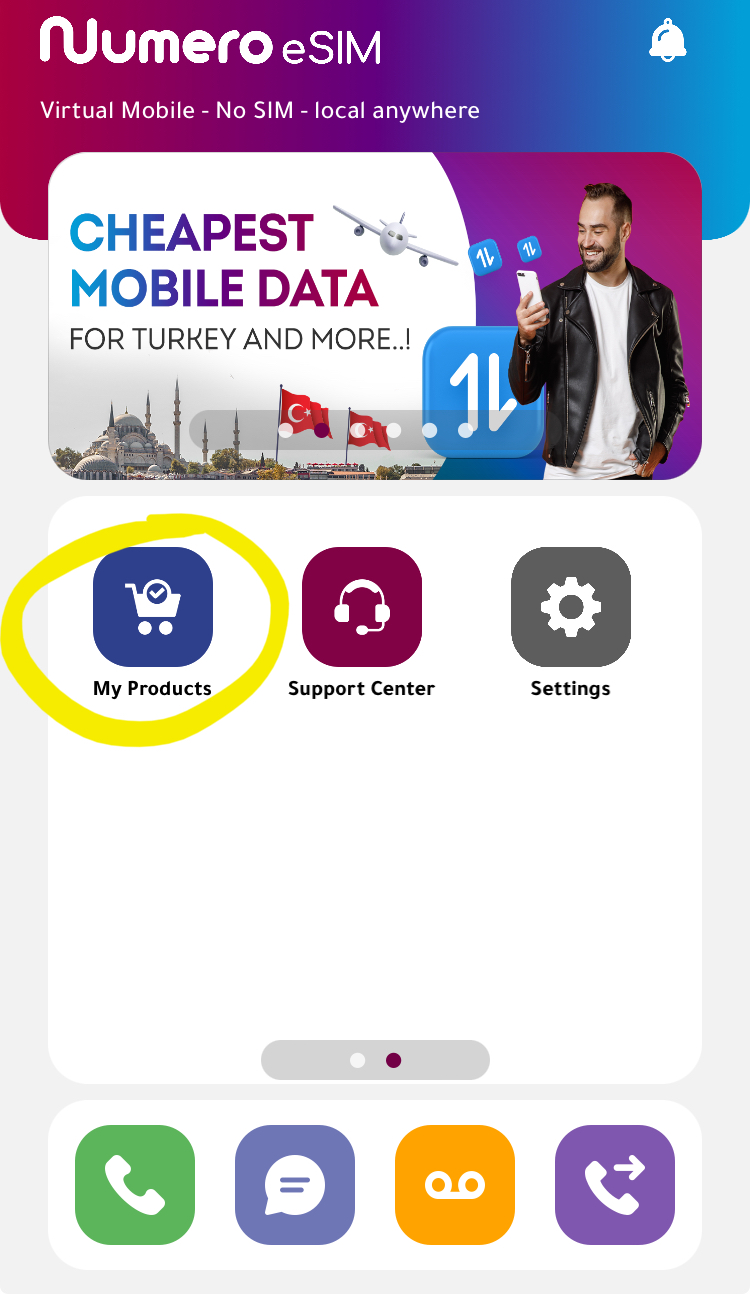
-
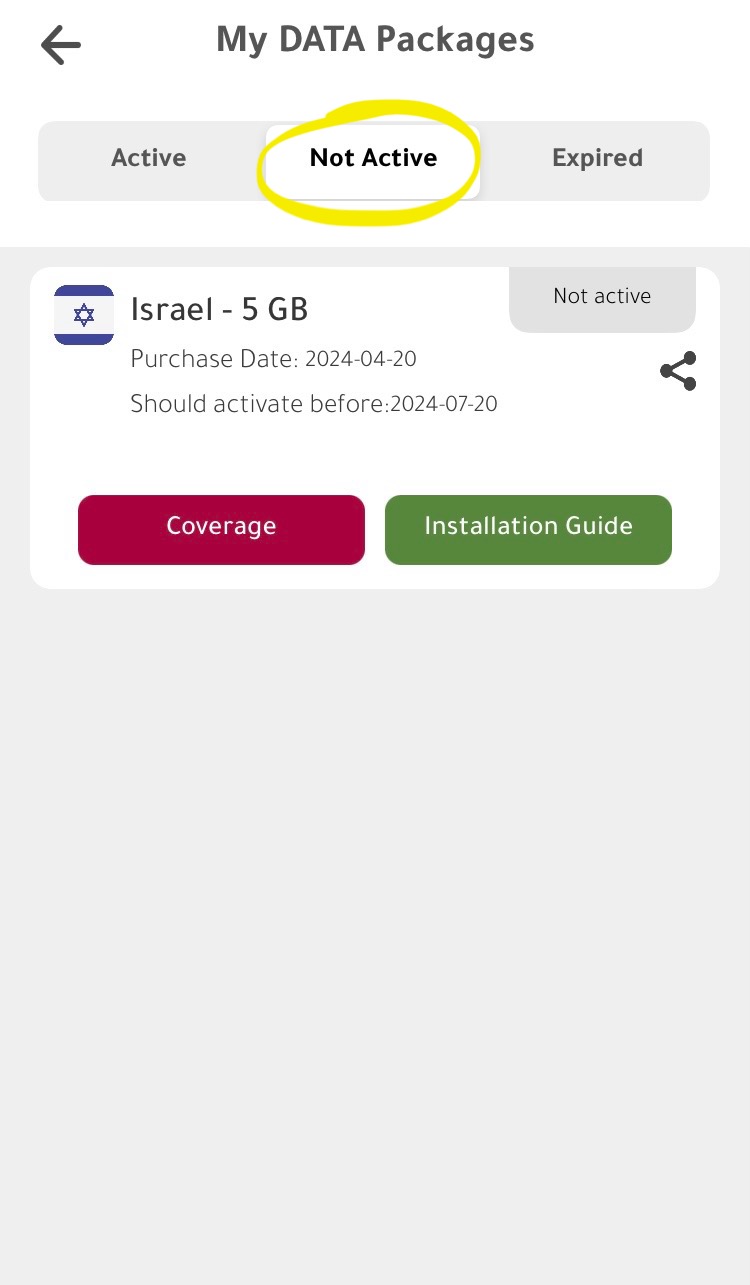
If you have navigated away from this page, you can get back here by opening the app; swiping to the right to access more icons; and clicking the dark blue button with an icon of a shopping cart that says “My Products” at the top left. Then select “My DATA Packages.” Swipe over to the “Not Active” tab to see the eSim you have just purchased.
-
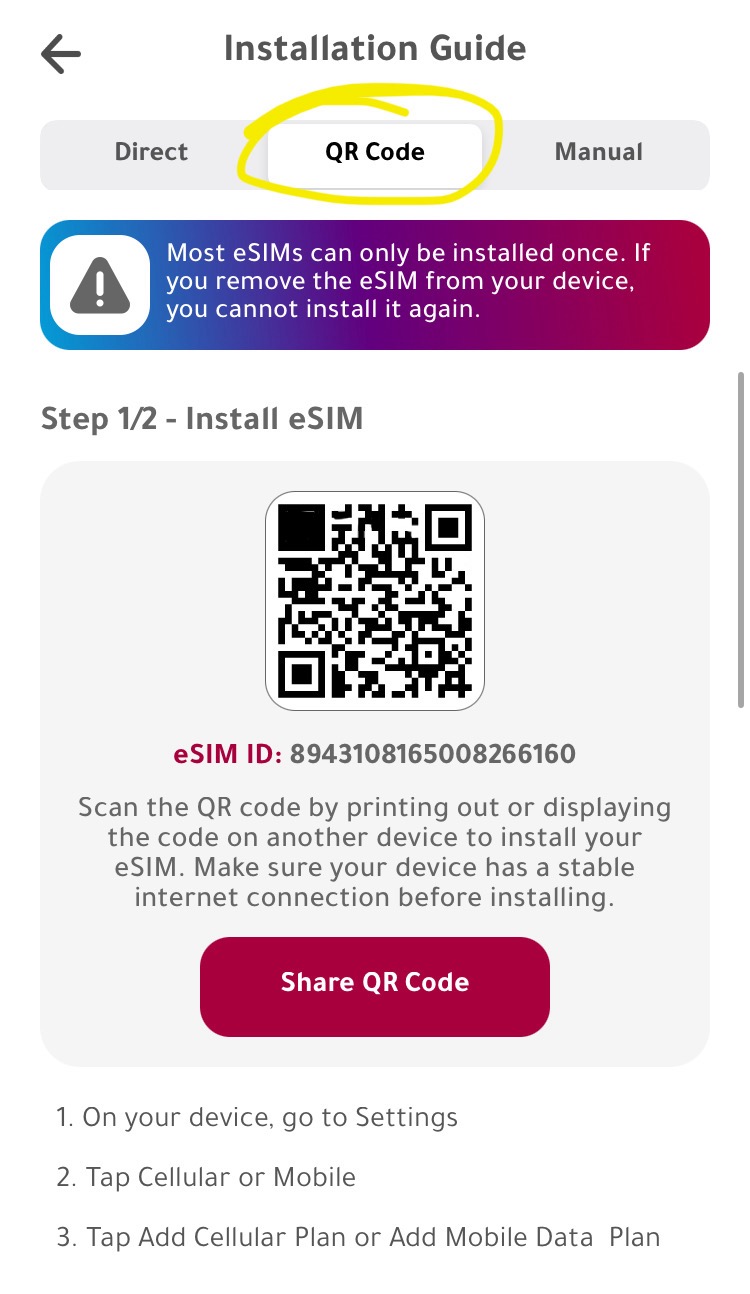
To get the QR code: Click the green button at the bottom right of the plan information that says “Installation Guide.” At the top will be three tabs: “Direct,” “QR Code,” and “Manual.” Tab over the “QR Code” page and screenshot the QR code.
-
To upload the QR code: Navigate to https://www.gaza.online/upload. Under “eSIM Provider,” click the gray button with a plus mark that says “Add.” Scroll down to select “Numero_[#]GB_[#]Days_Egypt,” depending on the size of the plan you purchased. Attach the file for the QR code and enter your email. Click “Submit” at the bottom of the page.
🖥️ Desktop #
-
Navigate to https://esimdata.numeroesim.com/data-packages/packages#13.
-
Select a data package and click the red button at the bottom that says “Buy.”
-
Scroll down past the information about device compatibility and click the green button that says “Buy Now.”
-
If you are not signed in, you will be prompted to log in or sign up for an account. Enter the required information to sign up, and the code that will be sent to your email. Click “Buy Now” again.
-
Enter your payment information, then click the blue button at the bottom right that says “Pay.” You will be taken to a page titled “My eSIMs”
-
If you have navigated away from the “My eSIMs” page, you can get there again by clicking the button at the right right reading “Hi, [your name]” and then “My eSIM” in the drop-down menu that appears; or navigating to https://esimdata.numeroesim.com/data-packages/my-esims.
-
To get the QR code: The eSim you just purchased will appear here: click the green button below it that says “Details.”
-
You will be on an “eSIM Details” page. Under the menu at the right where it says “eSIM Installation,” select “Android Device” or “iOS Device” (it doesn’t matter which). Screenshot the QR code from the page that comes up.
-
To upload the QR code: Navigate to https://www.gaza.online/upload. Under “eSIM Provider,” click the gray button with a plus mark that says “Add.” Scroll down to select “Numero_[#]GB_[#]Days_Egypt,” depending on the size of the plan you purchased. Attach the file for the QR code and enter your email. Click “Submit” at the bottom of the page.

🔵 Sparks #
📱 App #
-
Download “Sparks eSIM” from the App Store.
-
Open the app. You should be on the “Store” page. If you are not, click the button on the bottom left that says “Store” with an icon of a storefront awning.
-
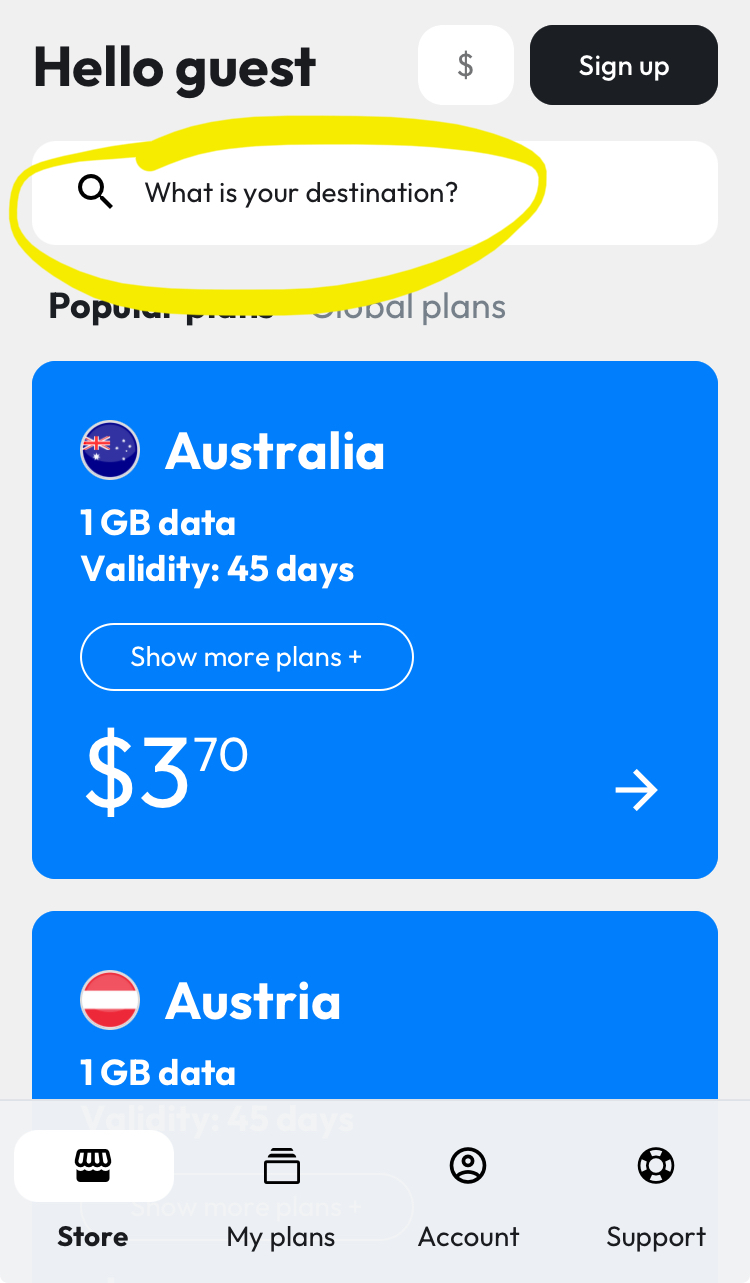
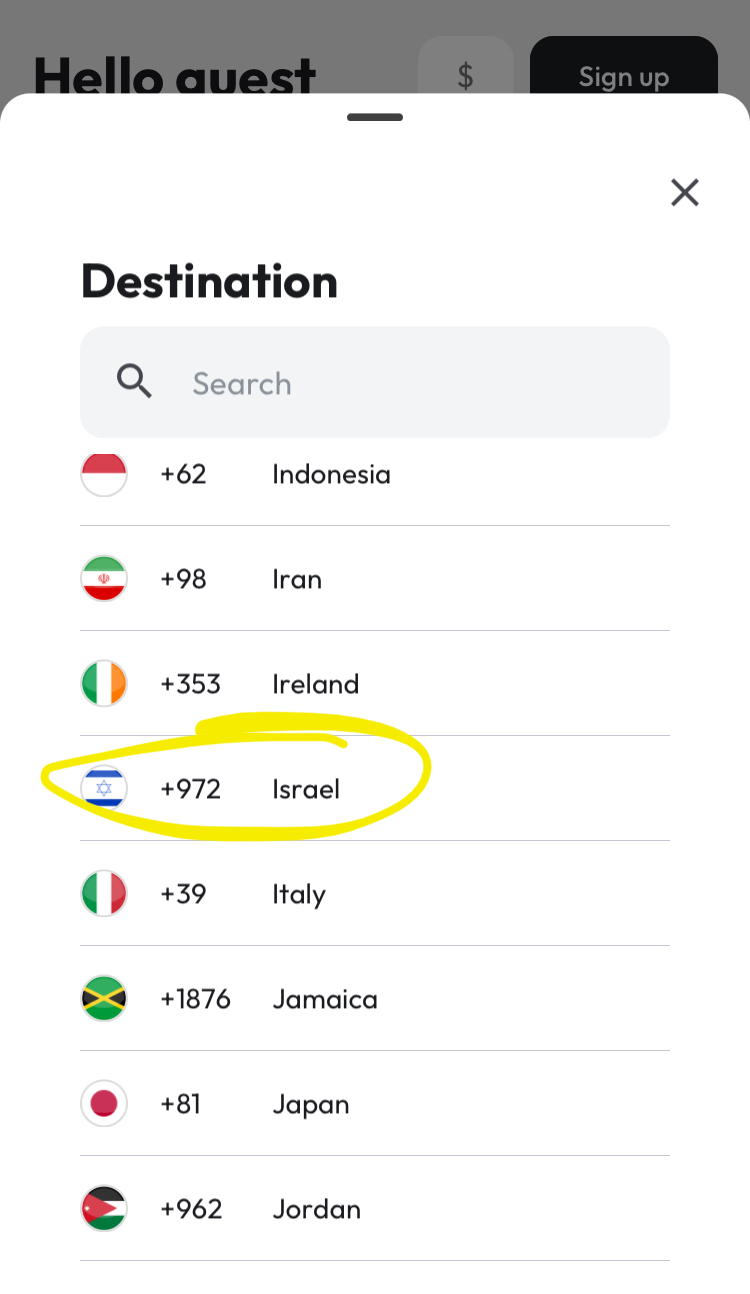
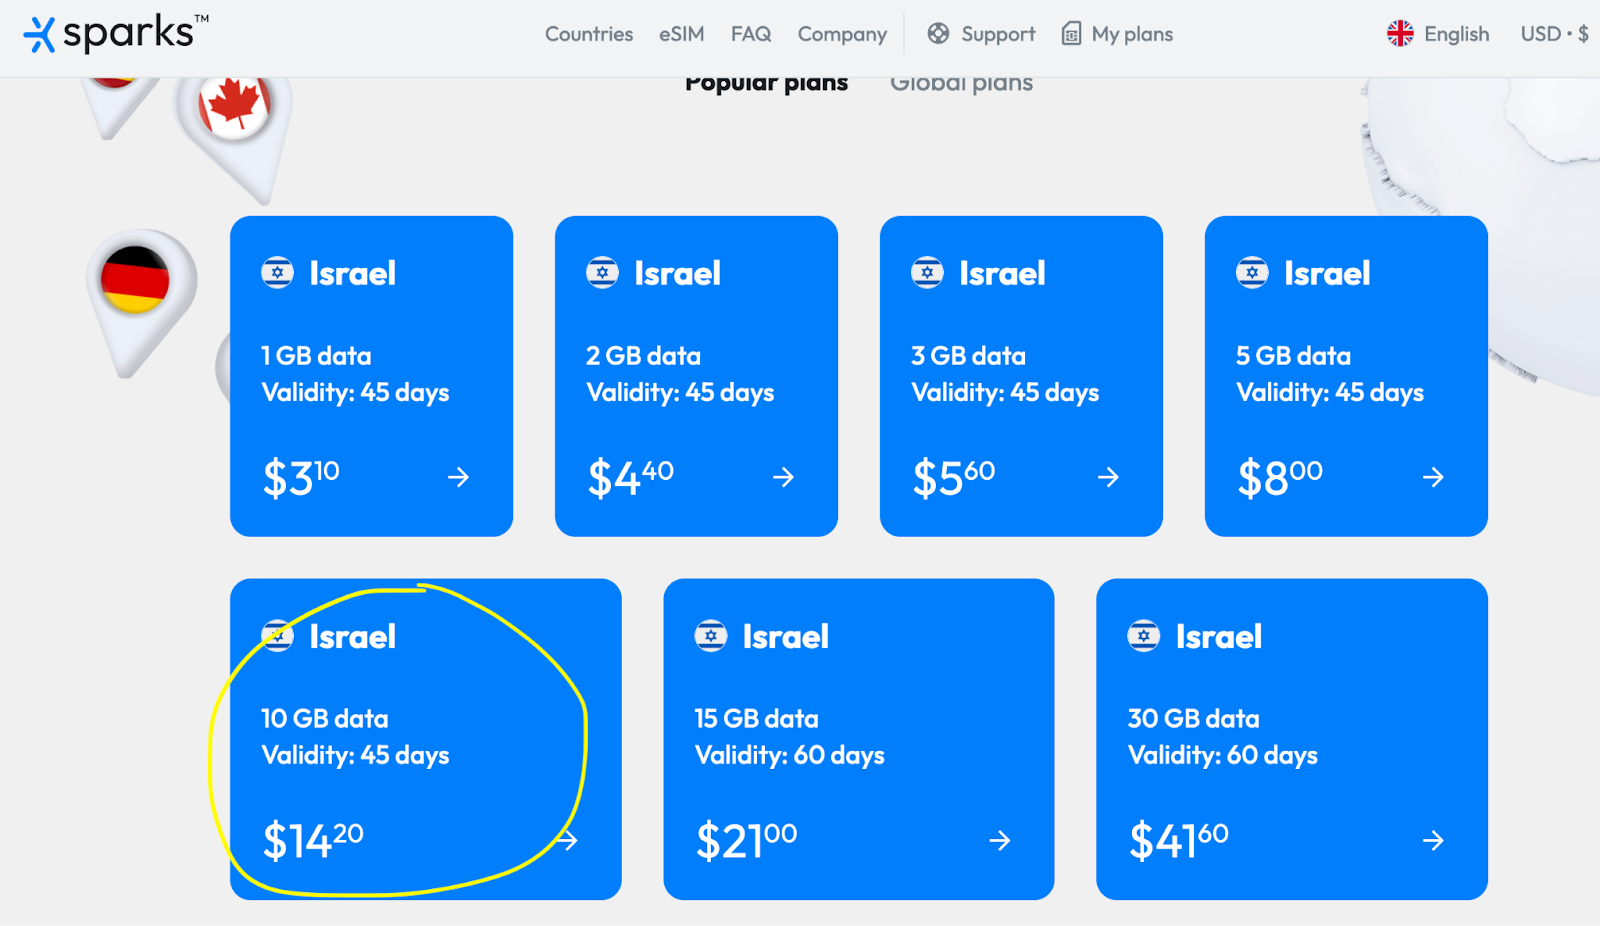
At the top is a search bar reading “What is your destination?” Click on it to open a page headed “Destination”; scroll down to “Israel.”
-
Select a plan. If you are not signed in, you will be prompted to log in (the blue button at the bottom) or sign up (the black button at the top right).
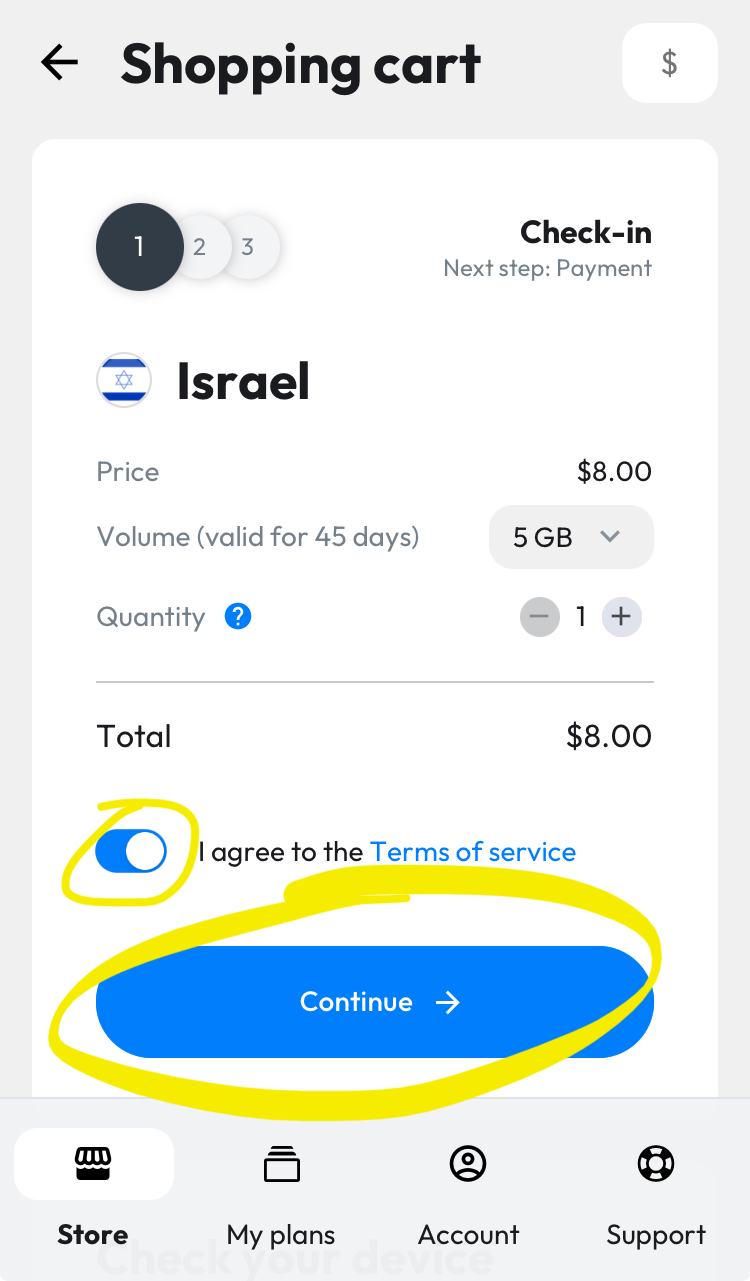
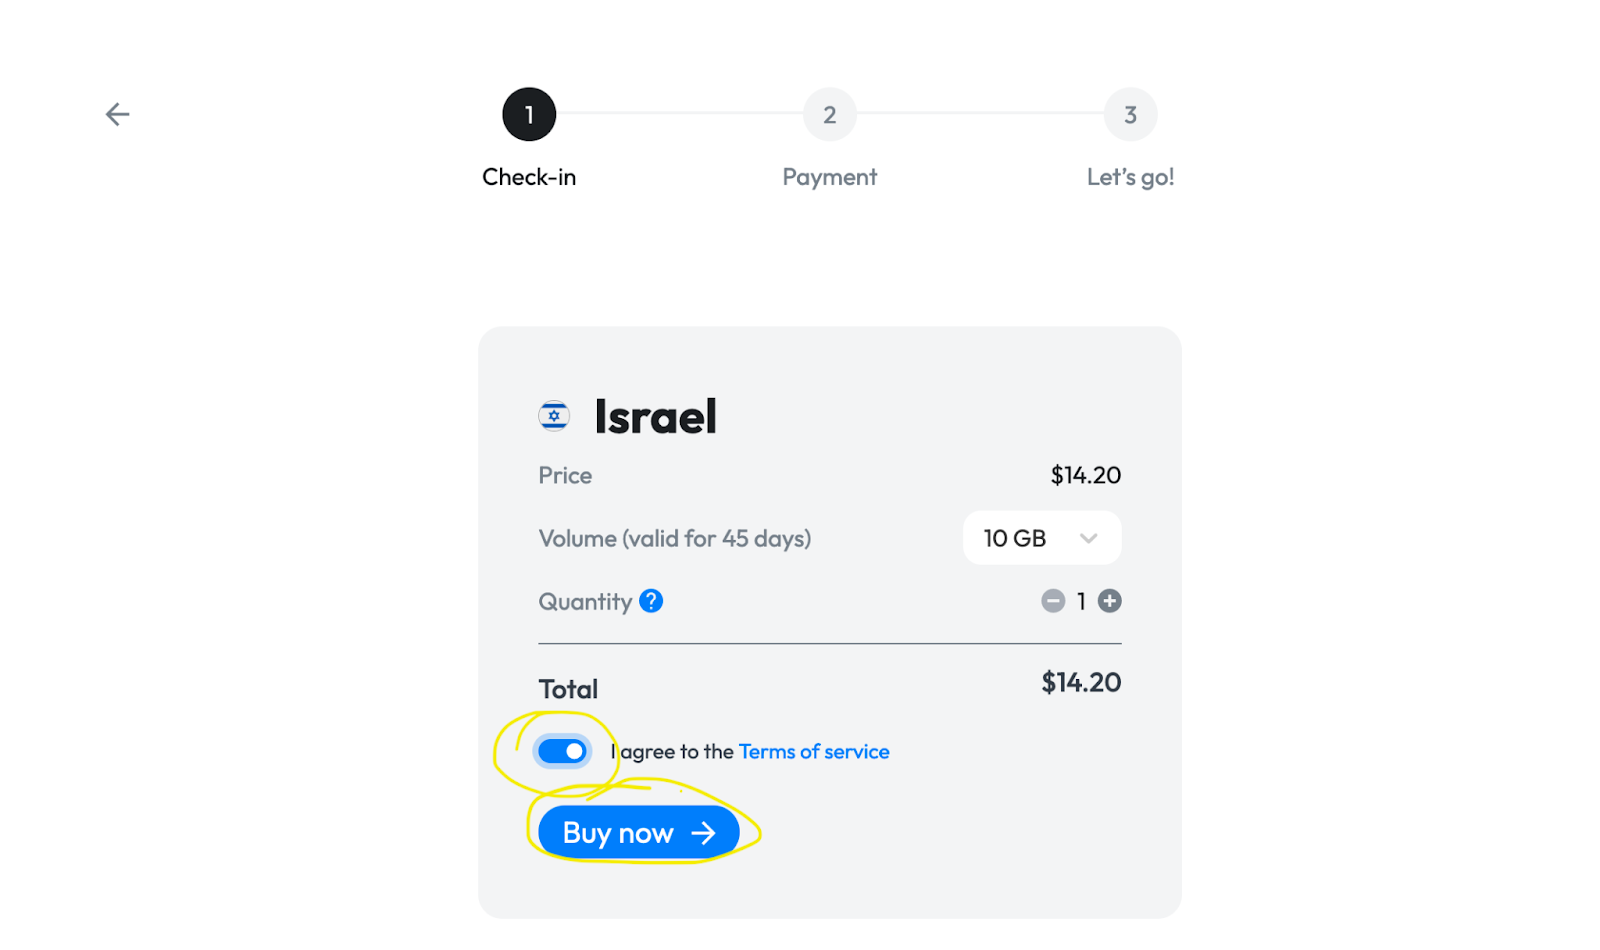
-
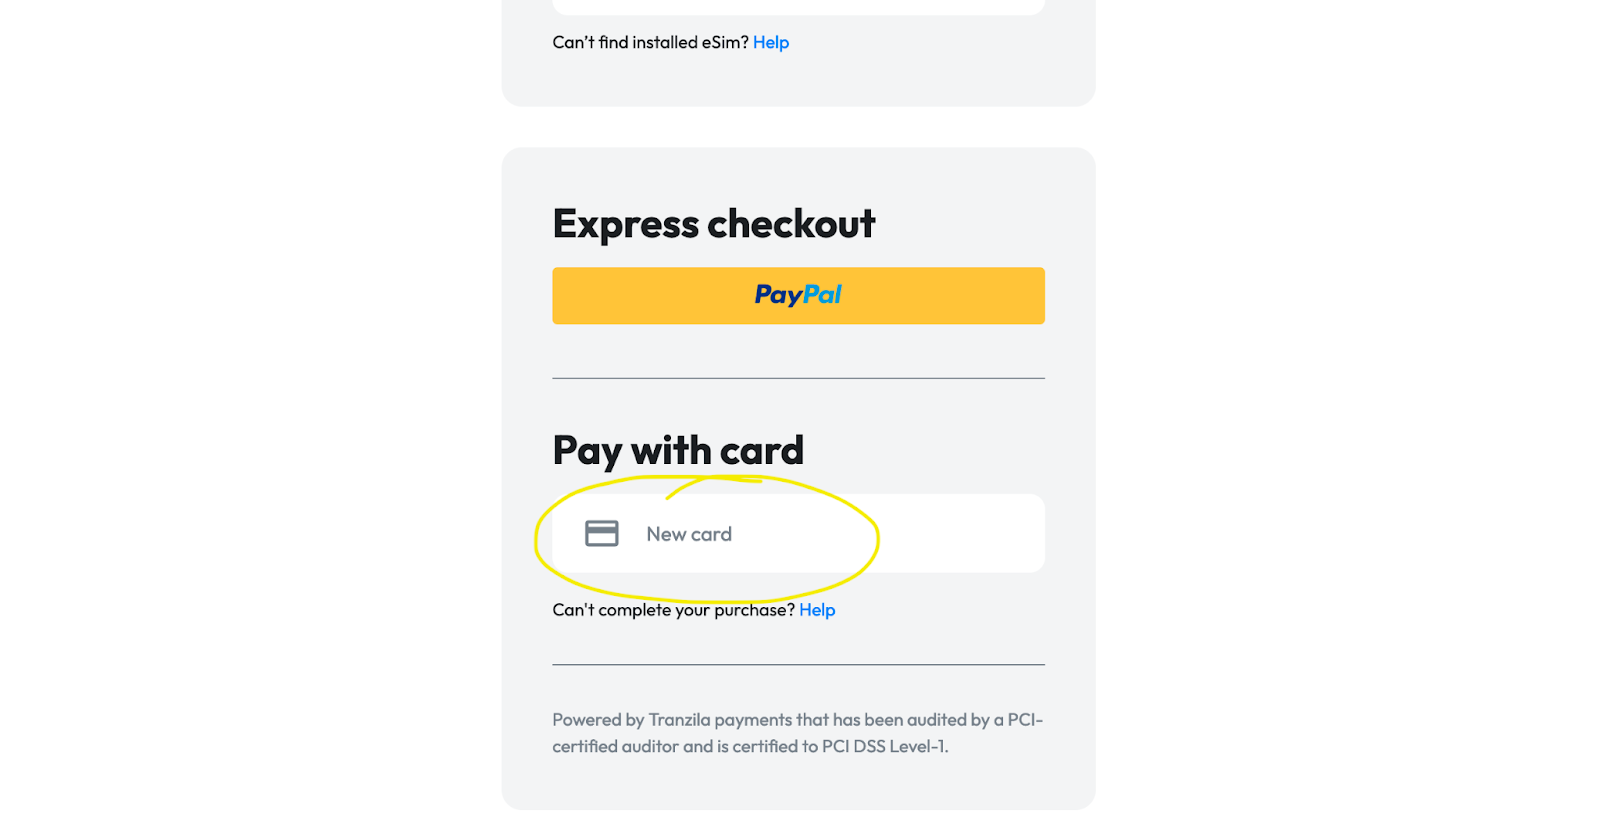
Agree to the terms of service and click the blue button at the bottom that says “Continue →”. Scroll down and enter your payment information.
-
To get the QR code: You will be on a page headed “Shopping cart.” Scroll down to see the QR code and screenshot or download it.
-
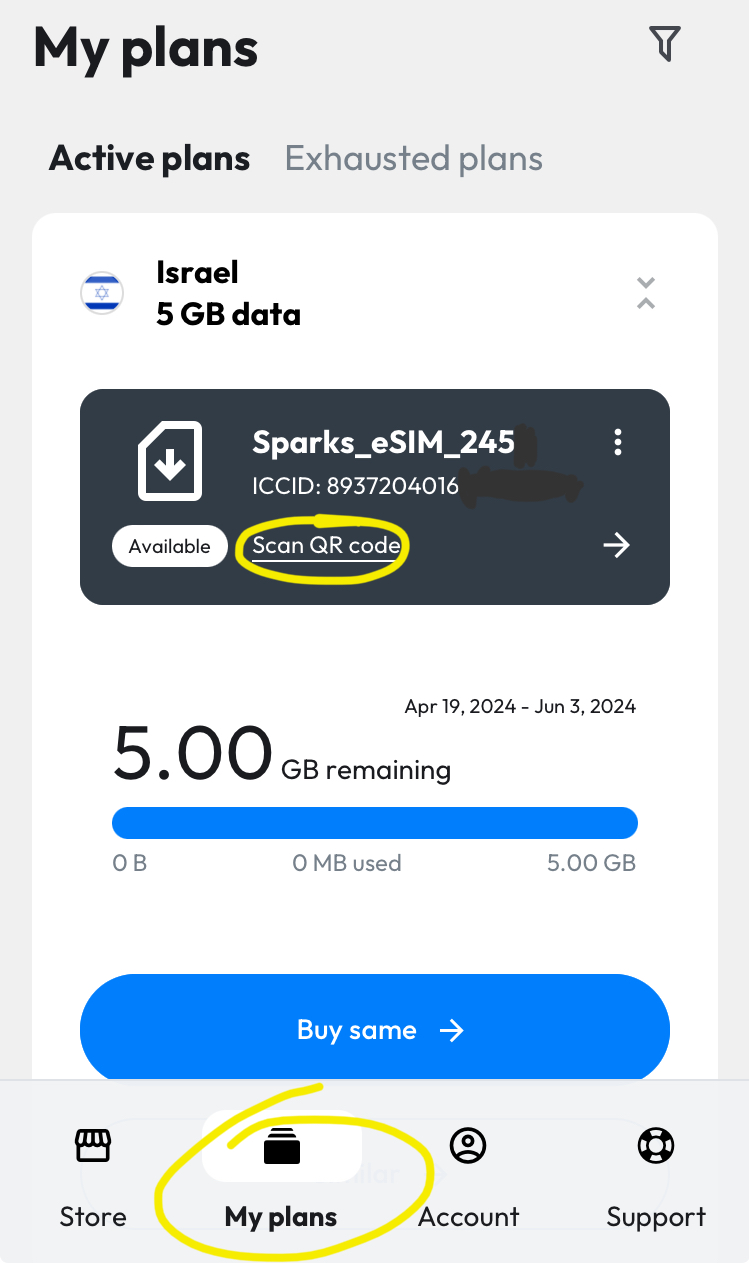
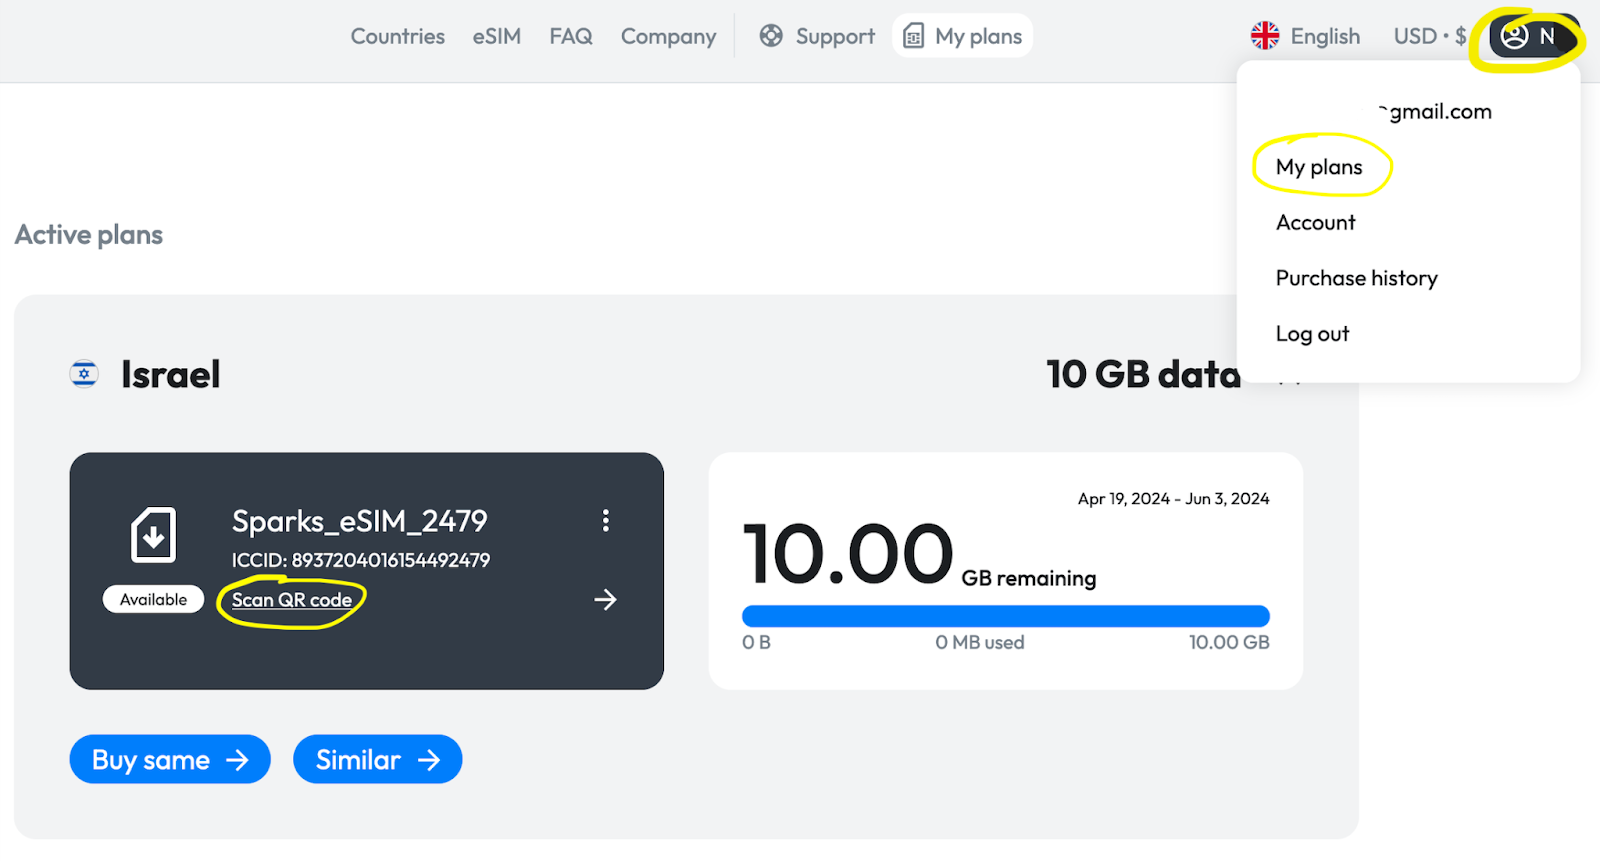
If you have navigated away from this page: Click the button that says “My plans” at the bottom of the page. Click the link that reads “Scan QR code” on the details summary of the eSim that you just bought.
-
To upload the QR code: Navigate to https://www.gaza.online/upload. Under “eSIM Provider,” click the gray button with a plus mark that says “Add.” Search or scroll down to select “Sparks[#]GB_[#]Days_Israel,” depending on the size of the plan you purchased. Attach the file for the QR code and enter your email. Click “Submit” at the bottom of the page.

🖥️ Desktop #
-
Navigate to https://sparks.travel/packages/il.
-
Select a plan. If you are not signed in, you will be prompted to log in or sign up.
-
Toggle the button to agree to the terms of service and click the blue button at the bottom that says “Buy Now.”
-
Scroll down to enter your payment information. Click the blue button at the bottom that says “Pay Now.”
-
To get the QR code: You will be brought to a page headed “Done!” Scroll down to see the QR code and download or screenshot it.
-
If you have navigated away from this page, you can get back here by clicking on your initials in the black button at the top right of the screen, then clicking “My plans” in the dropdown menu that comes up. Click the link that reads “Scan QR code” on the details summary of the eSim that you just bought.
-
To upload the QR code: Navigate to https://www.gaza.online/upload. Under “eSIM Provider,” click the gray button with a plus mark that says “Add.” Search or scroll down to select “Sparks[#]GB_[#]Days_Israel,” depending on the size of the plan you purchased. Attach the file for the QR code and enter your email. Click “Submit” at the bottom of the page.
🍉 Guide to topping up eSims #
The Connecting Humanity team recommends keeping your sims topped up once they have been activated. Keep topping up the eSim for as long as the data usage keeps ticking up. This keeps a person or family connected for longer, without the Connecting Humanity team having to go through another process of helping someone install a new eSim.
If the data usage hasn’t changed in a week or so, you may want to allow the plan to expire and purchase another one.
This guide also shows how to tell whether your plan has been activated or not, how to see how much data has been used, and how to tell which plans are inactive if you have purchased more than one. As of February 2024, the Connecting Humanity team is instructing that, if you sent an eSim more than two weeks ago and it has not yet been activated, you should reply to the email you initially sent containing the QR code for that eSim.
🔵 Nomad #
📱 App #
🔵 How to tell if your eSim is active #
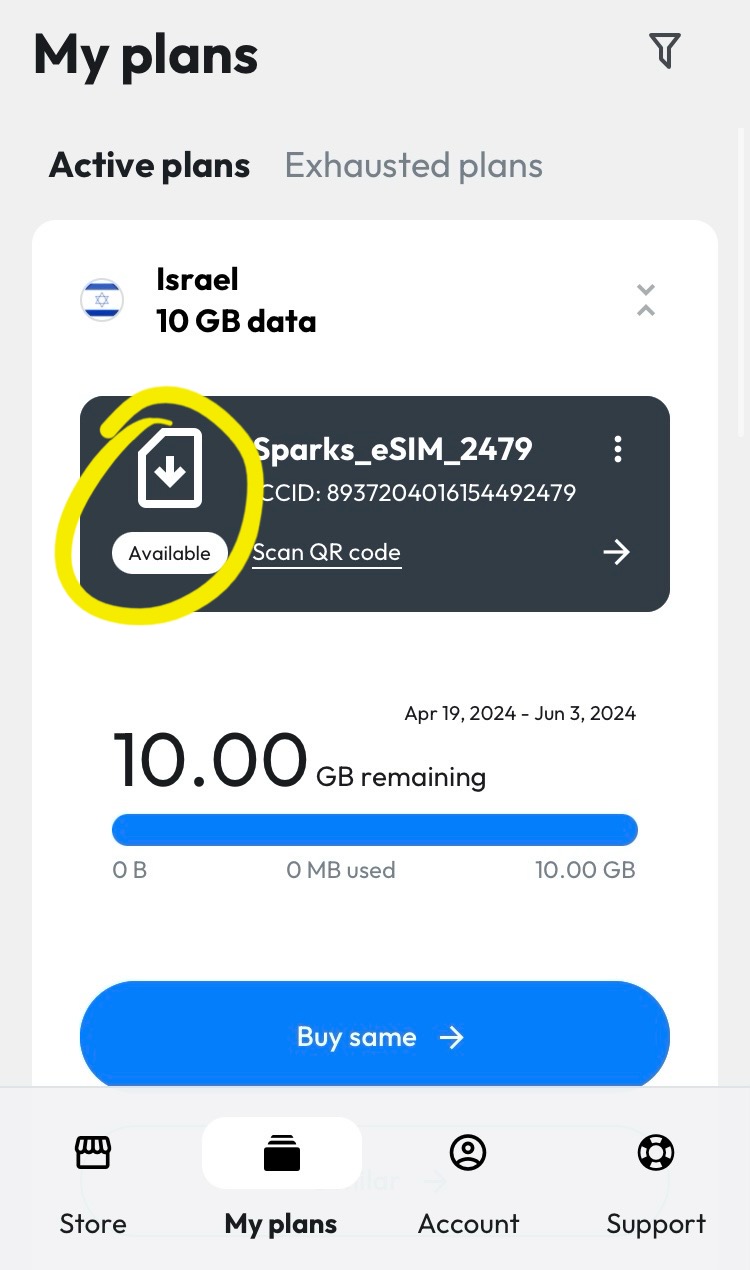
- Open the Nomad app on your phone. You will be on the “Manage” page, showing all the eSim plans you’ve purchased; if not, you can navigate here by pressing the button that says “Manage” at the center bottom of the screen.
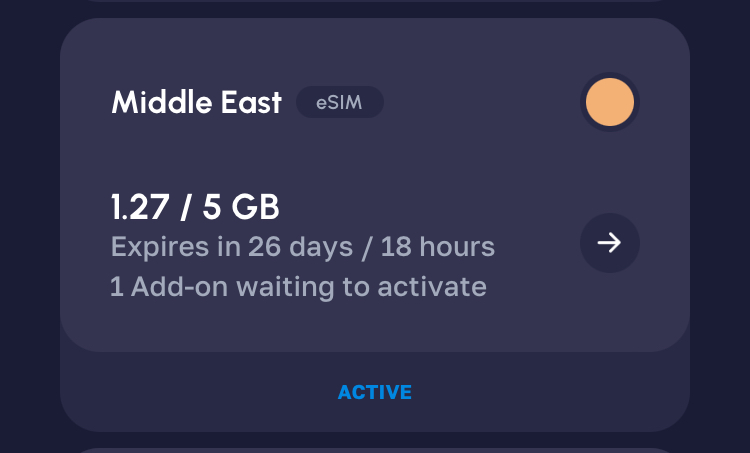
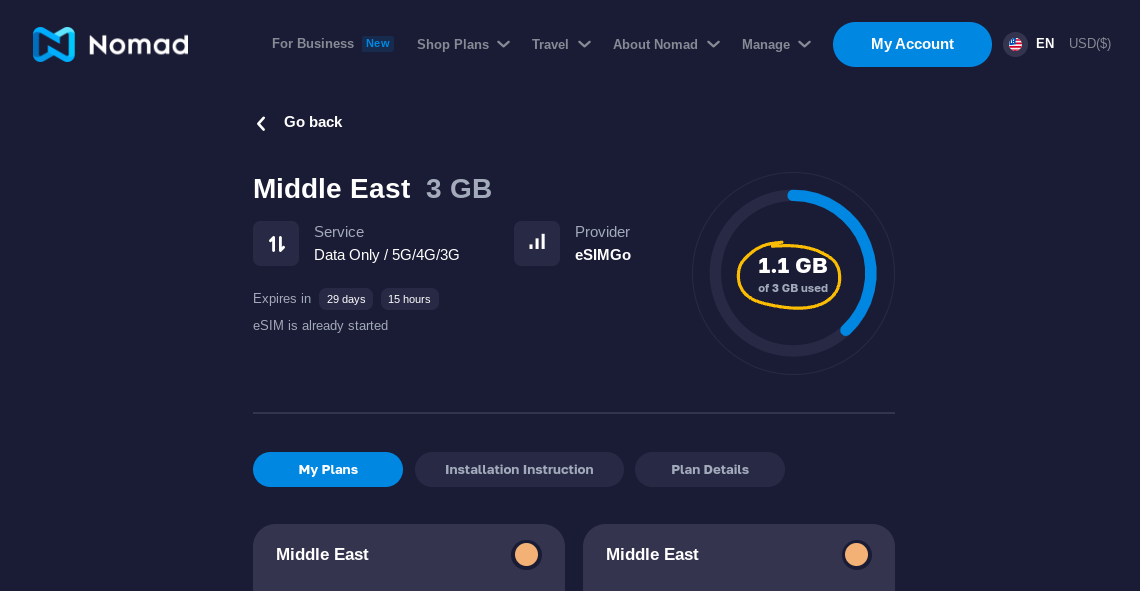
- An activated eSim will have blue text at the bottom that says “active.” The data usage and days until expiry will be shown just above.
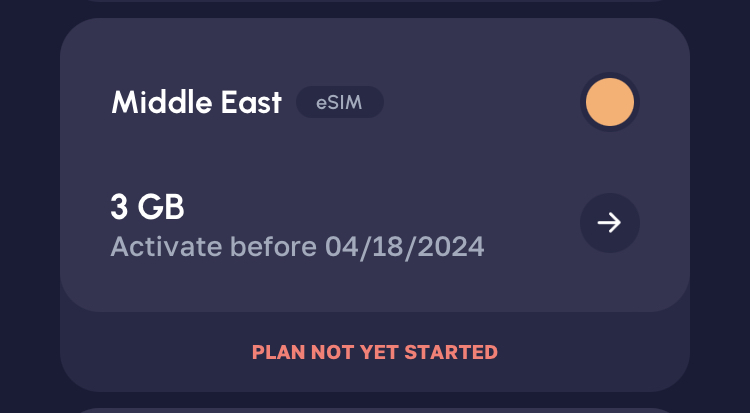
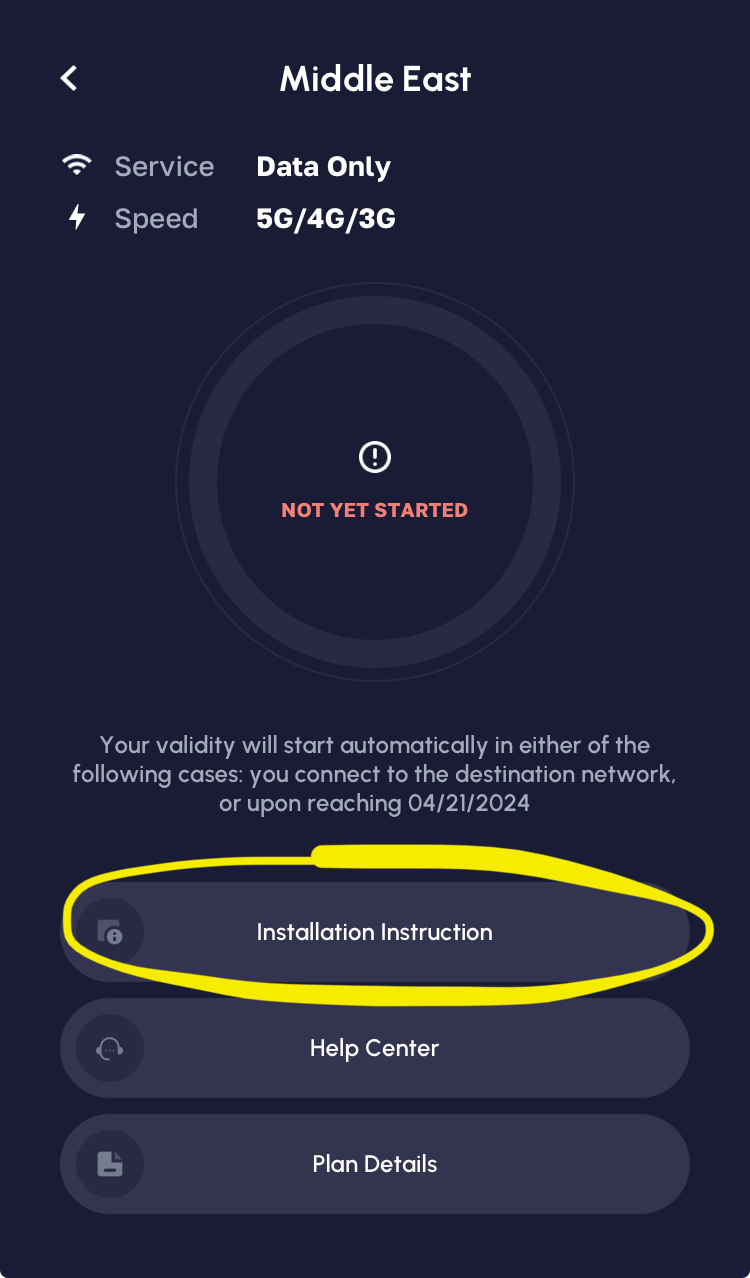
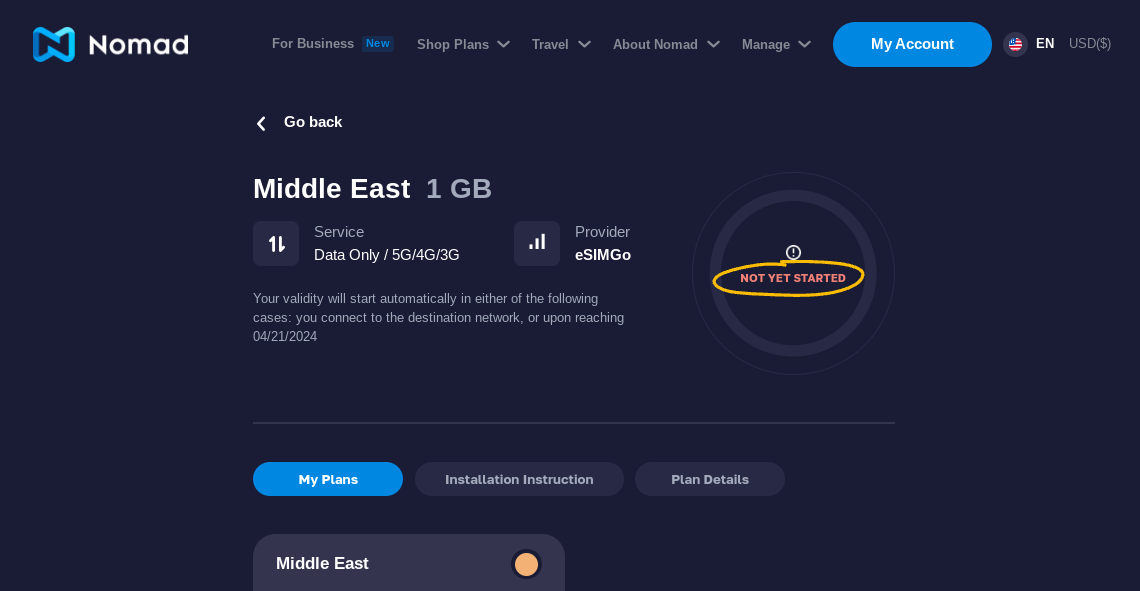
- An inactive plan will say “plan not yet started” in red text at the bottom.
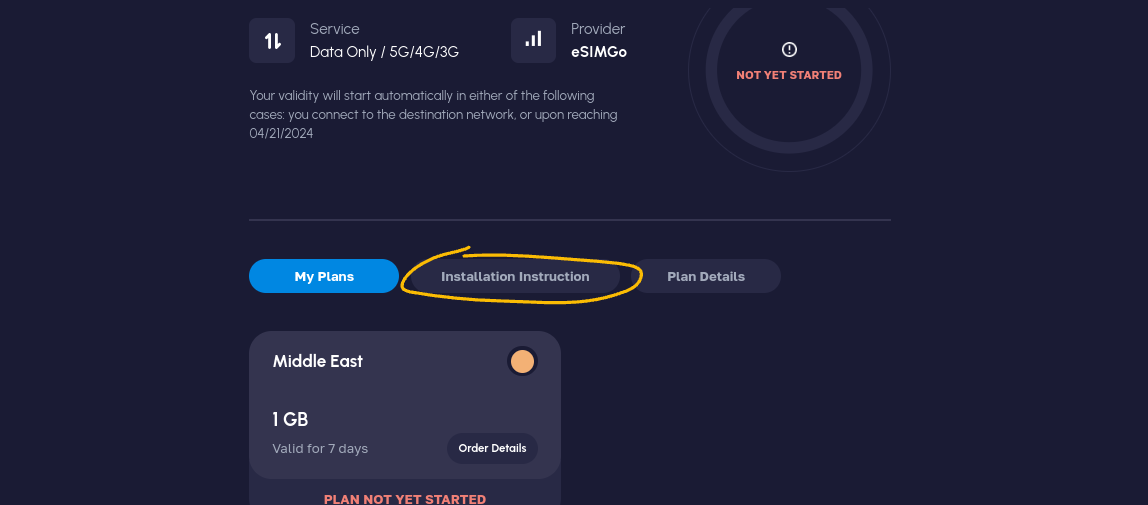
- Some plans only begin to count down to expiry once they are installed, but Nomad plans also have a set date (from the purchase of the eSim) that they will begin counting down to expiry, regardless of whether they have been installed. You can see this date under where it lists the amount of data (here: “Activate before 04/18/2024”). The Connecting Humanity team asks that people reply to the email they sent containing the QR code for any inactive eSim that is approaching that date. If you are within 12 hours of the date, contact customer service and ask for a credit (not a refund) to purchase a new eSim.
🔵 How to top up your eSim #
Note: eSims which were purchased before an upgrade in Nomad’s system sometime around March 23 can no longer be topped up. New eSims that were purchased after this date are unaffected.
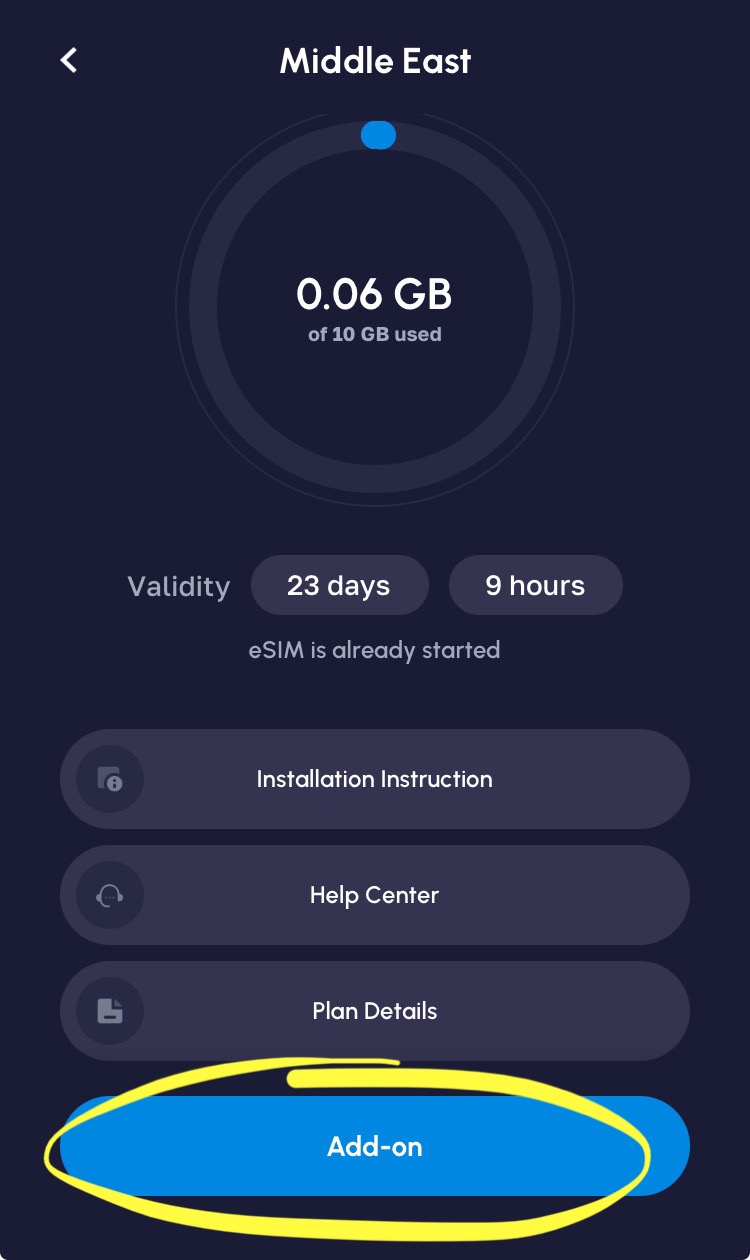
-
From the “Manage” page (see step 1 of “How to tell if your eSim is active” above), click on the plan that you would like to top up. Click the blue button at the bottom that says “Add-on.”
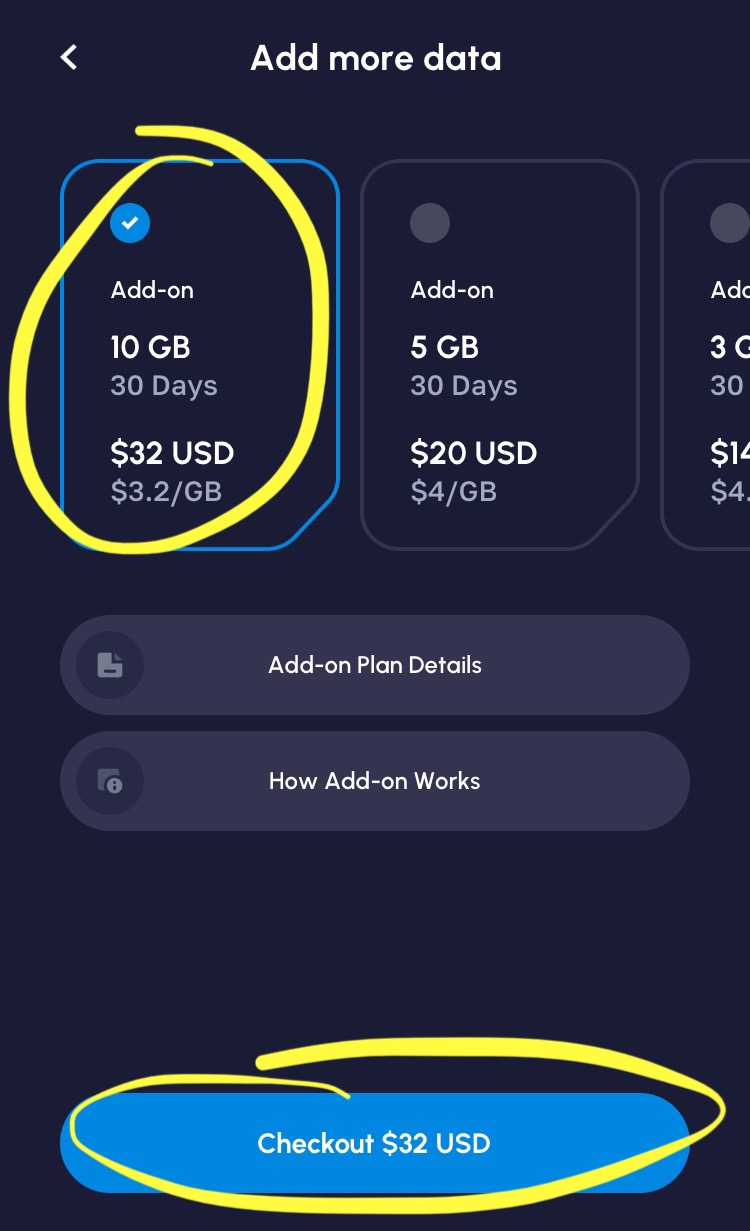
-
A page titled “Add more data” will come up. Choose one of the data plans at the top of the screen (I recommend 3-5 GB), then click the blue button at the bottom that says “Checkout.” Enter your payment information and confirm.
-
You’re done! There is no need to get a QR code or send it to the team.
🔵 Notes on top-ups #
- Make sure your low-data notifications are on so that you can top up eSims as they need it. Go to “Profile” (icon of a person at the bottom right) → “Settings” (icon of a gear in the center of the page) → “Notifications” → toggle “Data” on.
- The topped-up eSim will now show the text “1 Add-on waiting to activate” under the data usage and expiry date on the “Manage” page. Once the top-up has been activated, this text will disappear, and the data usage shown will be for the top-up, not the original eSim.
- To see an eSim’s top-up history, click on it on the “Manage” page, then click “Your Plans.” The original eSim will be at the bottom, with all add-ons you’ve purchased from first to last as you move up.
- You can only have one add-on waiting at a time.
🔵 How to tell which plan is which #
This information is only important if you have multiple eSims on this app, some of them are active and others are inactive, and you are trying to figure out which email to reply to to let the team know that a plan is inactive. Only reply to an email if you purchased the plan more than two weeks ago.
-
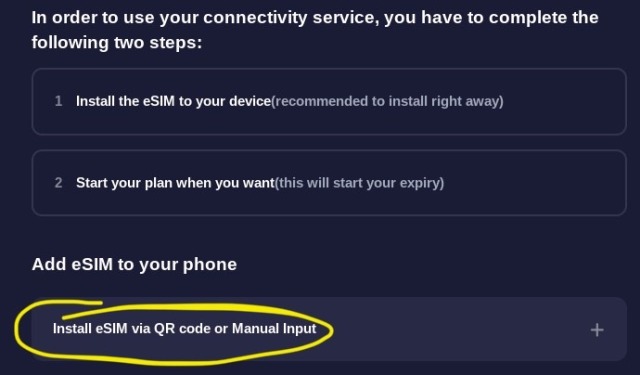
From the “Manage” page, click on an inactive plan. Click on the button that says “Installation Instruction” (under “Your Plans” and above “Help Center”).
-
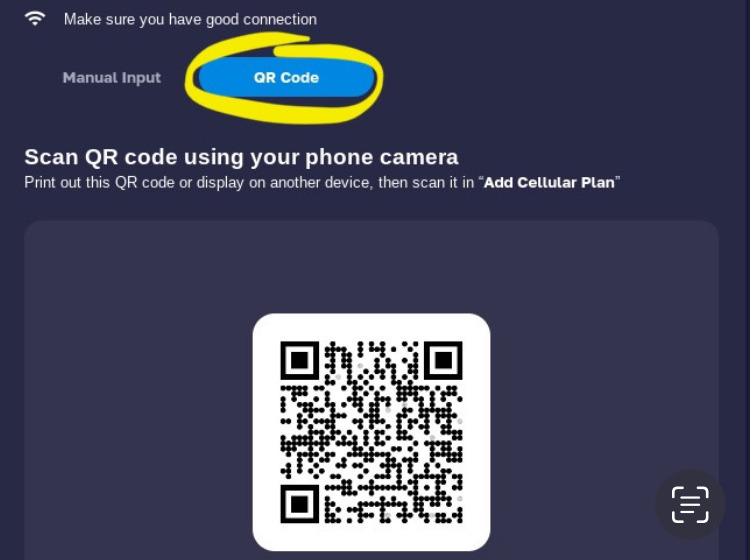
Swipe right to get to a screen with two tabs at the top, “Manual input” and “QR code.”
-
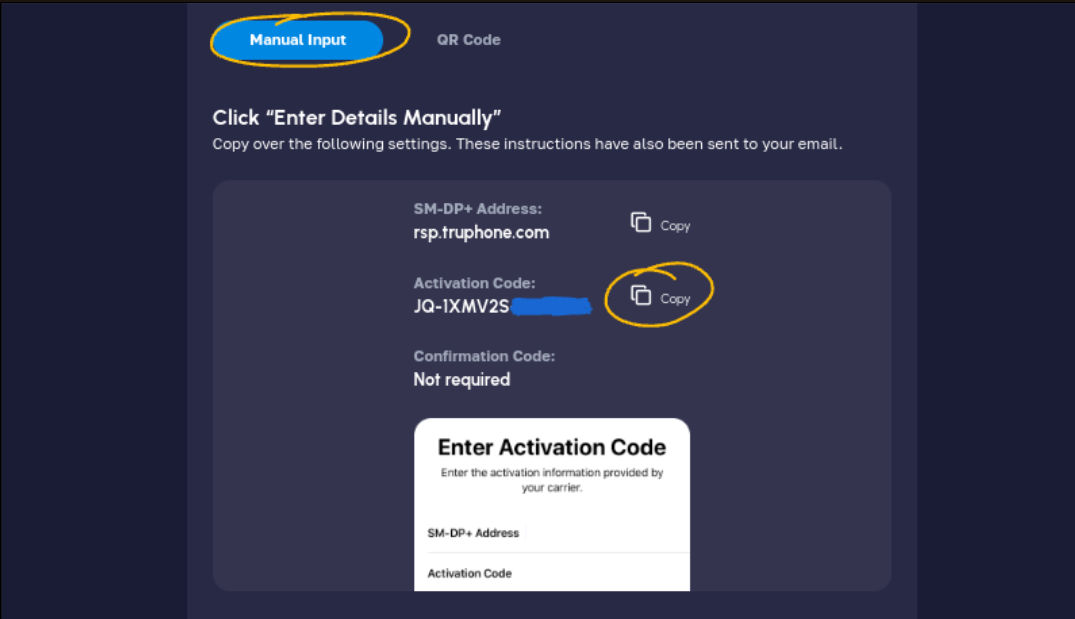
If you put the activation code in the body of the email you sent, copy it on this screen (under “Activation Code,” right below “SM-DP + Address” and above “Confirmation Code”) and search for it in your sent emails. When you find the email you sent to the team with this plan’s QR code, reply to the email with a message such as “inactive plan.”
-
Otherwise, click the “QR code” tab. Search for emails you’ve sent to gazaesims@gmail.comincluding the word “Nomad” and visually compare the QR codes. When you find one that matches exactly, reply to that email with a message such as “inactive plan.”
-
If you can’t compare the QR codes visually, upload screenshots of both codes to an online QR code reader and compare the text you get back.
🖥️ Desktop #
🔵 How to tell if your eSim is active #
-
Navigate to getnomad.app/ in your web browser. Sign in with the email and password you used to buy the eSim.
-
At the top right of the screen, to the left of the blue oval button that says “My Account,” click “Manage.” In the drop-down menu that appears, click “Manage Plans.”
-
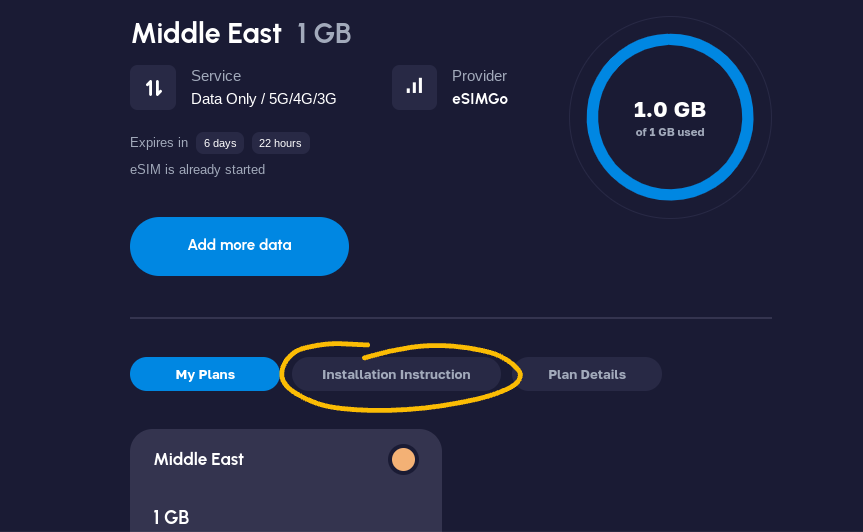
Click on a plan to open its details page. If the plan is active, the blue circular meter will show how much data has been used, and text at the left will show how much time is left before the eSim expires.
-
If the plan is inactive, red text will read “not yet started” in the circle to the right.
-
Some plans only begin to count down to expiry once they are installed, but Nomad plans also have a set date (from the purchase of the eSim) that they will begin counting down to expiry, regardless of whether they have been installed. You can see this date under where it lists the amount of data (here: “Activate before 02/20/2024”). The Connecting Humanity team asks that people reply to the email they sent containing the QR code for any inactive eSim that is approaching that expiry date.
🔵 How to top up your eSim #
Note: eSims which were purchased before an upgrade in Nomad’s system sometime around March 23 can no longer be topped up. New eSims that were purchased after this date are unaffected.
- Navigate to the details page of an active eSim (see above “How to tell if your eSim is active” steps 1-3).
- Click the blue button at the bottom of the plan information that says “Add more data.”
- Scroll down and select one of the plans (I recommend 3-5 GB), then click the blue button at the bottom that says “Checkout.”
- On the “Cart” page, click the blue button at the bottom right that says “Proceed to Checkout.”
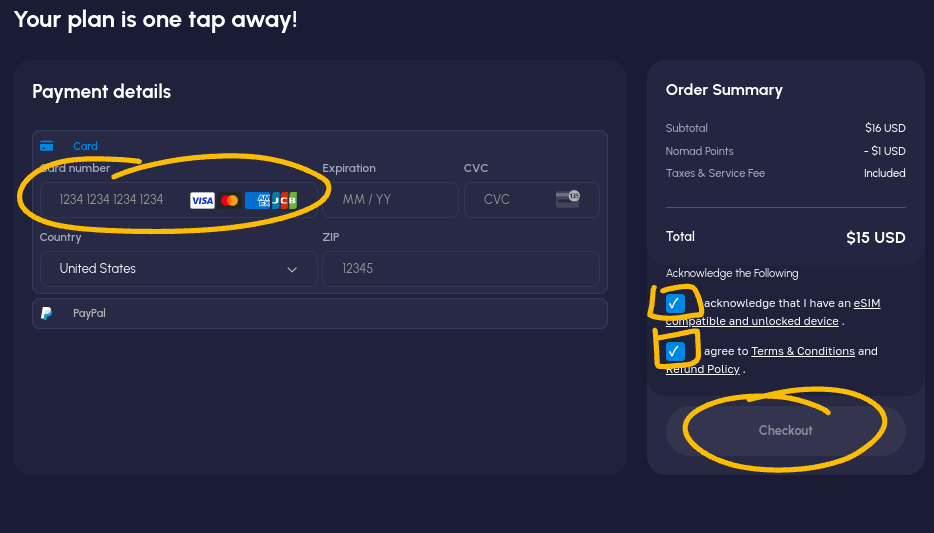
- Enter your payment details. At the bottom right, tick the two boxes reading “I acknowledge that I have an eSIM compatible and unlocked device” and “I agree to the Terms & Conditions…”. Click the blue button at the bottom right that says “Checkout.”
- You’re done! There is no need to get a QR code or send it to the team.

🔵 Notes on top-ups #
- There are no low-data notifications for the desktop version of this provider. Make sure you check back every day, or buy data in 5-10 GB chunks and check back every few days (1 GB eSims can run out of data very quickly, and Nomad eSims cannot be topped up once they run out of data).
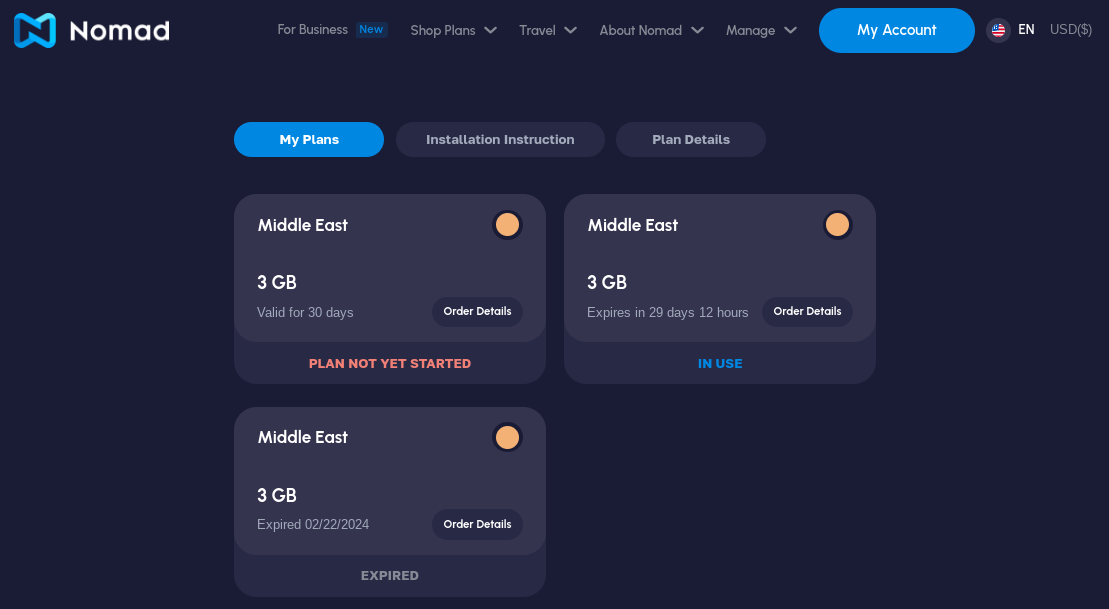
- The waiting top-up for your active eSim will now show as an inactive plan (with red text “plan not yet started”) under the blue “My Plans” tab below the plan details. The plan currently being used will show up here with text reading “in use”; old top-ups that have already been used will show with grey text reading “expired.” This is useful to see the history of top-ups that a given plan has gone through.
- You can only have one add-on waiting at a time.
🔵 How to tell which plan is which #
This information is only important if you have multiple eSims on this app, some of them are active and others are inactive, and you are trying to figure out which email to reply to to let the team know that a plan is inactive. Only reply to an email if you purchased the plan more than two weeks ago.
If you have a phone that can read QR codes, follow the instructions on the first page (under “Which eSims are needed right now?”) to determine whether an eSim is valid instead. I have found that an eSim that reads as inactive in the app may be unable to be activated, presumably because there was an error in installation.
-
From the “Manage” page, click on an inactive plan (you will only be able to see if a plan is inactive once you have clicked on it; see “How to tell if your eSim is active” above).
-
Below the plan details, click on the blue tab that says “Installation Instruction” (to the right of “Your Plans” and to the left of “Plan Details”).
-
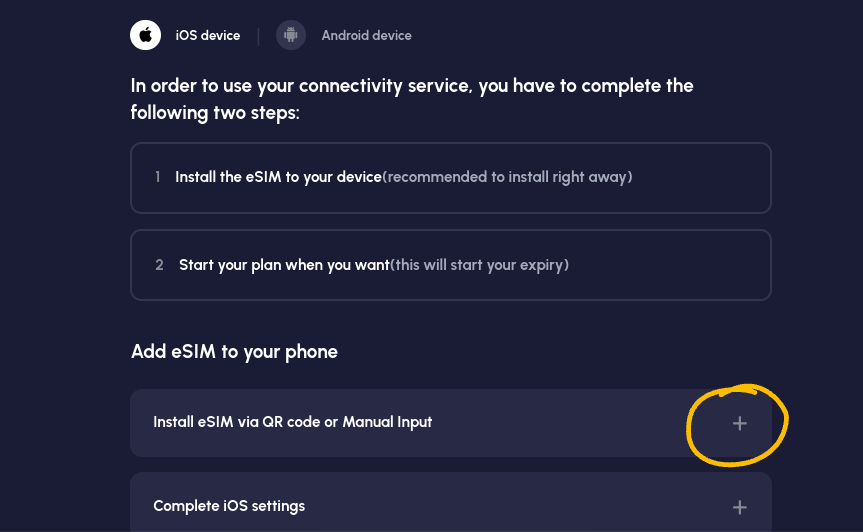
Scroll down a bit. Under where it says “Add eSim to your phone,” expand the menu titled “Install eSIM via QR code or Manual Input.”
-
Scroll down a bit. You will see two tabs, “Manual Input” and “QR Code.”
-
If you put the activation code in the body of the email you sent, copy it on this screen (next to “Activation Code,” right below “SM-DP + Address” and above “Confirmation Code”) and search for it in your sent emails. When you find the email you sent to the team with this plan’s QR code, if the email is more than two weeks old, reply to the email with a message such as “inactive plan.”
-
Otherwise, click over to the “QR code” tab. Search for emails you’ve sent to gazaesims@gmail.com including the word “Nomad” and visually compare the QR codes. When you find one that matches exactly, if the email is more than two weeks old, reply to that email with a message such as “inactive plan.”
-
If you can’t compare the QR codes visually, upload screenshots of both codes to an online QR code reader and compare the text you get back.
🟠 Simly #
📱 App #
🟠 How to tell if your eSim is active #
- Open the Simly app on your phone and tap the button that looks like a sim card in the center bottom of the screen. This will bring you to the “My eSims” page.
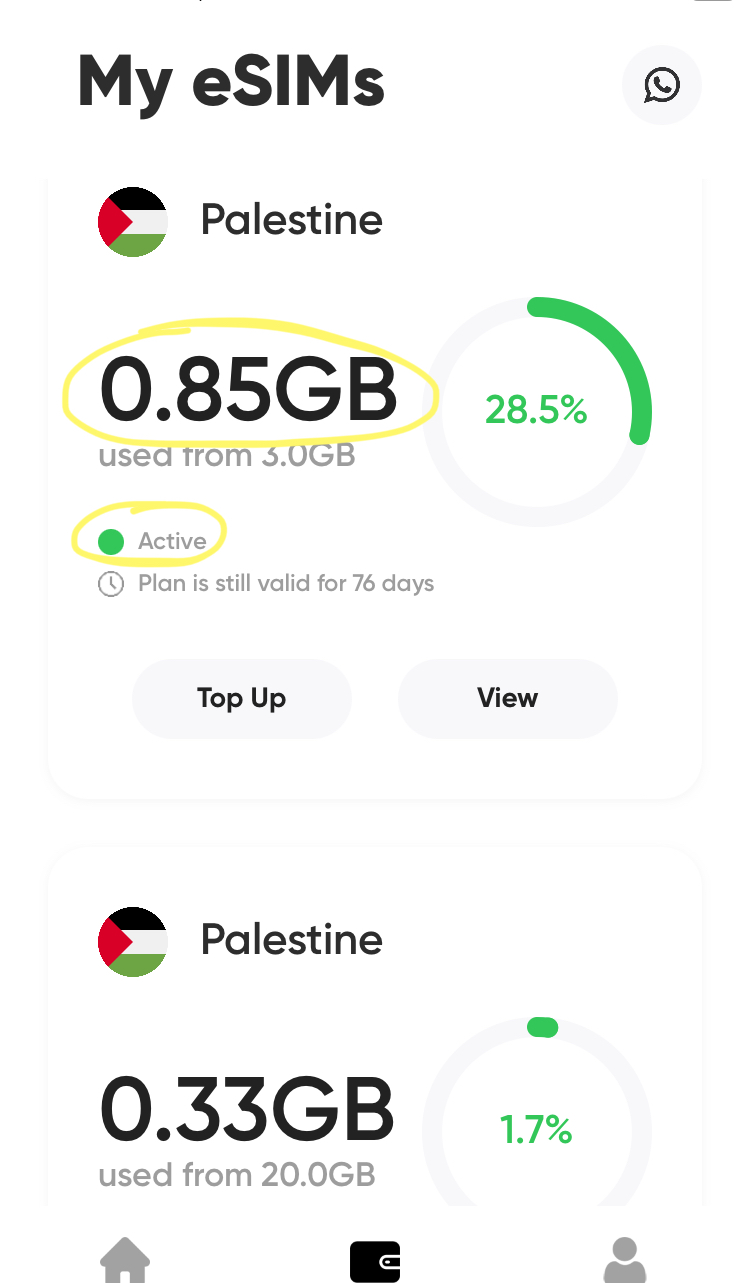
- An activated plan will show a green dot and text reading “active”; it will also tell you how much data has been used, and how many days are left until the plan expires.
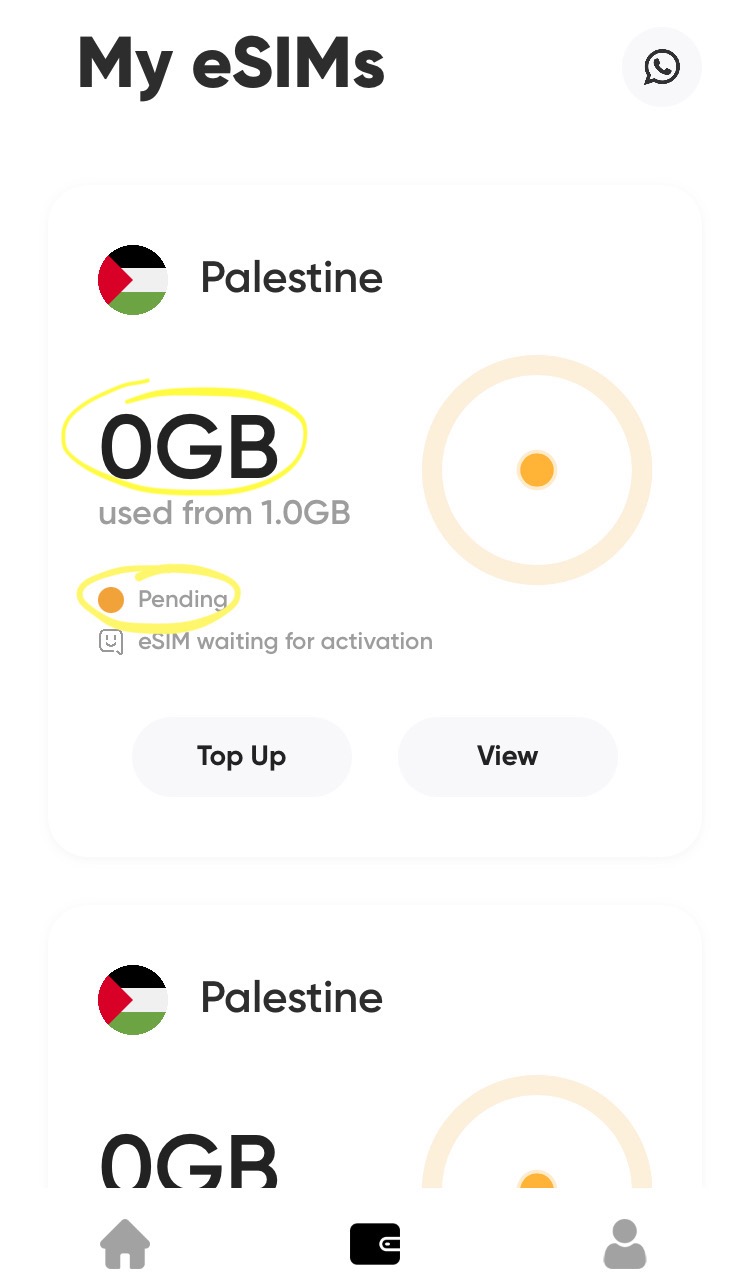
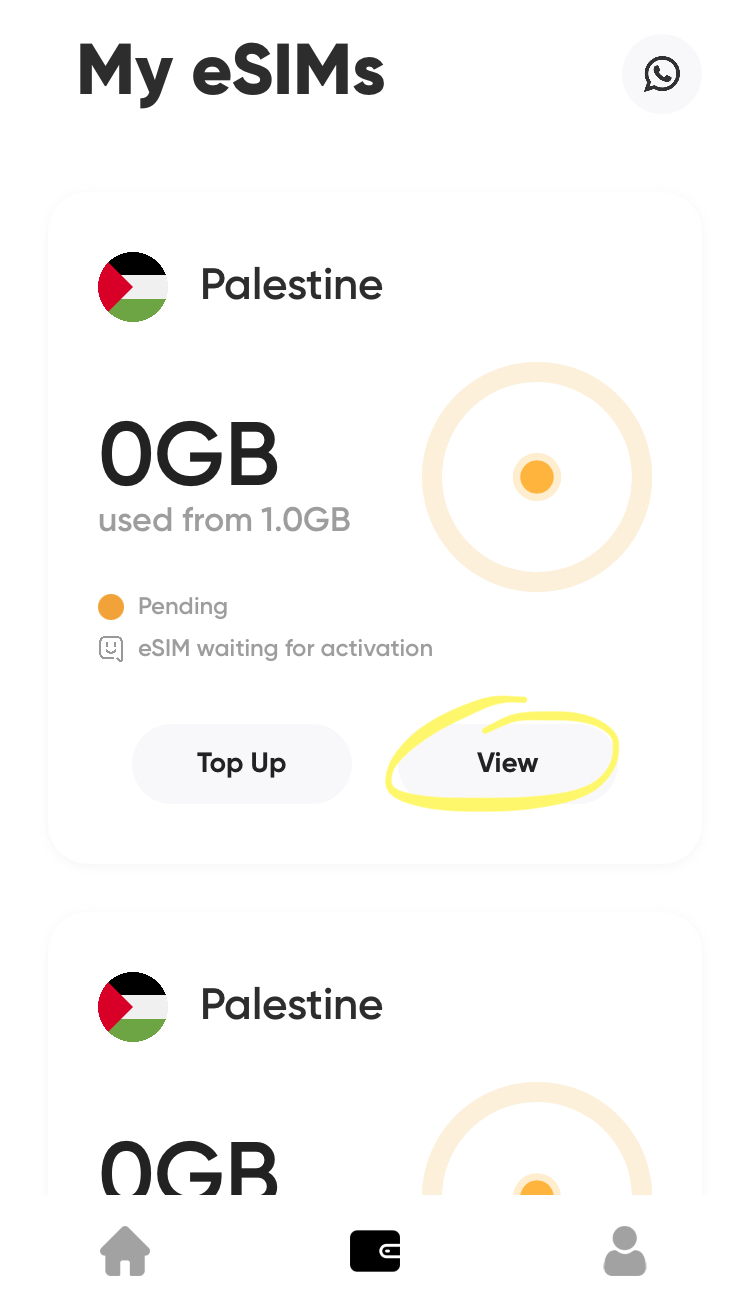
- An inactive plan will show an orange dot and text reading “pending.”
🟠 How to top up your eSim #
- From the “My eSims” page, find the active eSim you would like to top up. Click the grey button that says “Top Up” to the bottom left of the plan information.
- Choose a plan (I recommend buying data in 2-5 GB chunks) and click the orange button at the right that says “Buy Now.”
- Click the green button that says “Top Up” at the bottom of the next screen. Select your payment method, then click the blue button at the bottom that says “Pay.”
- You’re done! There is no need to get a QR code or send it to the team.
🟠 How to tell which plan is which #
This information is only important if you have multiple eSims on this app, some of them are active and others are inactive, and you are trying to figure out which email to reply to to let the team know that a plan is inactive. Only reply to an email if you purchased the plan more than two weeks ago.
If you have a phone that can read QR codes, follow the instructions on the first page (under “Which eSims are needed right now?”) to determine whether an eSim is valid instead. I have found that an eSim that reads as inactive in the app may be unable to be activated, presumably because there was an error in installation.
-
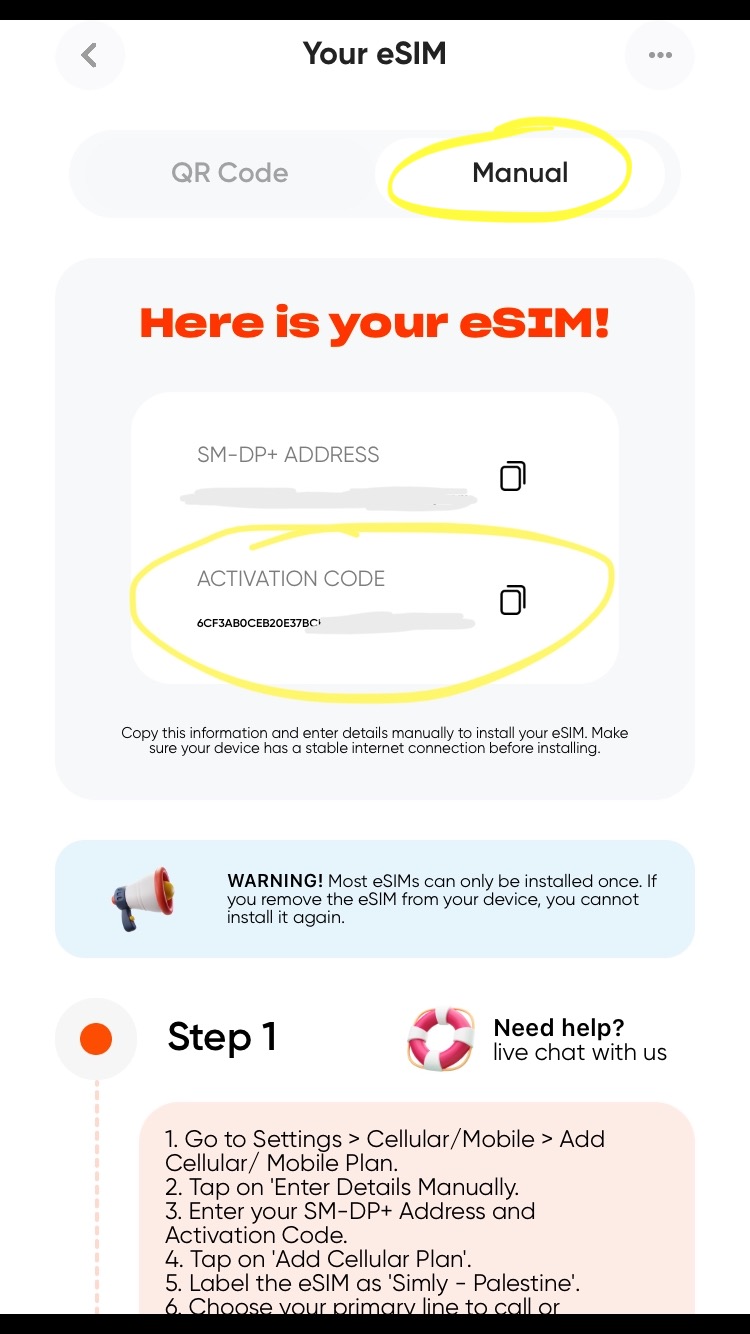
From the “My eSims” page, choose an inactive plan, and click the grey button that says “view” at the bottom right.
-
A page will come up saying “Here is your eSim!” with two tabs at the top, “Manual Input” and “QR Code.”
-
If you put the activation code in the body of the email you sent, tab over to “Manual” and copy it on this screen (right below “SM-DP + Address”) and search for it in your sent emails. When you find the email you sent to the team with this plan’s QR code, if the email is more than two weeks old, reply to the email with a message such as “inactive plan.”
-
Otherwise, stay on the “QR code” tab. Search for emails you’ve sent to gazaesims@gmail.com including the word “Simly” and visually compare the QR codes. When you find one that matches exactly, if the email is more than two weeks old, reply to that email with a message such as “inactive plan.”
-
If you can’t compare the QR codes visually, upload screenshots of both codes to an online QR code reader and compare the text you get back.
🖥️ Desktop #
Simly eSims cannot be topped up on desktop at this time.
🔴 Holafly #
📱 App #
🔴 How to tell if your eSim is active #
-
Open the Holafly app on your phone and tap the button that looks like a sim card in the center bottom of the screen. This will bring you to the “My eSIMs” page.
-
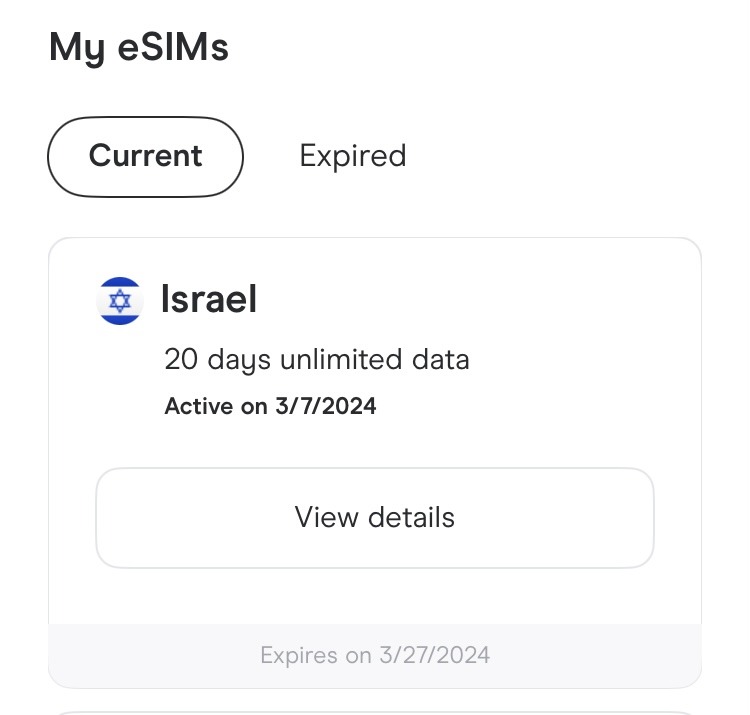
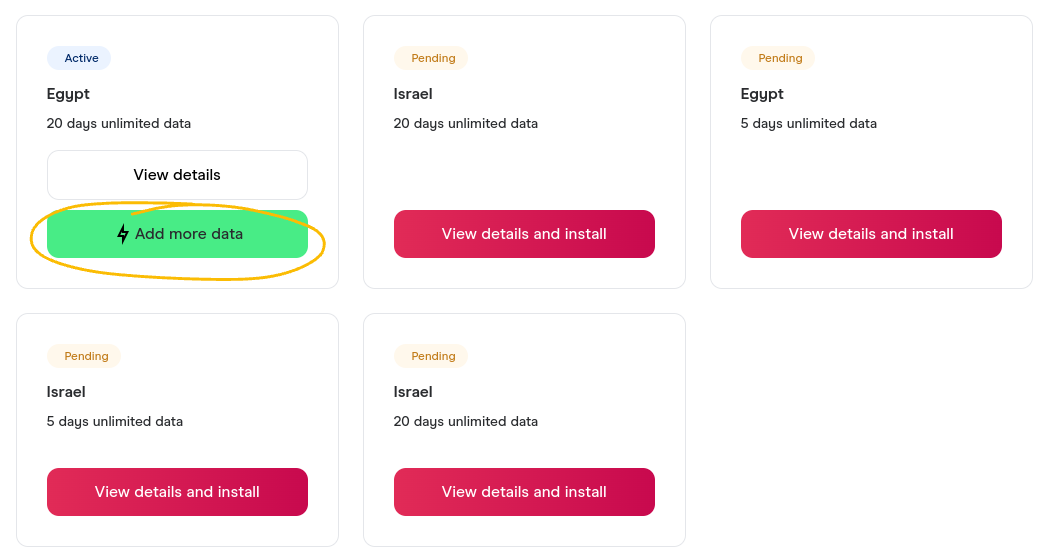
You will be on a page showing your current plans. An active plan will have black text reading “Active on [date]” under the text showing the amount of data, and a white rectangle with black text will read “View details”; the expiration date will be in gray at the bottom.
-
Data usage will not be displayed on the app; you will have to contact customer support. Copy the order number from the eSim in question → go to “Shop” or “My eSIMs” or “Guides” → click the question mark in the box at the top right of the screen to get to “Help center” → scroll down to “Contact us” and click “Let’s chat” → ask the representative you’re connected to to tell you how much data has been used for the eSim with this order number, and tell them that you can’t check yourself because the eSim is installed on someone else’s phone.
-
An inactive plan will have a red rectangle at the bottom, with white text reading “Install and activate.”

🔴 How to top up your eSim #
Holafly eSims cannot be topped up through the app. You can order a top-up on the desktop website, but eSims always appear as expired even if a top-up has been purchased for them, and it’s unclear if their recipients still have access to data. I don’t recommend topping up Holafly eSims until this problem is solved—unless you are in personal contact with the recipient of the eSim and they are able to access WiFi to tell you if the top-up worked.
🔴 How to tell which plan is which #
This information is only important if you have multiple eSims on this app, some of them are active and others are inactive, and you are trying to figure out which email to reply to to let the team know that a plan is inactive. Only reply to an email if you purchased the plan more than two weeks ago.
If you have a phone that can read QR codes, follow the instructions on the first page (under “Which eSims are needed right now?”) to determine whether an eSim is valid instead. I have found that an eSim that reads as inactive in the app may be unable to be activated, presumably because there was an error in installation.
-
From the “My eSIMs” page (see “How to tell if your eSim is active” step 1 on how to get here), click on an inactive plan.
-
Scroll down to the “Activation code” (at the very bottom of the screen, under “Installation codes”) and copy it.
-
If you put the activation code in the email you sent to the team, search for the code in your sent emails. When you find the email you sent to the team with this plan’s QR code, if the email is more than two weeks old, reply to the email with a message such as “inactive plan.”
-
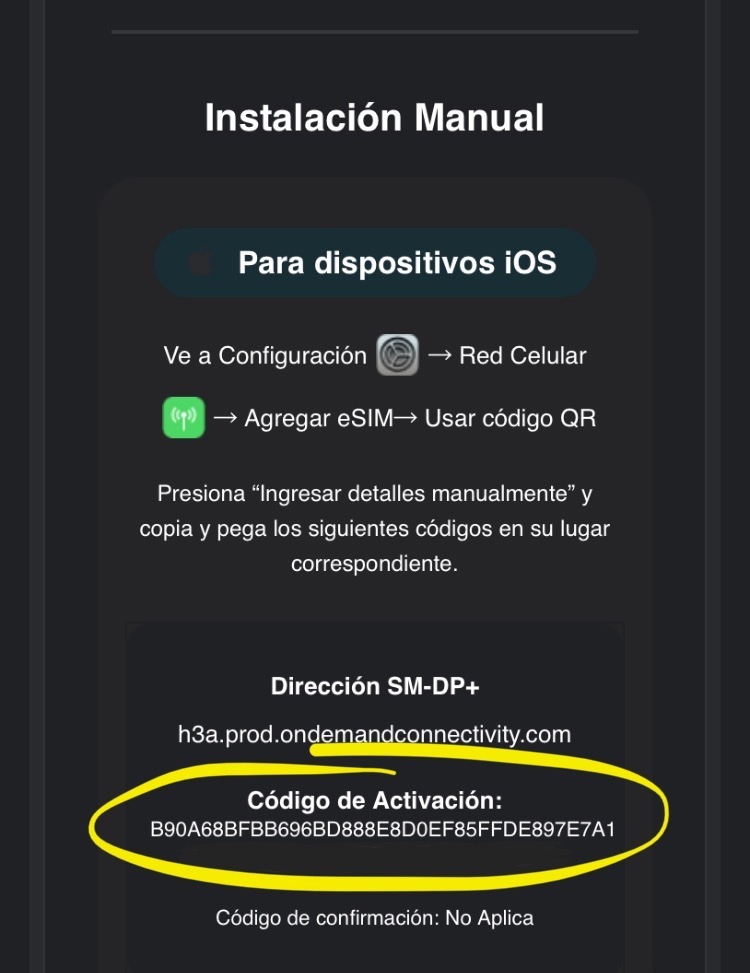
Otherwise, search for the code in your inbox to see the emails that Holafly sent you with instructions for activating this particular eSim. The code will be at the bottom of the e-mail, in a section titled “Instalación Manual” containingactivation codes (“código de activación”) for iPhone and Android. Scroll up just a little bit in the same email to find the QR code that encodes the data for this activation code. Now you know that this QR code is for an inactive plan. Search your outbox for emails sent to gazaesims@gmail.comcontaining the word “Holafly” until you see a QR code that matches this one exactly. If the email is more than two weeks old, reply to the email with a message such as “inactive plan.”
-
If you can’t compare the QR codes visually, upload screenshots of both codes to an online QR code reader and compare the text you get back.
🖥️ Desktop #
🔴 How to tell if your eSim is active #
-
Navigate to https://esim.holafly.com/. Log in with the same email address that you used to purchase the eSim.
-
You will be taken to a page titled “My Holafly Center” with your plans shown at the bottom. An active plan will have a green bubble reading “active” to the top left. You can click on “view details” to see the expiry date.
-
Data usage will not be displayed; you will have to contact customer support. Copy the order number from the eSim details page (scroll down to “General information” and expand “Purchase info”) → scroll down and click on “Contact Us” under the “Holafly” section at the bottom right → select Whatsapp or web chat → ask the representative you’re connected to to tell you how much data has been used for the eSim with this order number, and tell them that you can’t check yourself because the eSim is installed on someone else’s phone.
-
An inactive plan will have an orange bubble reading “pending” to the top left.
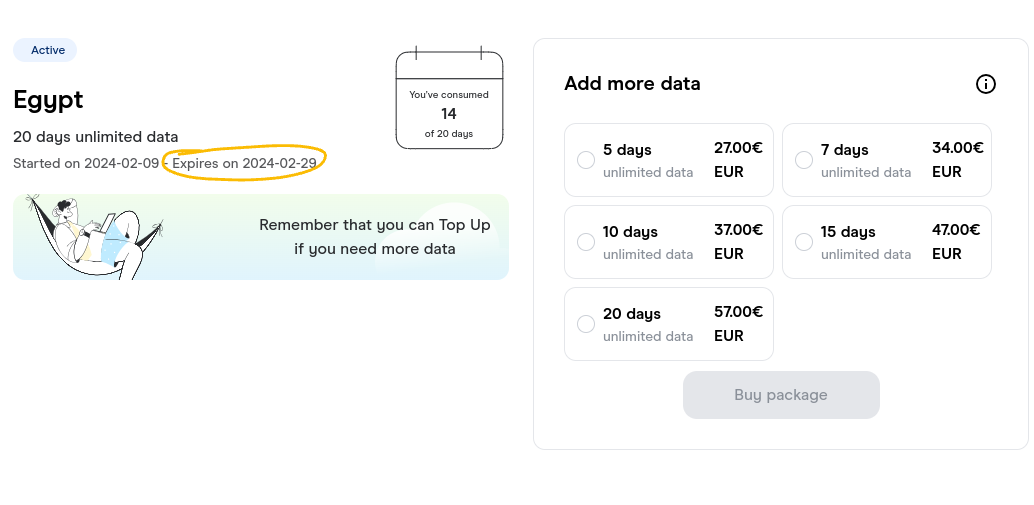
🔴 How to top up your eSim #
You can order a top-up on the Holafly website, but eSims always appear as expired even if a top-up has been purchased for them, and it’s unclear if their recipients still have access to data. I don’t recommend topping up Holafly eSims until this problem is solved—unless you are in personal contact with the recipient of the eSim and they are able to access WiFi to tell you if the top-up worked.
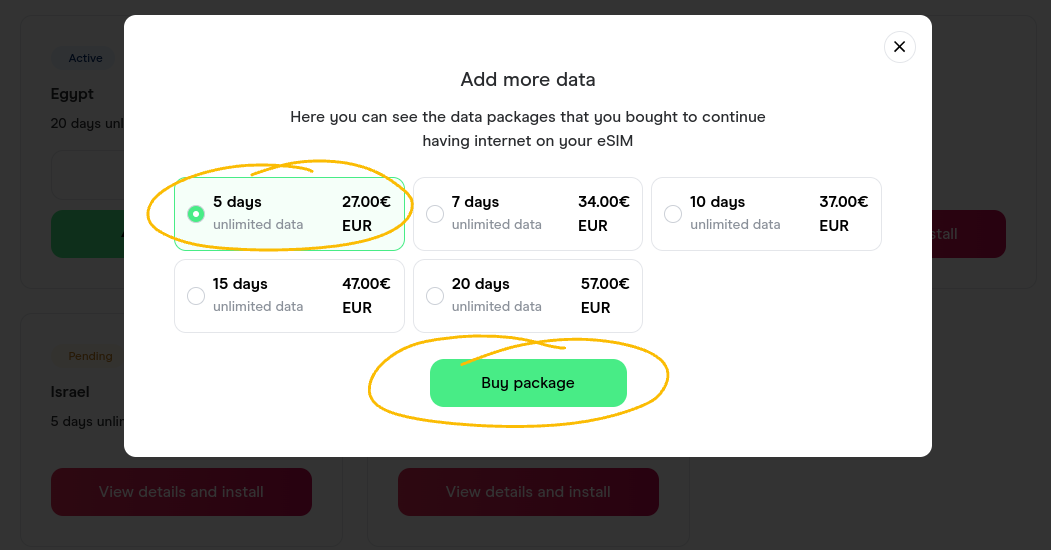
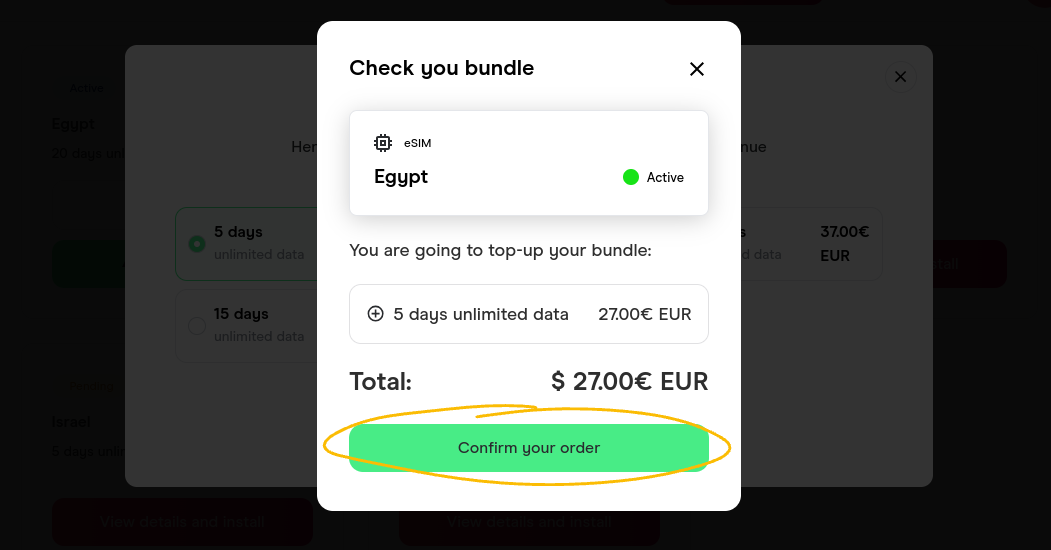
- From the “My Holafly Center” page, click on the green button that says “Add more data” at the bottom of the details for an active plan.
- Select a data package and click the green button that says “Buy package” at the bottom of the pop-up.
- Click the green button that says “Confirm your order” at the bottom of the pop-up.
- You should get a confirmation email for your purchase. Nothing will appear on the “My Holafly Center” page or the plan details to say that there is a top-up waiting. There is no need to send another QR code to the team.
- When the eSim expires, it will move over to the “Expired” rather than the “Current” tab. Contact customer service and tell them that your eSim has expired even though you ordered a top-up; they may update something on their end, and they will also tell you to turn airplane mode off and then on, and then restart your phone. Tell the person who is using the eSim to follow these instructions. I have not seen any confirmation that this process works.
🔴 How to tell which plan is which #
This information is only important if you have multiple eSims on this app, some of them are active and others are inactive, and you are trying to figure out which email to reply to to let the team know that a plan is inactive. Only reply to an email if you purchased the plan more than two weeks ago.
If you have a phone that can read QR codes, follow the instructions on the first page (under “Which eSims are needed right now?”) to determine whether an eSim is valid instead. I have found that an eSim that reads as inactive in the app may be unable to be activated, presumably because there was an error in installation.
-
From the “My Holafly Center” page, click the red button that says “view details and install” on an inactive plan.
-
Scroll down to the section titled “1. Install before your trip.” Just underneath this to the left will be a title reading “Installation codes”; to the right is a title reading “Scan the QR code to install your eSIM” and, just under that, the QR code.
-
If you put the activation code in the email you sent to the team, copy it on this screen, and search for it in your sent emails. When you find the email you sent to the team with this plan’s QR code, if the email is more than two weeks old, reply to the email with a message such as “inactive plan.”
-
Otherwise, search in your outbox for emails sent to gazaesims@gmail.comthat contain the word “Holafly” until you see a QR code that matches this one. If the email is more than two weeks old, reply to the email with a message such as “inactive plan.”
-
Note that the QR code in your confirmation email will look a bit different than the one on the Holafly website, since the one in the email will have the orange “H” logo in the center; but they will be otherwise identical.
-
If you can’t compare the QR codes visually, upload screenshots of both codes to an online QR code reader and compare the text you get back.
🟣 Airalo #
📱 App #
🟣 How to tell if your eSim is active #
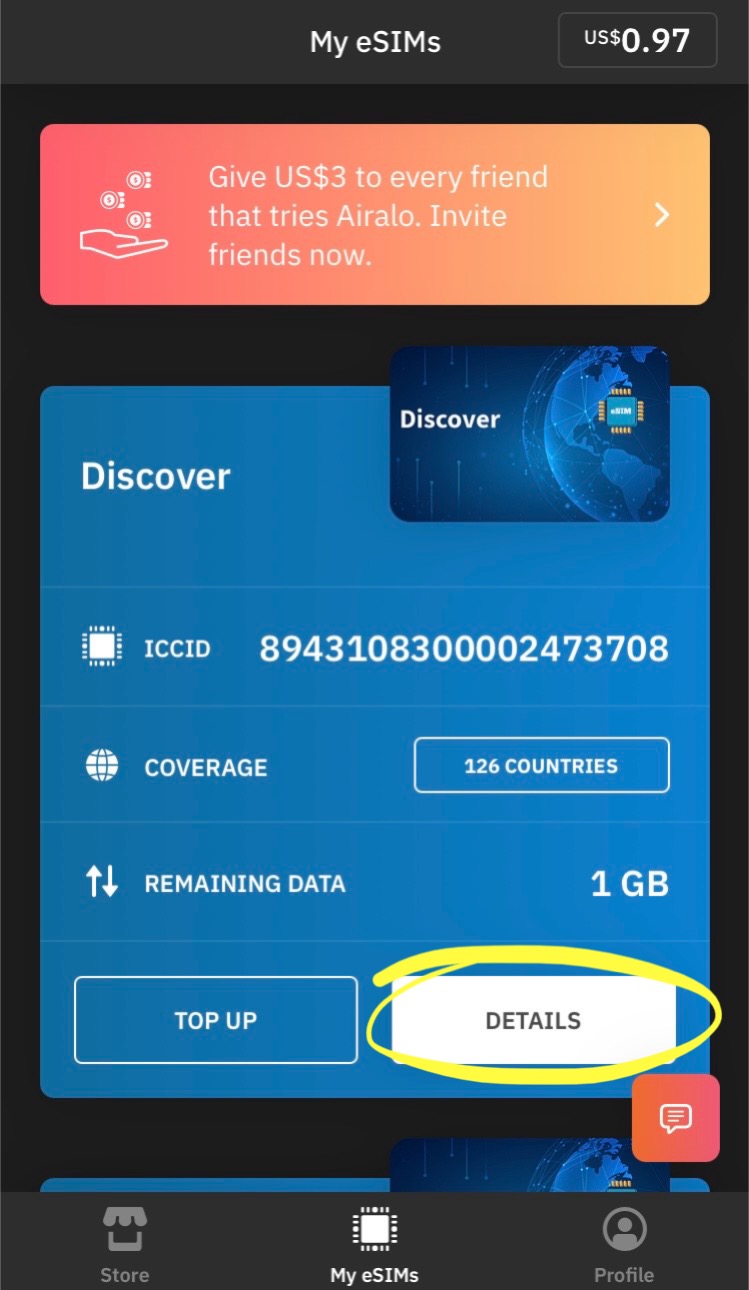
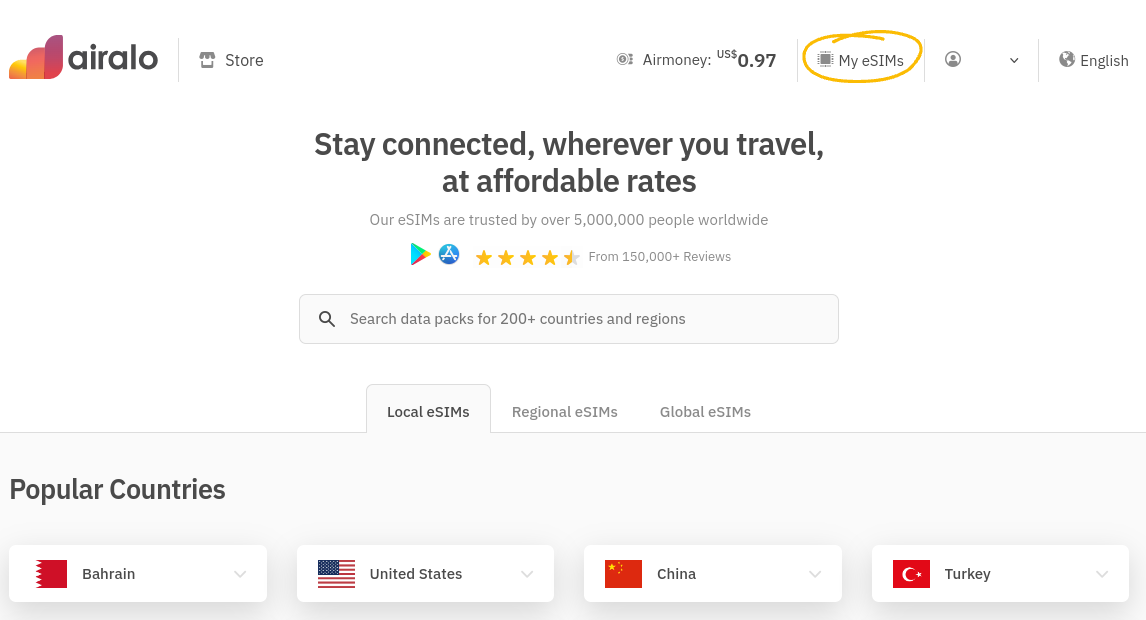
- Open the Airalo app on your phone. Click the button that looks like a sim card and says “My eSims” in the middle of the bottom menu.
- You will be led to a page that has all of the non-expired eSims you have purchased. Choose a plan and click “details” on the bottom right.
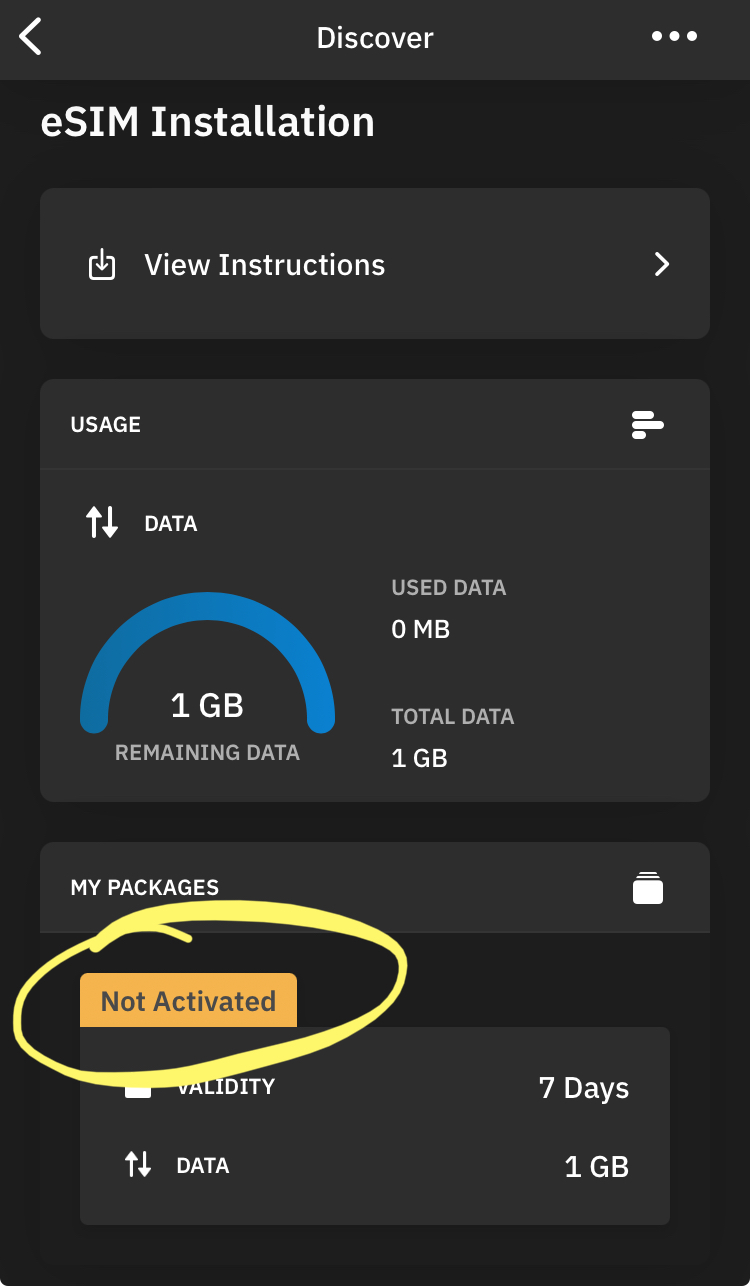
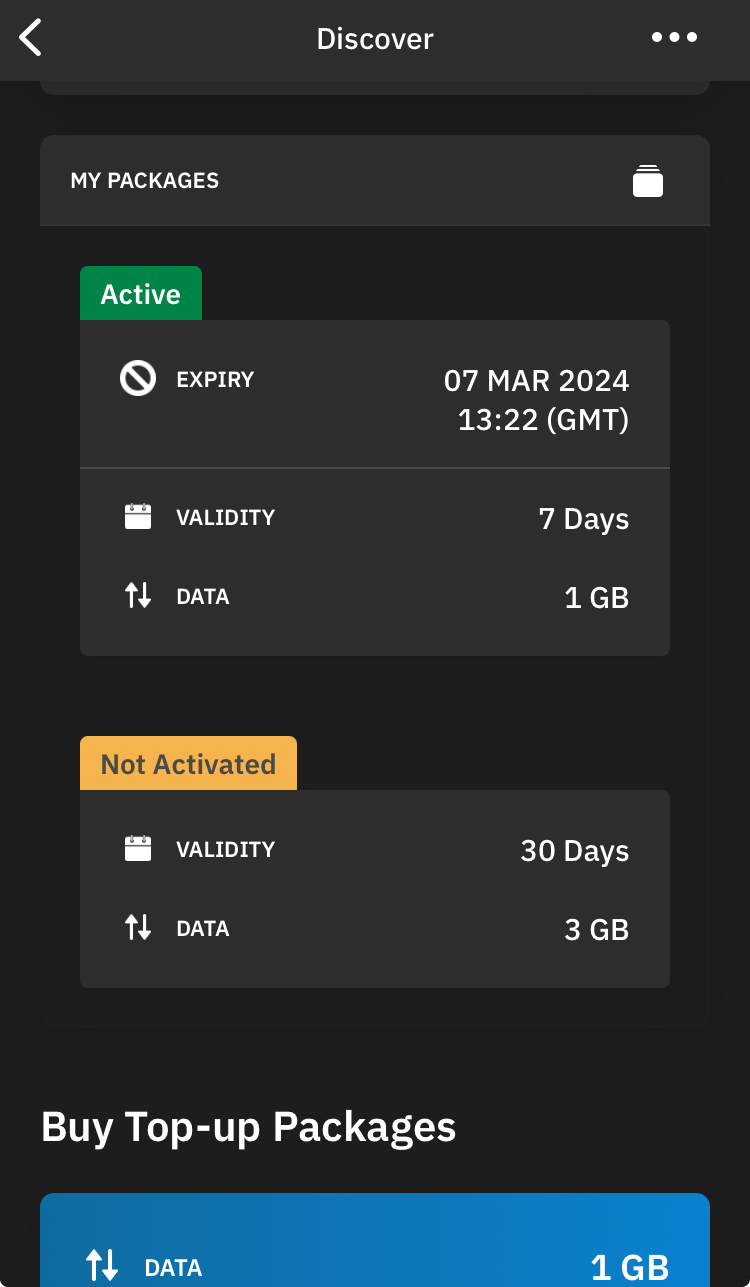
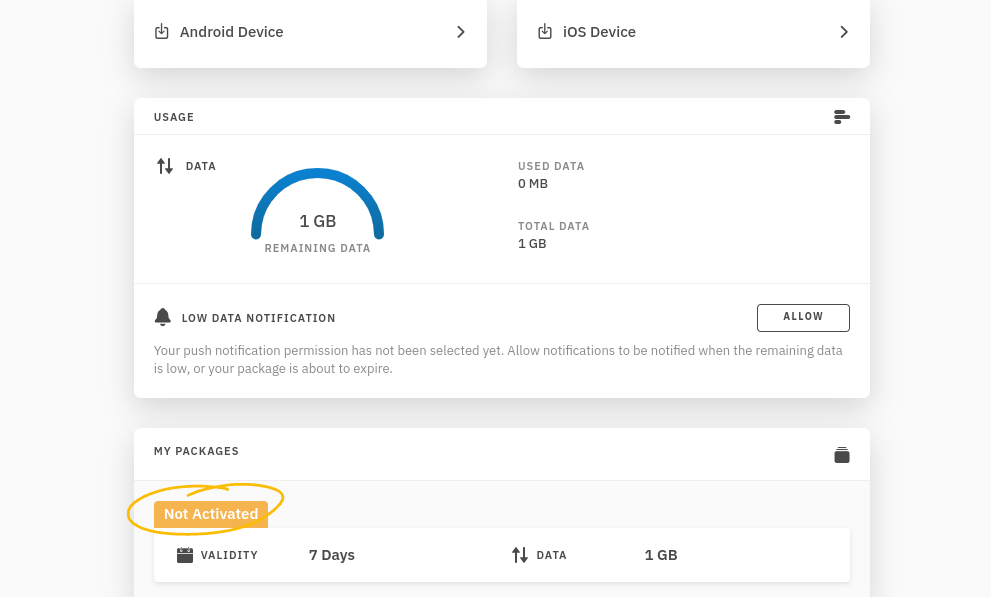
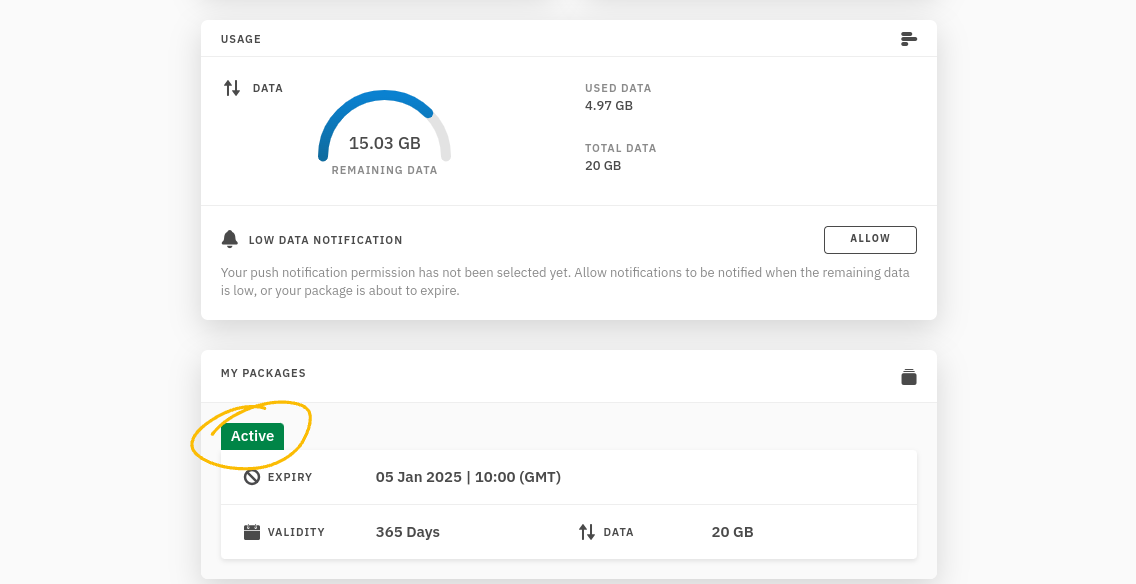
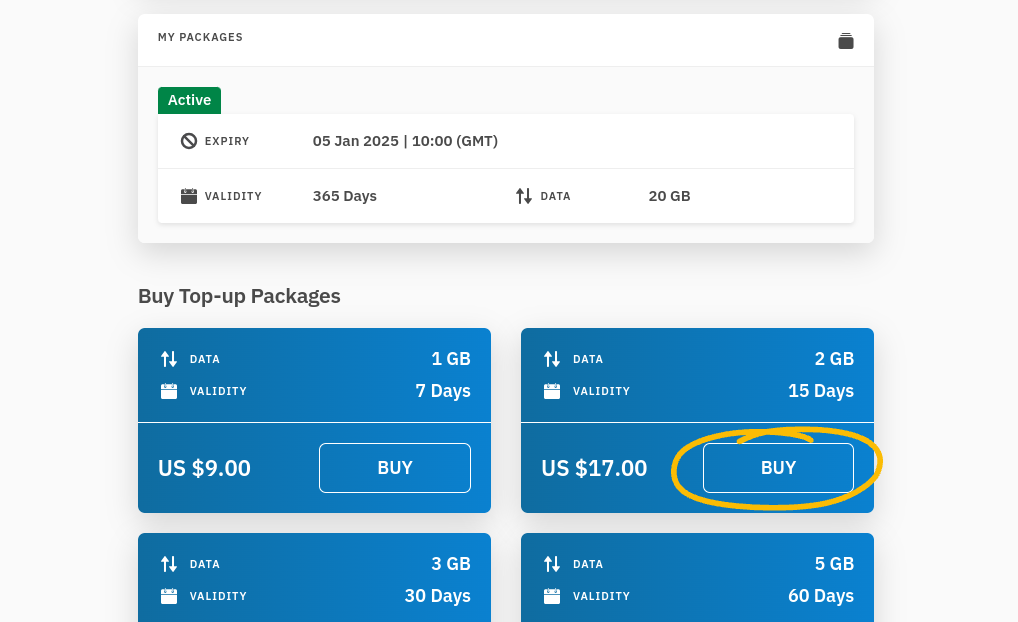
- Scroll down to the section titled “my packages” (under the “usage” section). An inactive eSim will have an orange rectangle reading “Not Activated.”
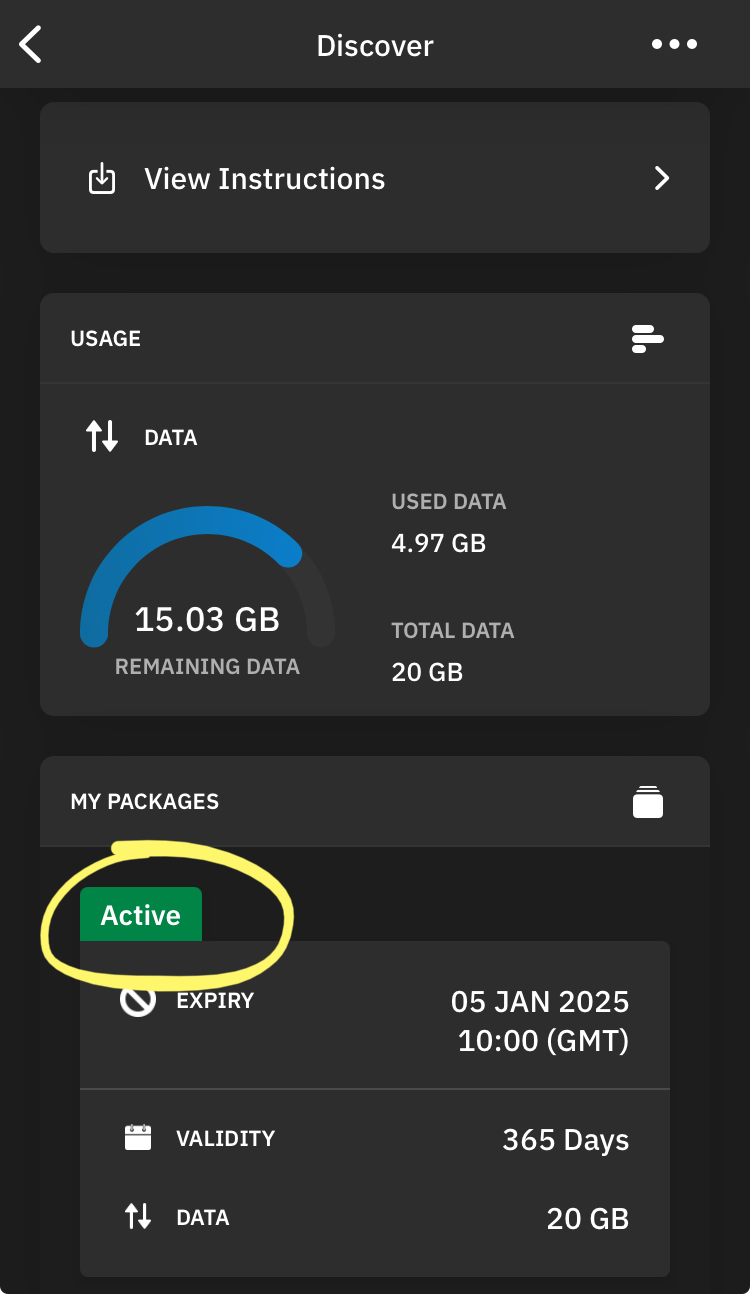
- An activated eSim will instead have a green rectangle reading “Active.” You will be able to see how much data is remaining just above this, under “Usage.”
🟣 How to top up your eSim #
-
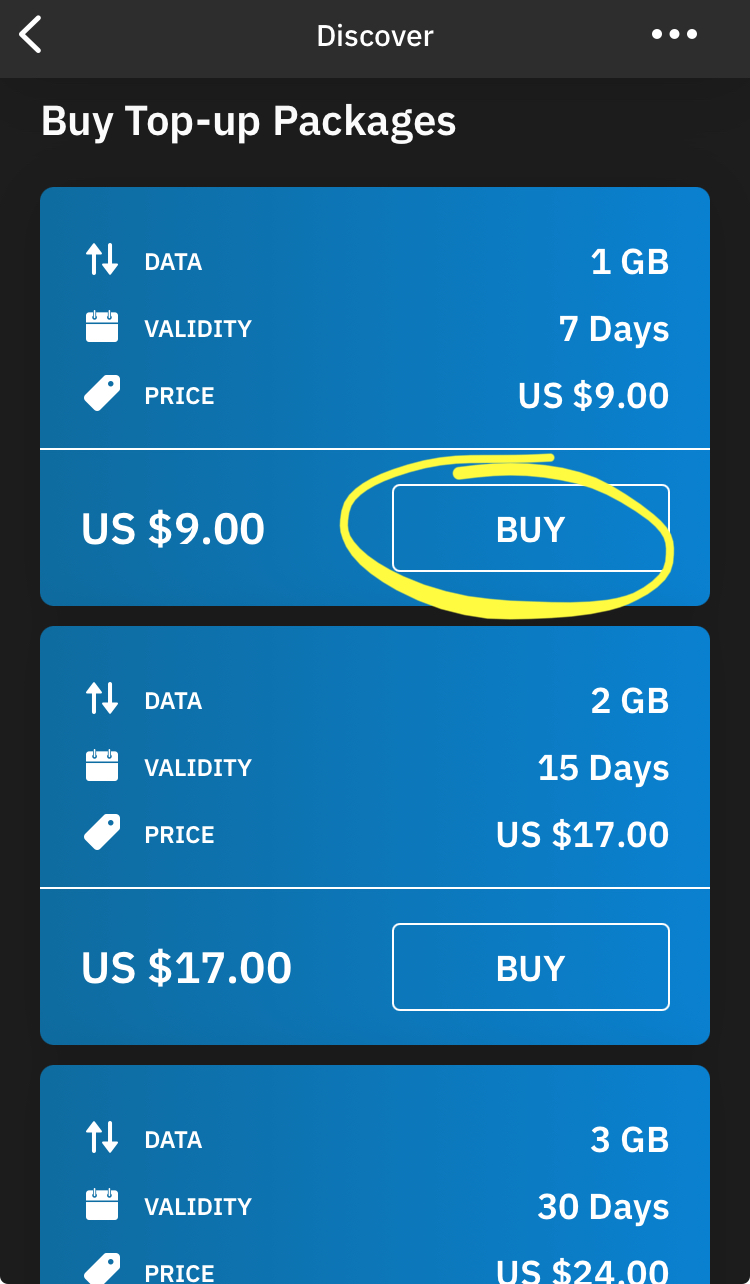
From the details page of an active eSim (see steps 1-4 of “How to tell if your eSim is active”), scroll down to the section titled “Buy Top-up Packages.”
-
Choose a top-up package (I recommend buying data in 3-5 GB chunks) and click the button that says “Buy” at the bottom right.
-
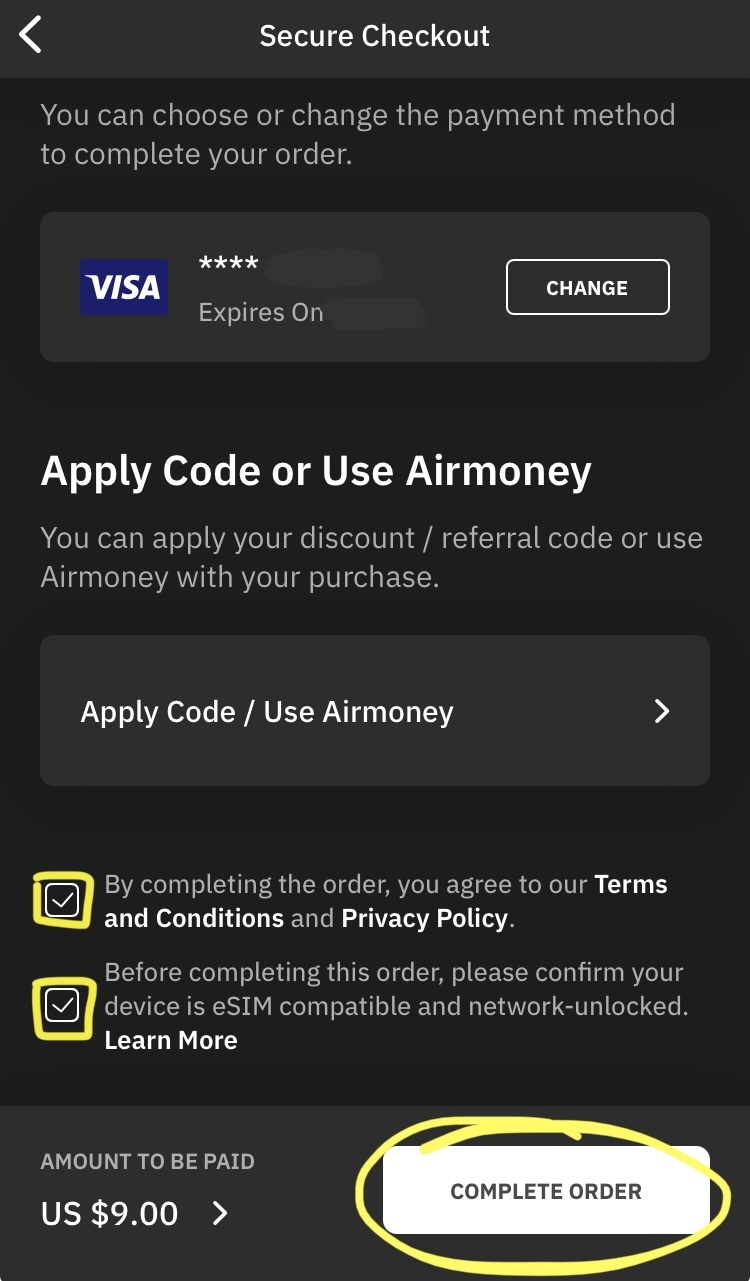
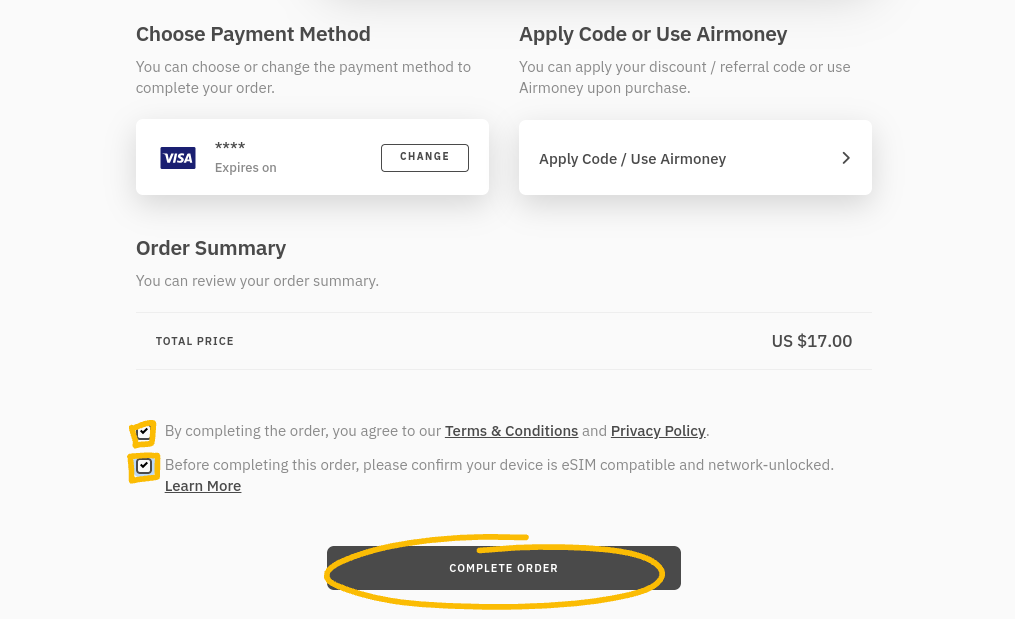
Choose a payment method, then check the two boxes at the bottom that say “By completing the order, you agree to our Terms and Conditions…” and “Before completing this order, please confirm your device is eSIM compatible…”. Click “complete order” in the bottom right.
-
You’re done! There is no need to get a QR code or send it to the team.
-
Your waiting top-up will be displayed on the details page for the relevant eSim, under the heading “My Packages.”
🟣 How to tell which plan is which #
This information is only important if you have multiple eSims on this app, some of them are active and others are inactive, and you are trying to figure out which email to reply to to let the team know that a plan is inactive. Only reply to an email if you purchased the plan more than two weeks ago.
If you have a phone that can read QR codes, follow the instructions on the first page (under “Which eSims are needed right now?”) to determine whether an eSim is valid instead. I have found that an eSim that reads as inactive in the app may be unable to be activated, presumably because there was an error in installation.
-
On the details page for an inactive eSim (see steps 1-4 of “How to tell if your eSim is active”), click “View Instructions” under where it says “eSIM installation.” At the top of the screen will be three tabs: “Direct,” “QR Code,” and “Manual.”
-
If you put the activation code in the email you sent to the team, click over to the “Manual” tab and copy the activation code (right under “SM-DP+ address”). Search for the code in your sent emails. When you find the email you sent to the team with this plan’s QR code, if the email is more than two weeks old, reply to the email with a message such as “inactive plan.”
-
Otherwise, click over to the “QR Code” tab. Search in your outbox for emails sent to gazaesims@gmail.comthat contain the word “Airalo” until you see a QR code that matches this one. If the email is more than two weeks old, reply to the email with a message such as “inactive plan.”
-
If you can’t compare the QR codes visually, upload screenshots of both codes to an online QR code reader and compare the text you get back.
🖥️ Desktop #
🟣 How to tell if your eSim is active #
- Navigate to https://www.airalo.com/ on your web browser. Log in using the same email and password you used when purchasing the eSim.
- Towards the top right of the page, click “My eSims.” Choose a plan and click “details” on the bottom right.
- Scroll down to where it says “my packages” (under “usage”). An inactive plan will show an orange rectangle in the “my packages” section reading “not activated.”
- An activated eSim will instead have a green rectangle reading “Active.”
🟣 How to top up your eSim #
- From the details page of an active plan (see steps 1-4 of “How to tell if your eSim is active” above), scroll down to the section titled “Buy Top-up Packages.”
- Choose a plan (I recommend 3-5 GB) and click “buy” in the bottom right.
- On the “Secure Checkout” page, enter your payment information. Scroll down and check the two boxes that read “By completing the order, you agree to our Terms and Conditions…” and “Before completing this order, please confirm your device is eSIM compatible…”. Click “Read and Accept” on the “Device Compatibility” pop-up.
- Click the grey button at the bottom of the screen that says “Complete Order.”
- You’re done! There is no need to get a QR code or send it to the team.
🟣 How to tell which plan is which #
This information is only important if you have multiple eSims on this app, some of them are active and others are inactive, and you are trying to figure out which email to reply to to let the team know that a plan is inactive. Only reply to an email if you purchased the plan more than two weeks ago.
If you have a phone that can read QR codes, follow the instructions on the first page (under “Which eSims are needed right now?”) to determine whether an eSim is valid instead. I have found that an eSim that reads as inactive in the app may be unable to be activated, presumably because there was an error in installation.
-
Go to the details page for an inactive eSim (see steps 1-4 of “How to tell if your eSim is active” above). Under “eSIM Installation,” click “Android Device” or “iOS Device” (it doesn’t matter which).
-
If you put the activation code in the email you sent to the team, choose the device that you chose when you first copied the activation code—the iOS code is different from the Android code.
-
Click “Ok, got it” at the bottom of the “Important Tips” page that pops up. In the onboarding tutorial, keep hitting “Next” until the page is no longer greyed out. There are two tabs at the top, “QR Code” and “Manual”.
-
If you put the activation code in the email you sent to the team, click over to the “Manual” tab and copy the activation code (in the section titled “Step 2/3 - Install eSIM,” right under “SM-DP+ address”). Search for the code in your sent emails. When you find the email you sent to the team with this plan’s QR code, if the email is more than two weeks old, reply to the email with a message such as “inactive plan.”
-
Otherwise, click over to the “QR Code” tab. Search in your outbox for emails sent to gazaesims@gmail.comthat contain the word “Airalo” until you see a QR code that matches this one. If the email is more than two weeks old, reply to the email with a message such as “inactive plan.”
-
If you can’t compare the QR codes visually, upload screenshots of both codes to an online QR code reader and compare the text you get back.
🔵 Mogo #
📱 App #
🔵 How to tell if your eSim is active #
-
Open the Mogo app on your phone. You will be on the “Home” screen. You can also get here by clicking the map pin icon to the left of the ribbon menu at the bottom of the screen.
-
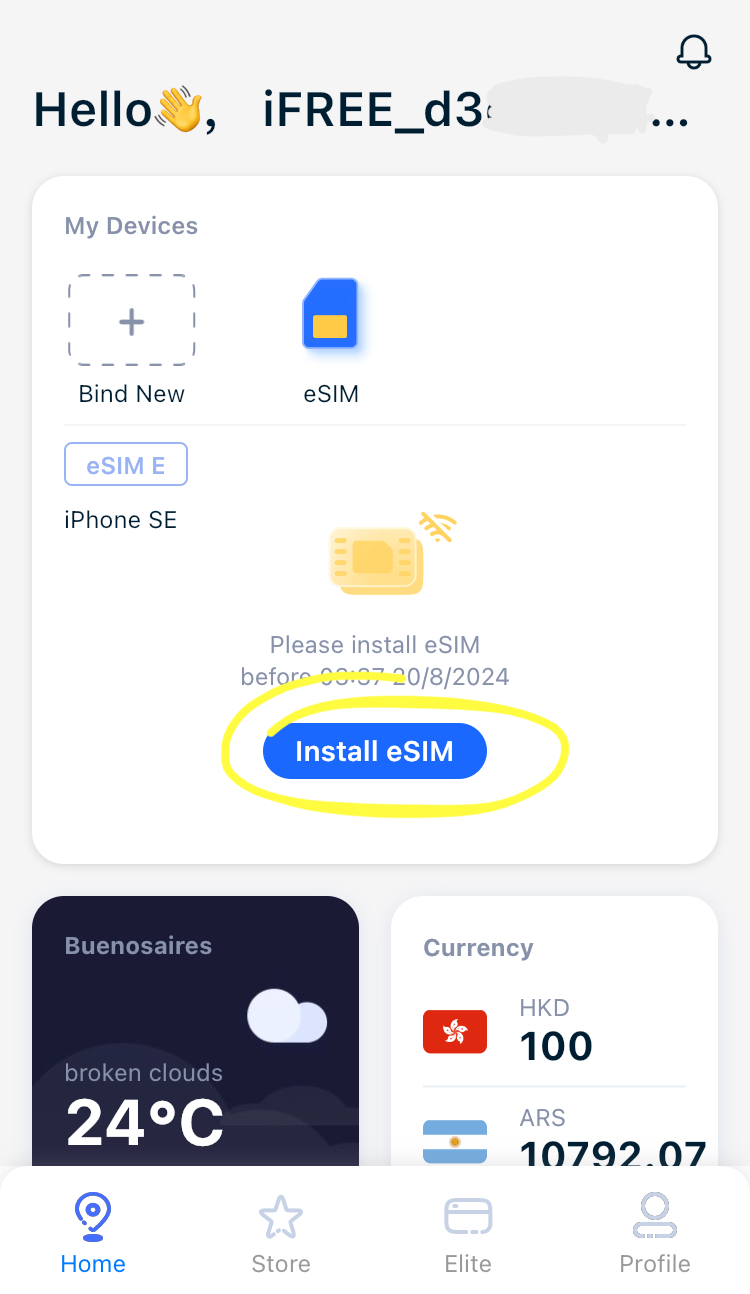
Inactive eSims will appear here with text reading “Please install eSIM,” along with the expiration date of the eSim.
-
If an eSim is within a few days of the expiration date listed, reply to the email that you originally sent the team with the QR code for that plan with a message such as “plan close to expiry.” See below, “How to tell which plan is which,” if you have sent multiple QR codes and don’t know how to differentiate them.
-
According to Mogo’s FAQ (under “Can the package be cancelled after purchase?”), eSims cannot be cancelled or refunded, even within the period of validity.
-
Active eSims should also appear here with their data usage and expiry dates (screenshot from promotion materials; I will update this page once I can independently confirm this).
-
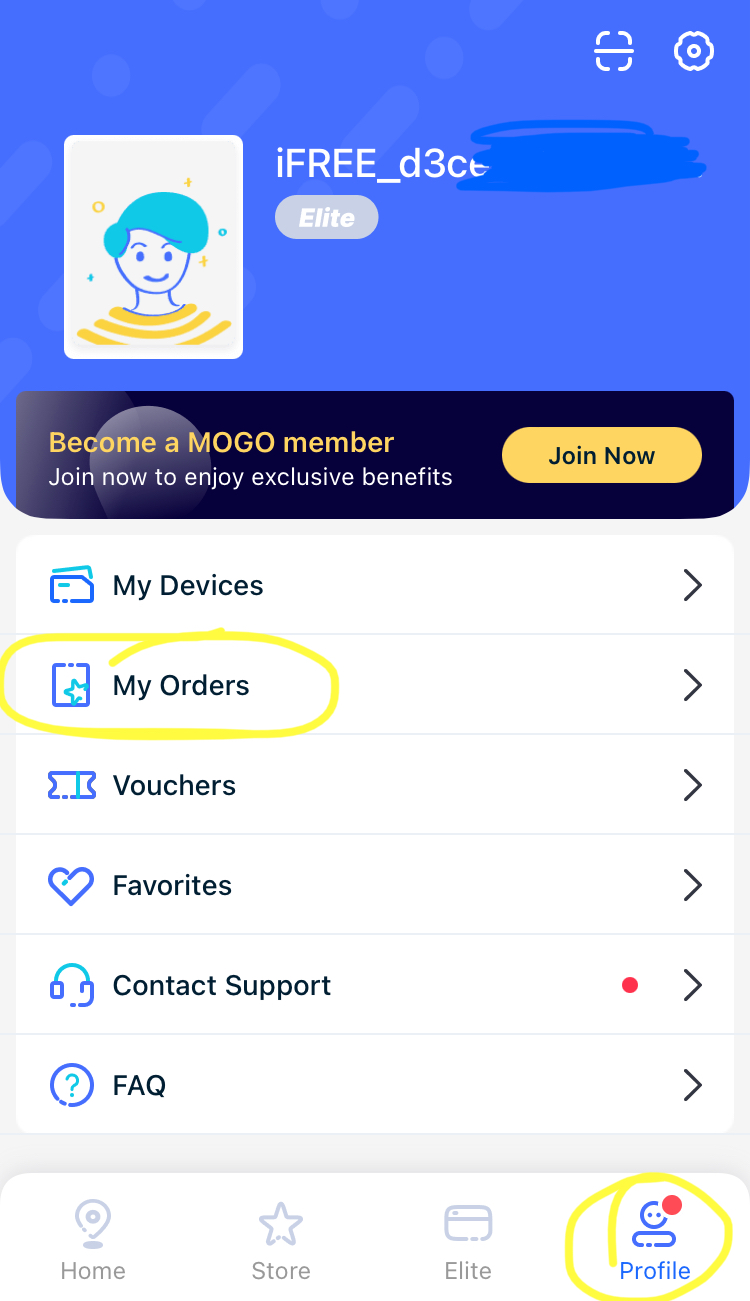
To see all of the eSims you have ordered, including expired ones: in the ribbon menu on the bottom of the screen, click the icon of a person at the far right that says “Profile.”
-
In the menu, click “My Orders” (right underneath “My Devices”). A list of your purchased eSims will appear.
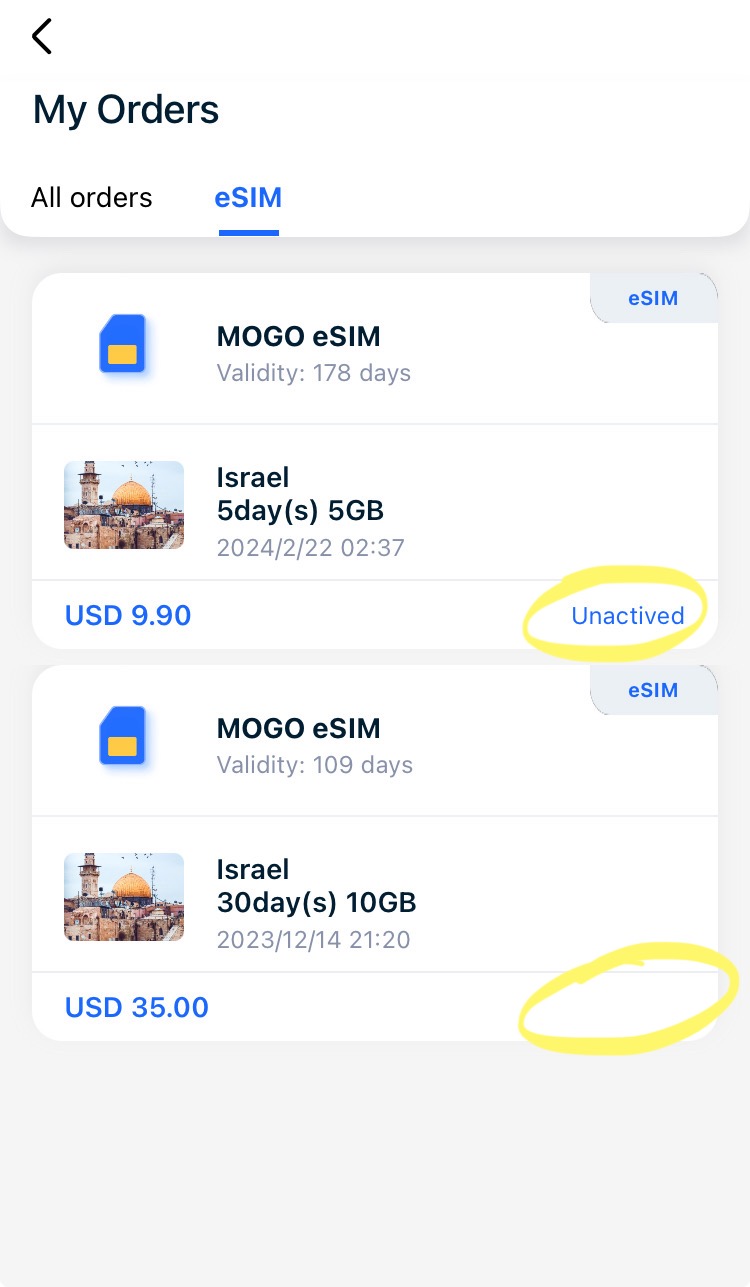
-
On this page, an inactive eSim will have blue text at the bottom right reading “Unactived” [sic]. A lack of text at the bottom right indicates an expired or deleted eSim.
🔵 How to top up your eSim #
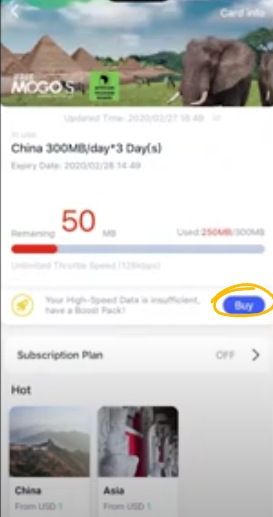
Mogo advertises that it is possible to top up eSims using their app. A message offering you a “Boost Pack,” with a blue button reading “Buy,” may appear at the bottom right of the plan information on the home screen (this is the process with the physical sim cards; screenshot taken from promotional materials). I will update this guide when one of my Mogo eSims has been activated and I can test the process.
🔵 How to tell which plan is which #
This information is only important if you have multiple eSims on this app, some of them are active and others are inactive, and you are trying to figure out which email to reply to to let the team know that a plan is inactive. Only reply to an email if you purchased the plan more than two weeks ago.
If you have a phone that can read QR codes, follow the instructions on the first page (under “Which eSims are needed right now?”) to determine whether an eSim is valid instead. I have found that an eSim that reads as inactive in the app may be unable to be activated, presumably because there was an error in installation.
-
Click on an inactive plan (see steps 1-2 of “How to tell if your eSim is active” above).
-
Get the order number next to where it says “Order No.” towards the bottom of the screen. (The order number cannot be copied from here; if you have a current iOS you can take a screenshot and copy it from the image.)
-
If you put the order number in the body of the email you sent, then search for the number in your sent emails. When you find the email you sent to the team with this plan’s QR code, if the email is more than two weeks old, reply to the email with a message such as “inactive plan.”
-
Otherwise, search for the order number in your inbox to find the confirmation email containing the QR code for this eSim. Search for emails you’ve sent to gazaesims@gmail.com including the word “Mogo” and visually compare the QR codes. When you find one that matches exactly, if the email is more than two weeks old, reply to that email with a message such as “inactive plan.”
-
If you can’t compare the QR codes visually, upload screenshots of both codes to an online QR code reader and compare the text you get back.
🖥️ Desktop #
🔵 How to tell if your eSim is active #
-
Navigate to https://esim.ifreemogos.com/. Log in with the same email and password that you used to buy the eSim.
-
Click “My eSIM” in the top ribbon menu, towards the right.
-
Uninstalled / inactive eSims will appear here, along with their expiration date.
-
If an eSim is within a few days of the expiration date listed, reply to the email that you originally sent the team with the QR code for that plan with a message such as “plan close to expiry.” See below, “How to tell which plan is which,” if you have sent multiple QR codes and don’t know how to differentiate them.
-
According to Mogo’s FAQ (under “Can the package be cancelled after purchase?”), eSims cannot be cancelled or refunded, even within the period of validity.
-
Expired or deleted eSims will not appear on this screen.
-
I will update this guide when I have a reference for what activated eSims look like on this screen.

🔵 How to top up your eSim #
A prompt offering you a “Boost Pack” may appear next to an activated eSim on the “My eSIM” page, next to the data usage information. I will update this guide when one of my Mogo eSims has been activated and I can test the process.
🔵 How to tell which plan is which #
This information is only important if you have multiple eSims on this app, some of them are active and others are inactive, and you are trying to figure out which email to reply to to let the team know that a plan is inactive. Only reply to an email if you purchased the plan more than two weeks ago.
If you have a phone that can read QR codes, follow the instructions on the first page (under “Which eSims are needed right now?”) to determine whether an eSim is valid instead. I have found that an eSim that reads as inactive in the app may be unable to be activated, presumably because there was an error in installation.
-
Click on an inactive plan (see steps 1-3 of “How to tell if your eSim is active” above).
-
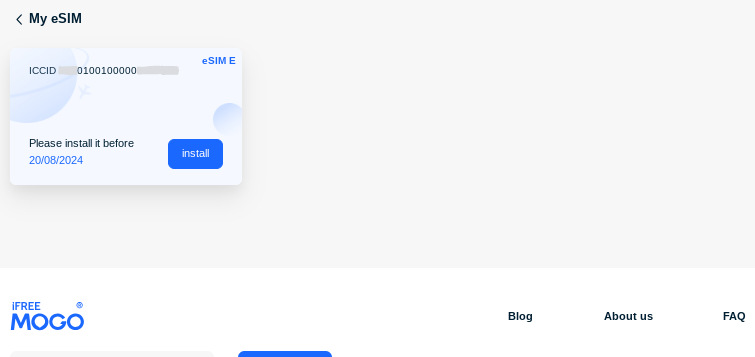
The ICCID will be at the top left of the plan details. If you put the ICCID in the body of the email you sent, then search for this number in your sent emails. When you find the email you sent to the team with this plan’s QR code, if the email is more than two weeks old, reply to the email with a message such as “inactive plan.”
-
Otherwise, look at the QR code to the right of the ICCID and expiration date. Search for emails you’ve sent to gazaesims@gmail.com including the word “Mogo” and visually compare the QR codes. When you find one that matches exactly, if the email is more than two weeks old, reply to that email with a message such as “inactive plan.”
-
If you can’t compare the QR codes visually, upload screenshots of both codes to an online QR code reader and compare the text you get back.
🟣 Numero #
📱 App #
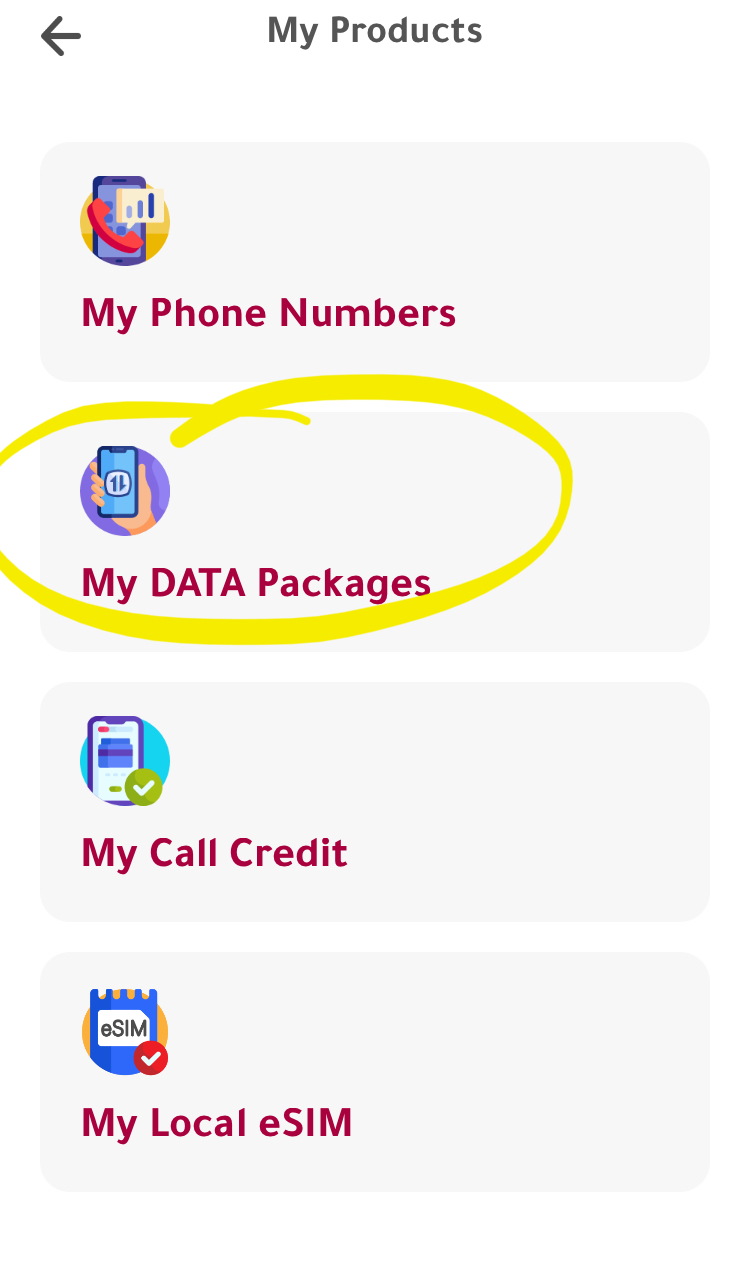
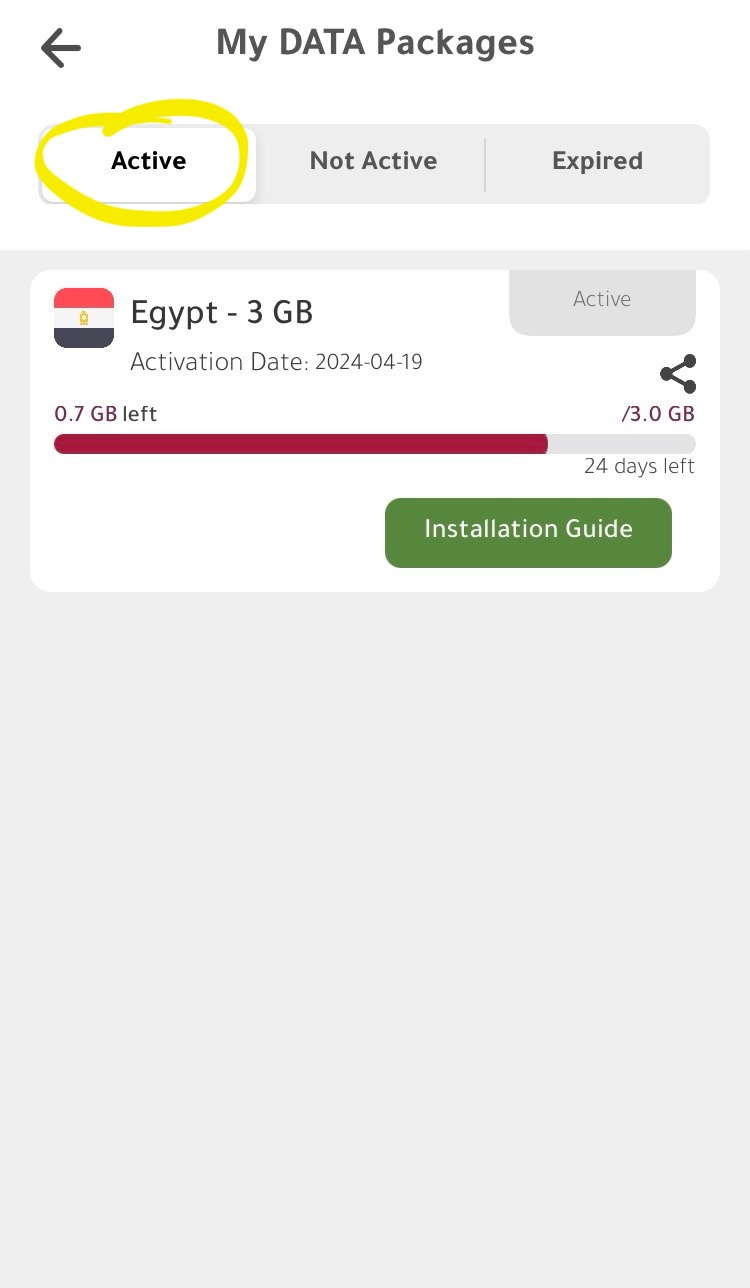
🟣 How to tell if your eSim is active #
-
Open the app and swipe right on the main menu to reveal more options. Click the icon of a shopping cart that says “My Products.”
-
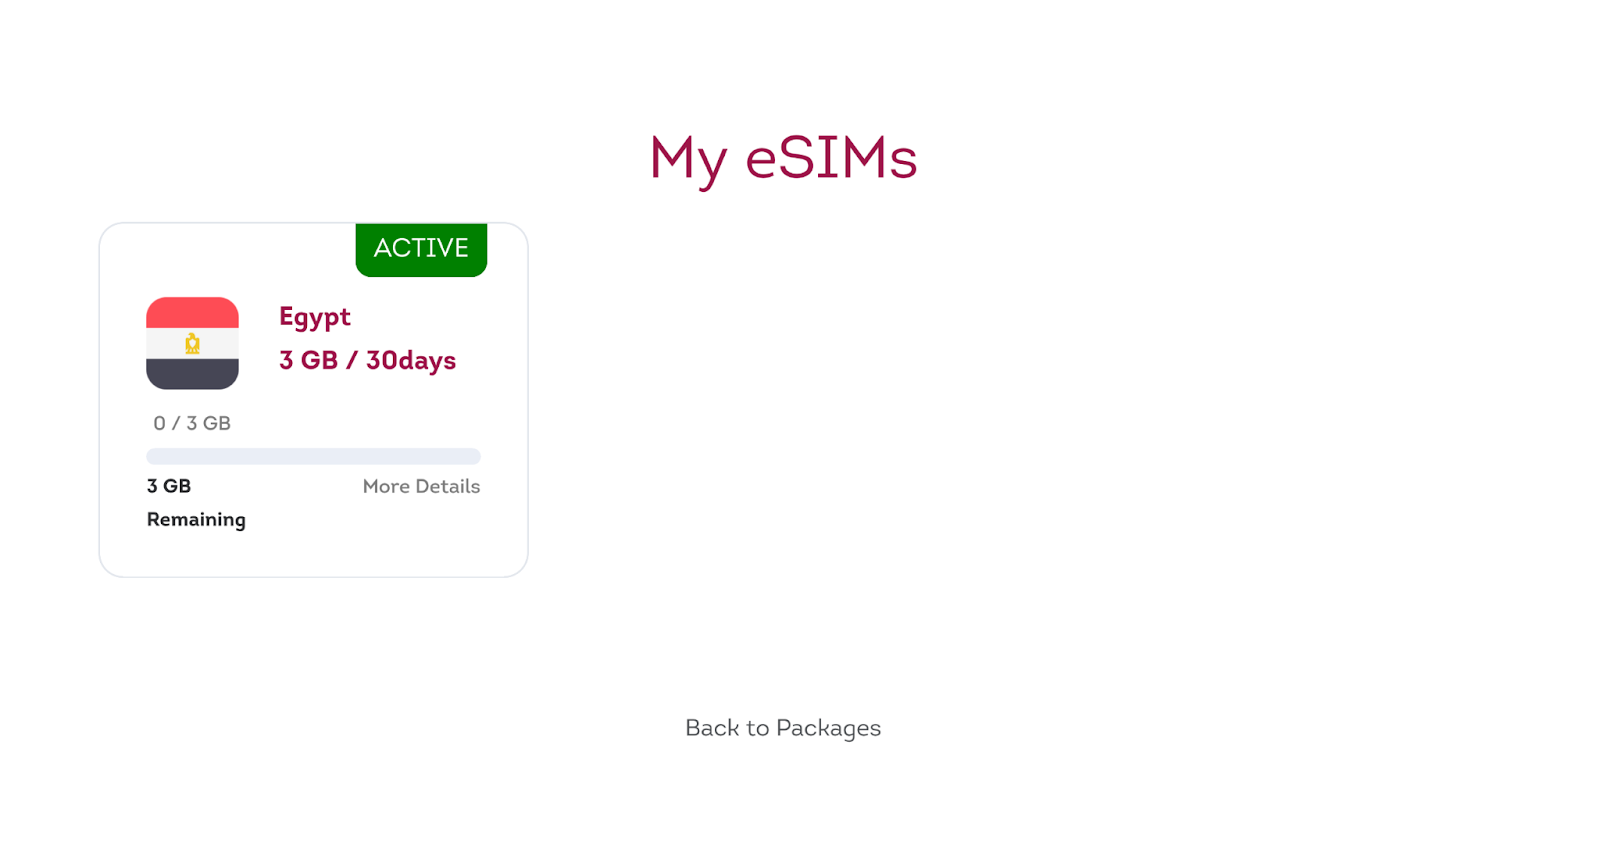
Select “My DATA Packages.” Active eSims will appear here, on the tab at the top that says “Active.” Inactive eSims will appear in the tab “Not Active.”
-
To see the data usage of an active eSim, click the red button that says “Details.”
🖥️ Desktop #
🟣 How to tell if your eSim is active #
-
Navigate to https://esimdata.numeroesim.com/data-packages/my-esims/ and log in.
-
You will be on the “My eSIMs” page. An activated plan will have a green rectangle in the top right reading “Active”.
-
This screen will also show you the data usage of the eSim.
🟣 How to top up your eSim #
- From the “My eSIMs” page (see “How to tell if your eSim is active” step 1), click on the text “More Details” at the bottom right of the eSim you want to top up.
- Scroll down to the section headed “Buy Top - Up Packages.” Select a plan, then scroll down and press the green button that says “Buy Now.” Enter your payment information and check out.

🔵 Sparks #
📱 App #
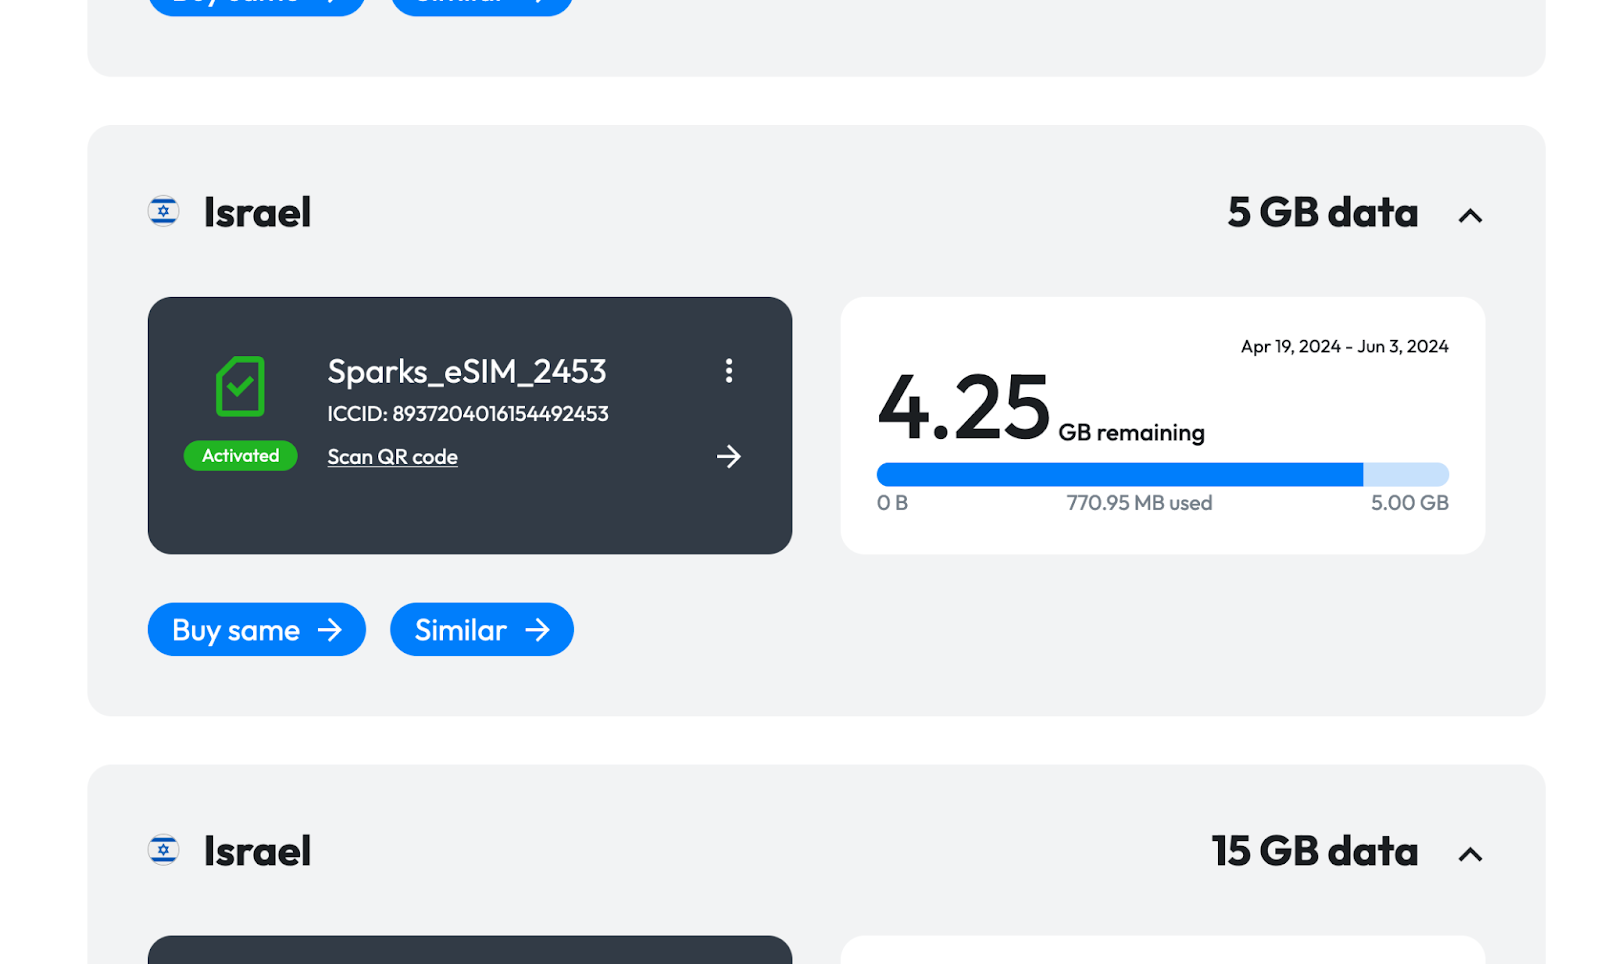
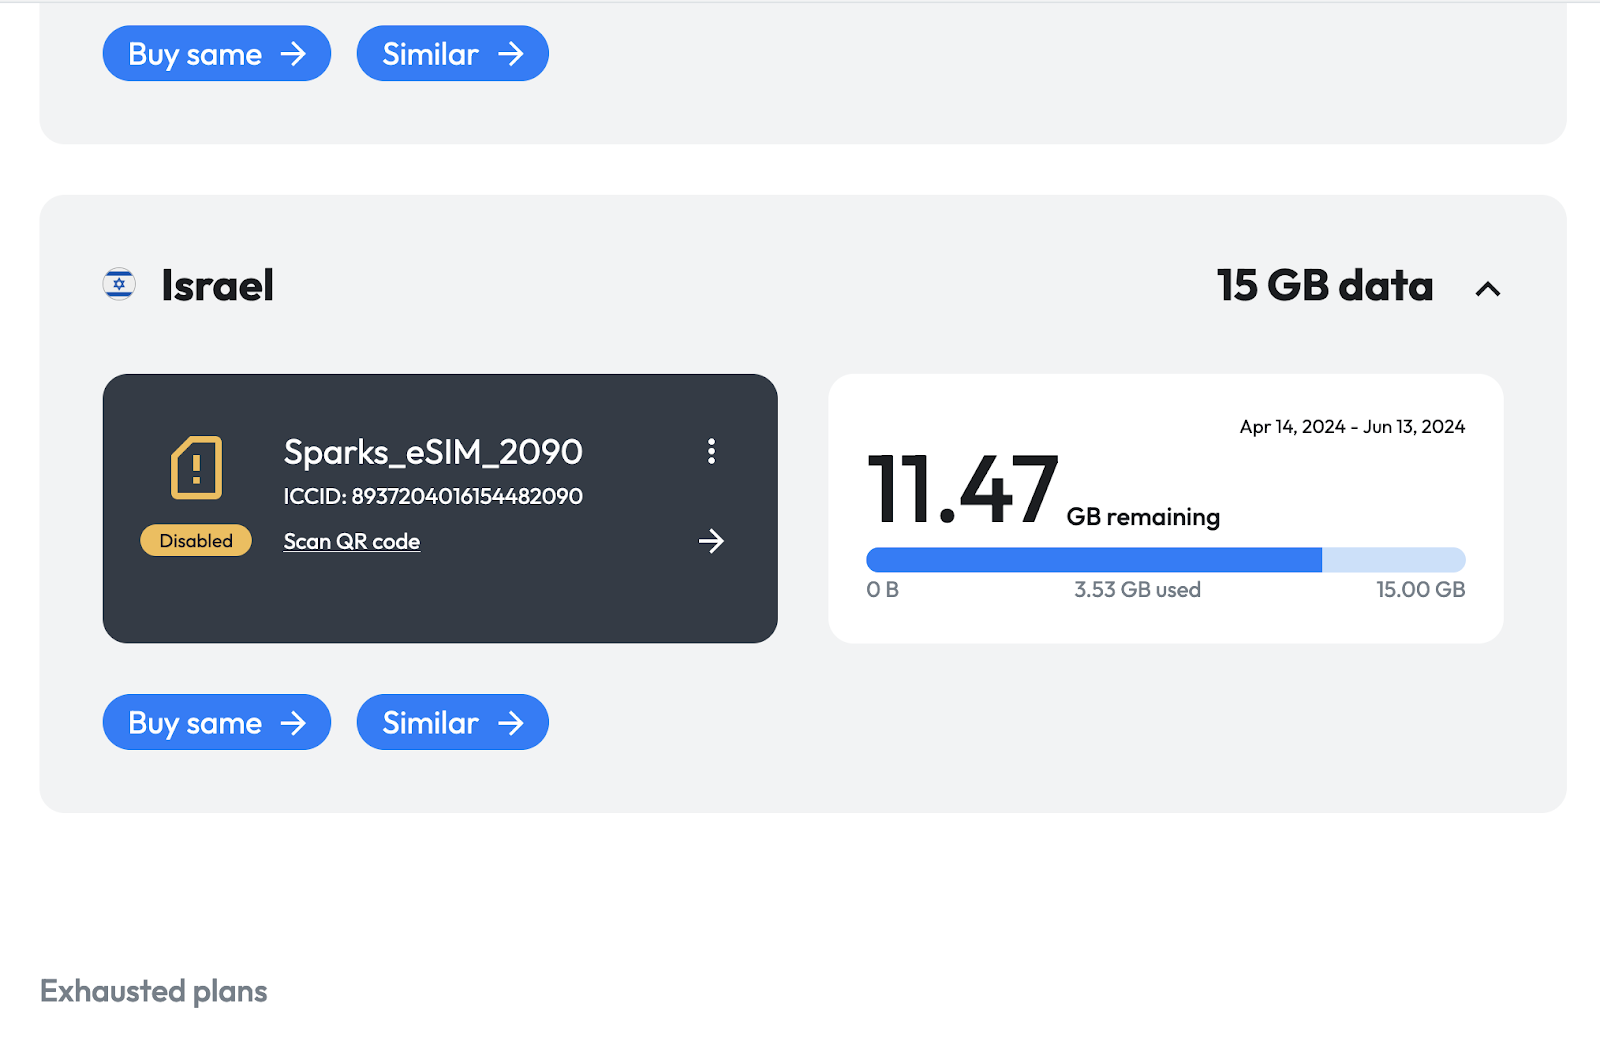
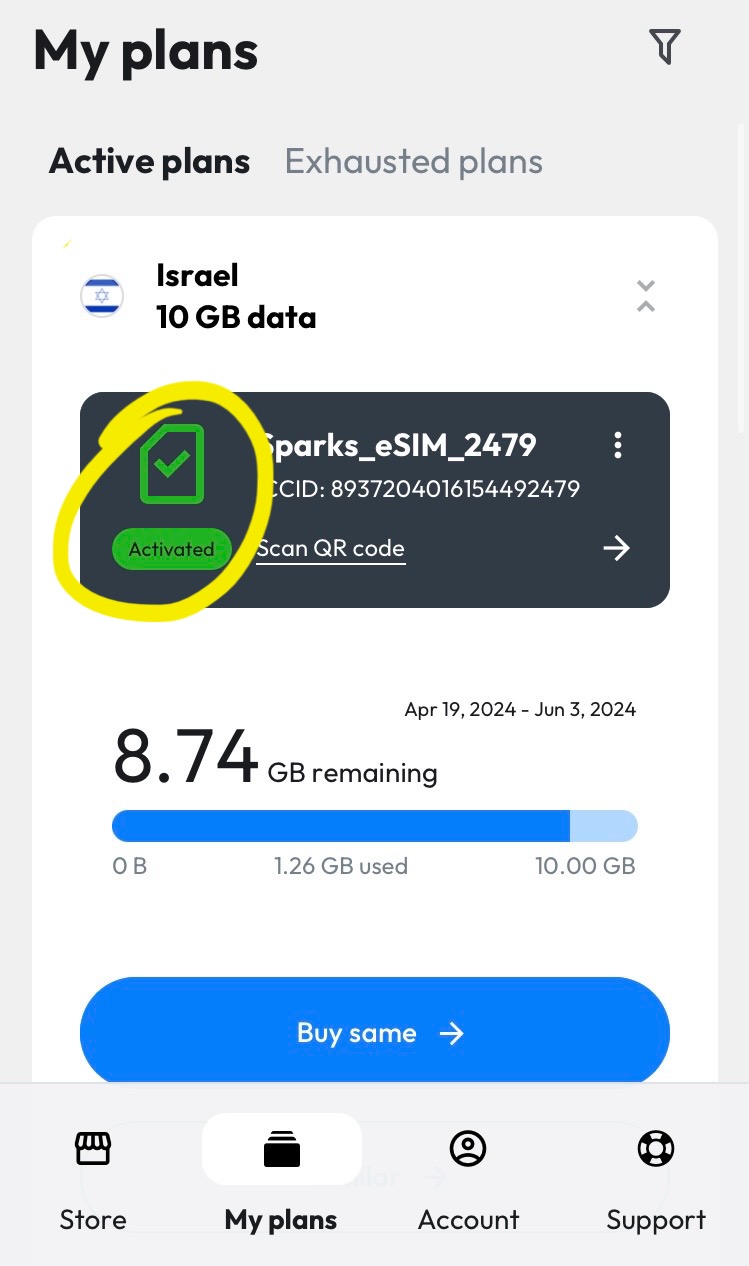
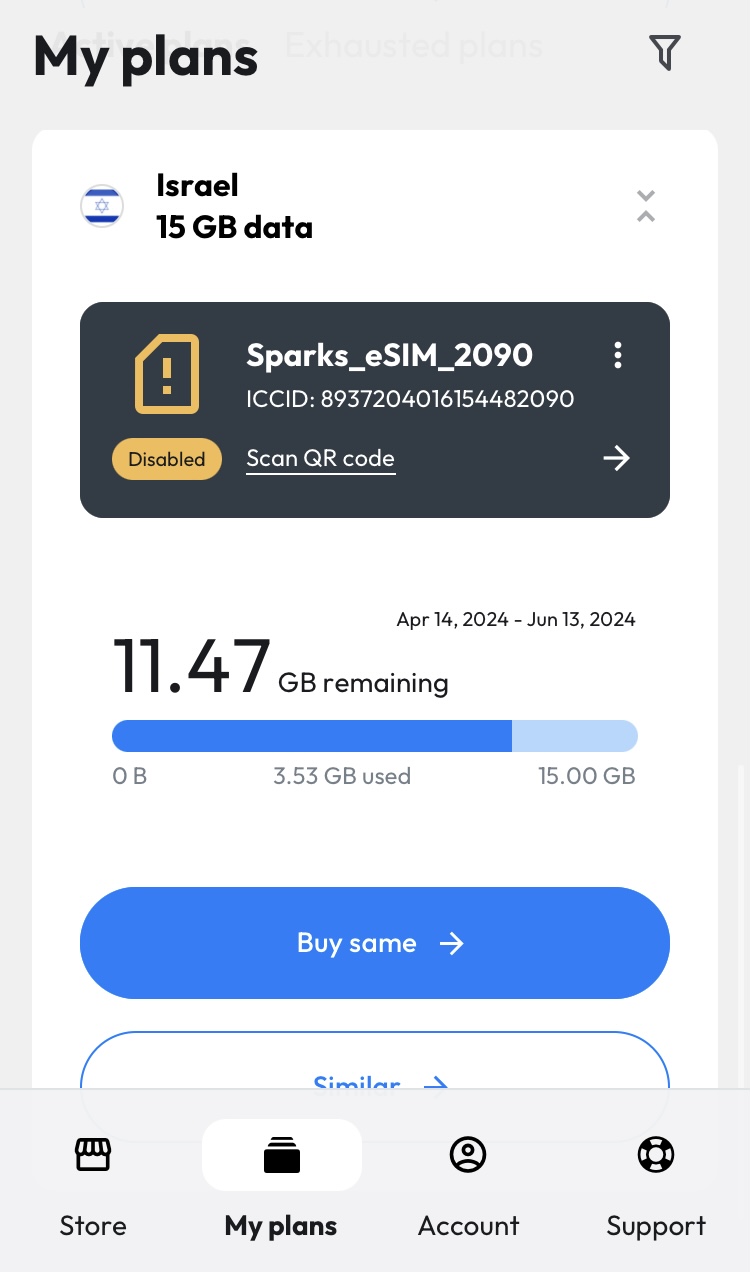
🔵 How to tell if your eSim is active #
-
Open the app. In the bottom ribbon, click “My Plans.” The “Active plans” tab will contain all plans (activated and not-yet activated) that have not expired.
-
Click on a plan to expand it. An activated eSim will have a green page icon with a check mark in it to the left, and a green bubble underneath the icon will read “Activated.”
-
This screen will also show the data usage of the eSim.
-
An inactive eSim will have a white page icon with a download arrow in it to the left, and a white bubble underneath the icon will read "Available.’
-
Sometimes, an orange page icon with an exclamation point and an orange bubble underneath reading “Disabled” will appear. I’m not sure what this means. The data usage seems to be ticking up despite this message.
🖥️ Desktop #
🔵 How to tell if your eSim is active #
- Navigate to https://sparks.travel/user/plans and log in.
- Under the heading “Active Plans” will be listed all plans (activated and not-yet activated) that have not expired.
- Click on a plan to expand it. An activated eSim will have a green page icon with a check mark in it to the left, and a green bubble underneath the icon will read “Activated.” This screen will also show the data usage of the eSim.
- An inactive eSim will have a white page icon with a download arrow in it to the left, and a white bubble underneath the icon will read "Available.’
- Sometimes, an orange page icon with an exclamation point and an orange bubble underneath reading “Disabled” will appear. I’m not sure what this means. The data usage seems to be ticking up despite this message.